This guide describes how to configure SAML Single Sign-On (SSO) between Mividas and Microsoft Entra ID.
Prerequisite
- You should know about setting up Single Sign-On in Entra ID.
- Signing certificate created with the attributes listed below.
- Microsoft Entra user account with the appropriate administrative roles (for example, Cloud Application Administrator).
- Time synchronization (NTP) is configured in the Mividas Installer and in sync.
- Security or Distribution groups set up in Entra ID for the following roles:
- Standard Users (Not needed if everyone should have standard user access).
- Administrator.
- Superuser.
- At least one user who is a member of the Superuser group.
Certificate requirement.
| Setting | Value |
|---|---|
| Algorithm | RSA |
| Key length | 2048 or higher |
| Hash | SHA-256 |
| Key Usage | Digital Signature |
| Extended Key Usage (EKU) | Optional / Not required |
| CA trust | Not required for SAML metadata trust |
Quickguide – Configuration steps.
- Create and Assign Users to Groups – If not already done
- Create three Security groups corresponding to the Mividas roles:
- User
- Admin
- Superuser
- Assign the groups to the Enterprise Application.
- Copy the Object ID for each group for use in the Mividas configuration.
- Assign users to the groups.
- You can now continue with the Mividas SAML/SSO configuration.
⚠️ Important:
At least one user must be assigned to the Superuser group.
In this guide, we use Group Object ID as the claim value. Please copy for each group for use later in Mividas setup.
- Create three Security groups corresponding to the Mividas roles:
- Create a new Enterprise Application:
- Log in to the Microsoft Entra admin center.
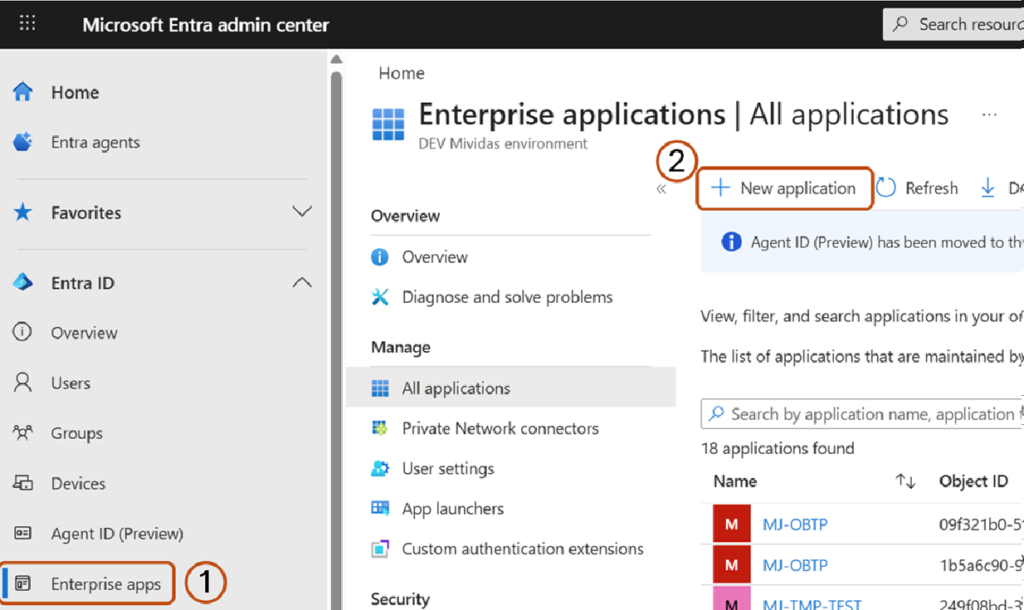
- Navigate to Enterprise apps.
- Click New application.
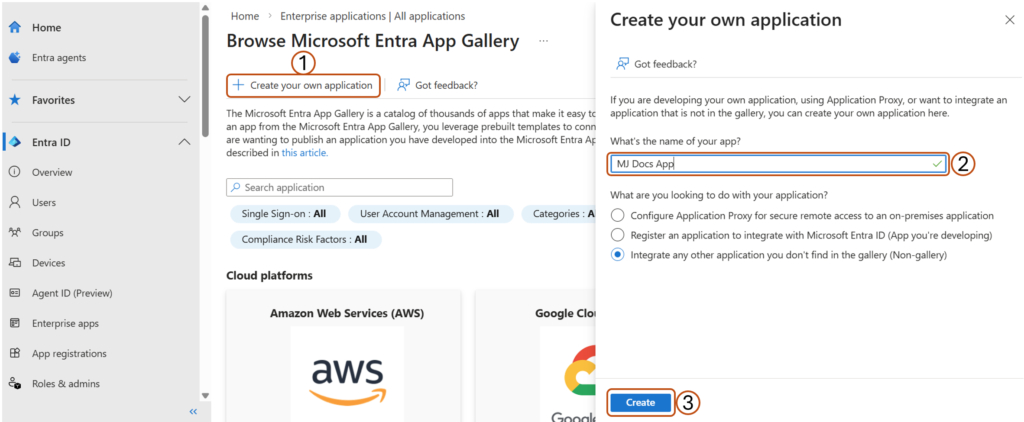
- Choose Create your own application.
- Enter a name for your application and click Create.
- Configure Single Sign-On (SSO):
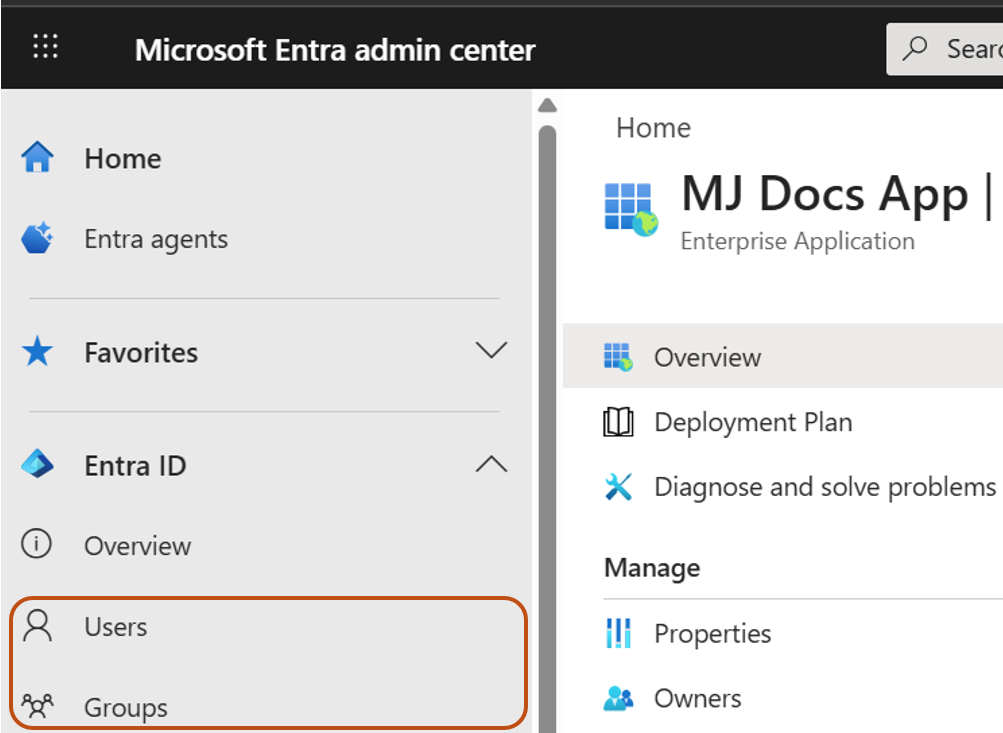
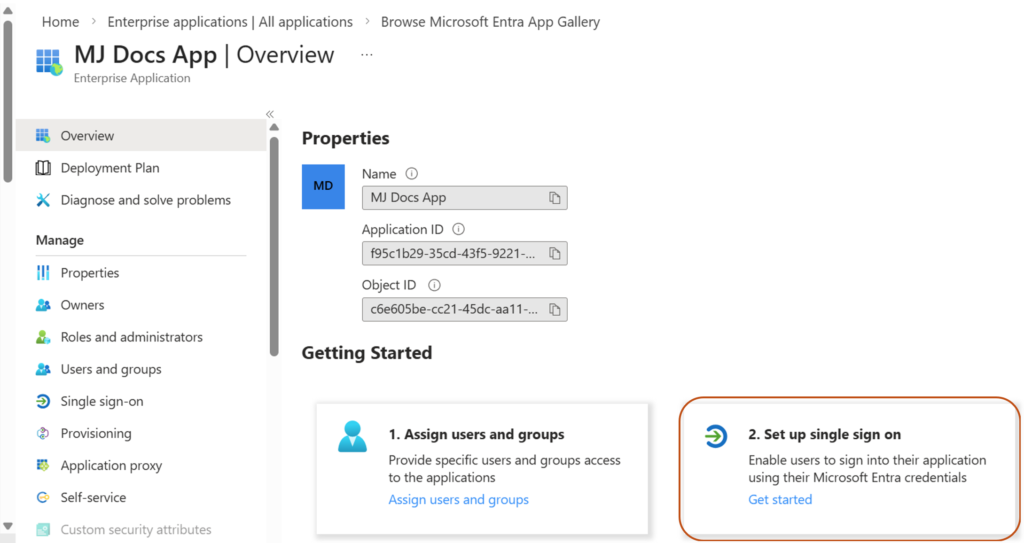
- Open the newly created Enterprise Application.
- In the Set up single sign-on card, click Get started.
- Select SAML.
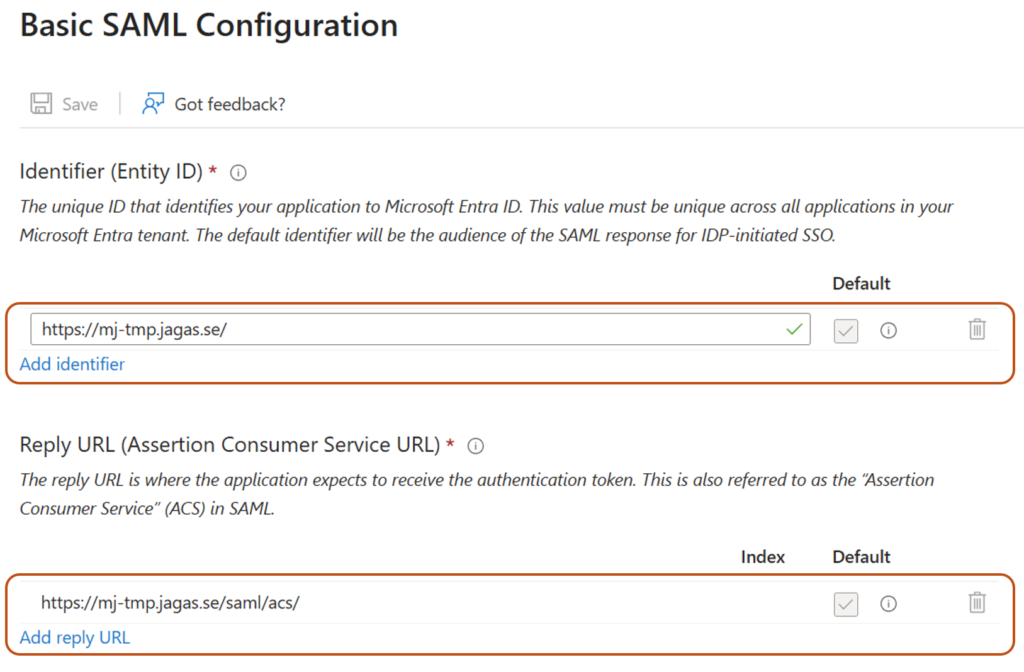
- Fill in the required fields in the Basic SAML Configuration card (You need to fill in at least these 2, to get to the next step):
- Identifier (Entity ID): A unique identifier that represents your application (Service Provider) in the SAML federation. Microsoft Entra ID uses this value to recognize which application the authentication request belongs to. It must exactly match the Entity ID configured in your application.
Example:https://fqdn.example.com/ - Reply URL (Assertion Consumer Service URL): The endpoint in your application where Microsoft Entra ID sends the SAML authentication response after a user successfully signs in.
Example for Mividas:https://fqdn.example.com/saml/acs/ - Click Save.
- Identifier (Entity ID): A unique identifier that represents your application (Service Provider) in the SAML federation. Microsoft Entra ID uses this value to recognize which application the authentication request belongs to. It must exactly match the Entity ID configured in your application.
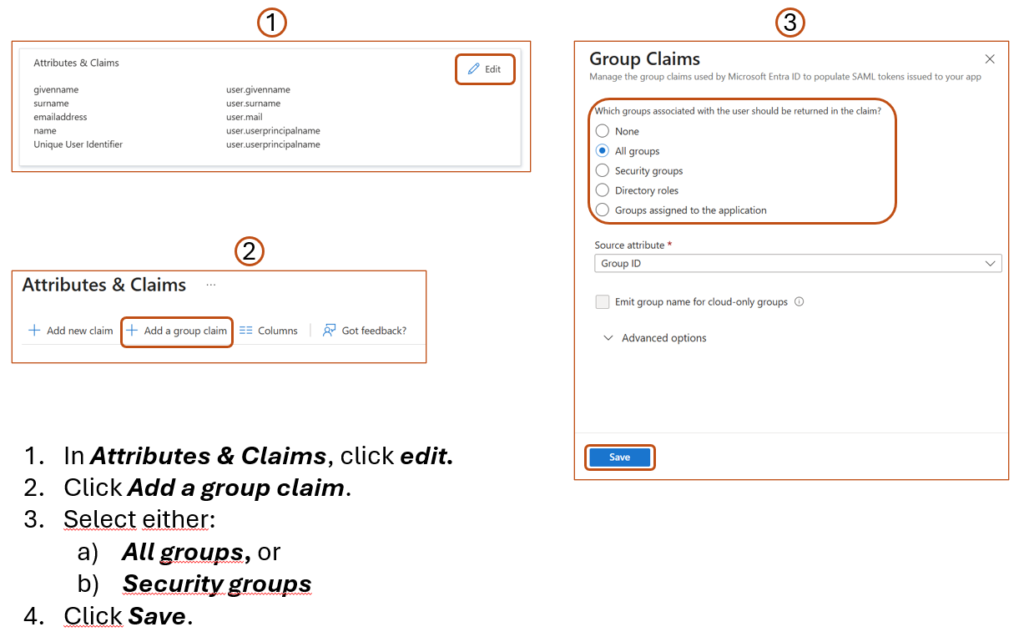
- Configure Group Claims:
- In Attributes & Claims, click edit:
- Click Add a group claim.
- Select either:
- All groups, or
- Security groups
- Leave the other settings as default unless customization is required.
- Click Save.
- Copy the Claim name for later use in the Mividas configuration.
- In Attributes & Claims, click edit:
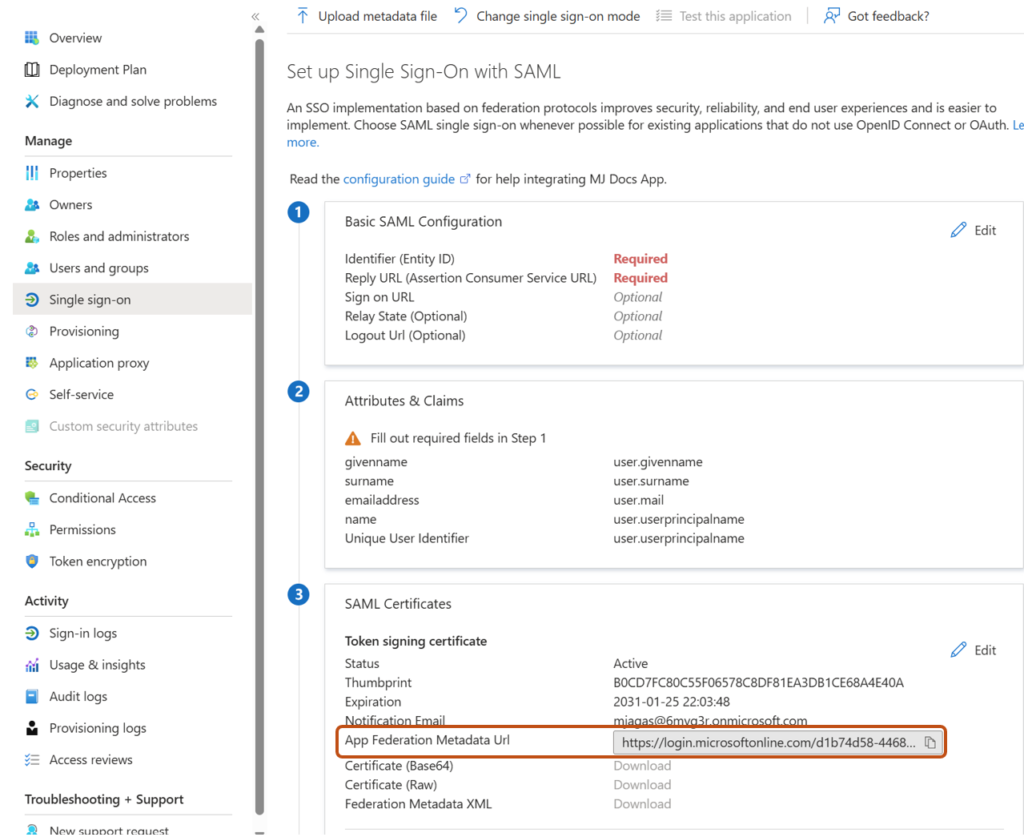
- Retrieve Entra Metadata:
- Go back to the SAML configuration page, and copy the App Federation Metadata URL and save it for the Mividas setup.
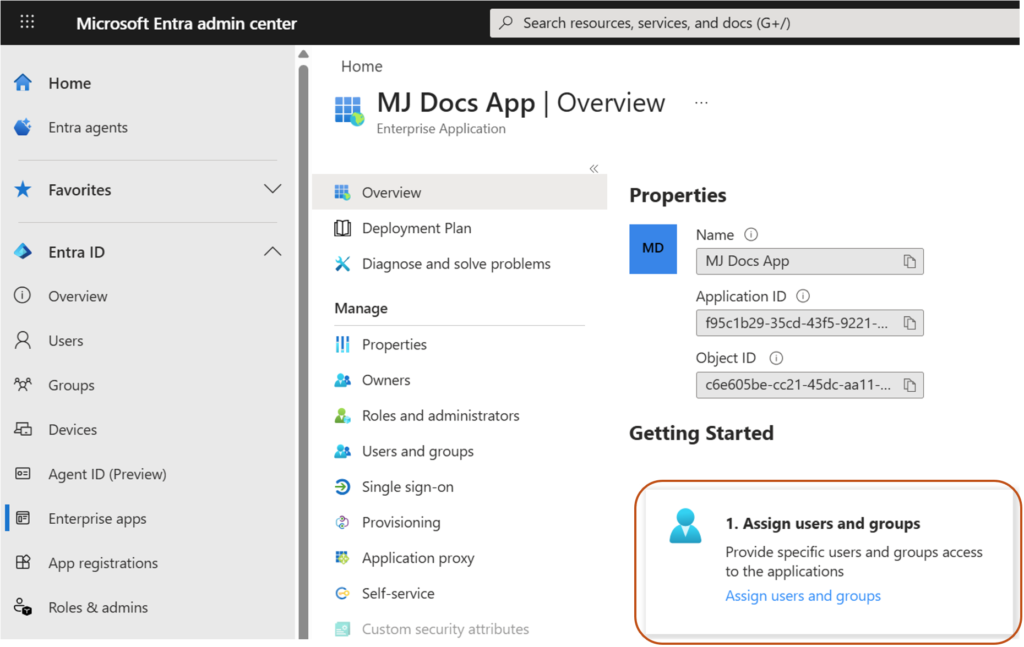
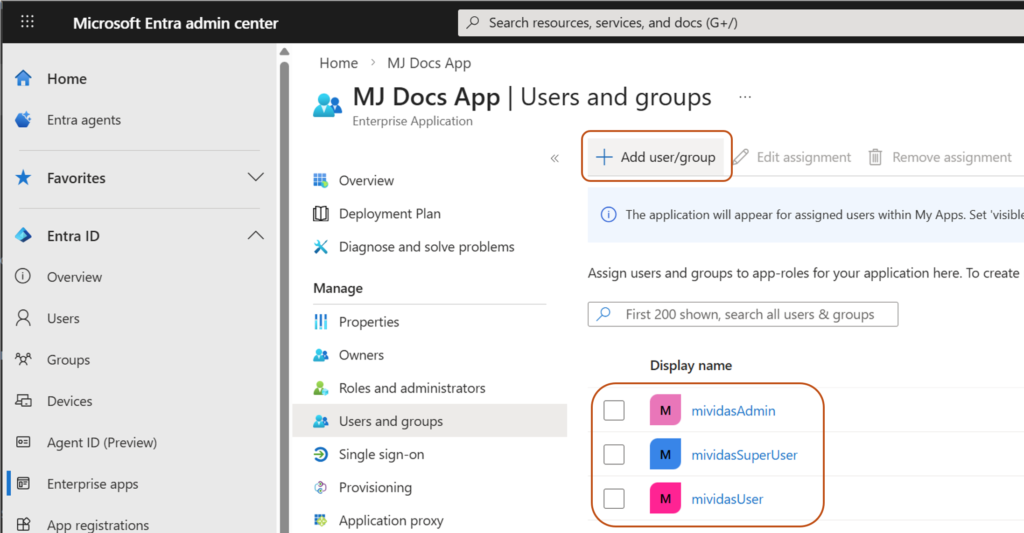
- Assign the Security groups to the Enterprise Application.
- Go to Assign users and groups in the Enterprise App.
- Assign the Security groups created above in step 1.
- Configure the Mividas Application SAML/SSO (Service Provider):
- Go to the Mividas Installer
Example:https://portal.examples.com:8999 - Log in and select the product to configure.
- Click Details → Configure.
- Open SAML SSO Settings.
- Configure the following:
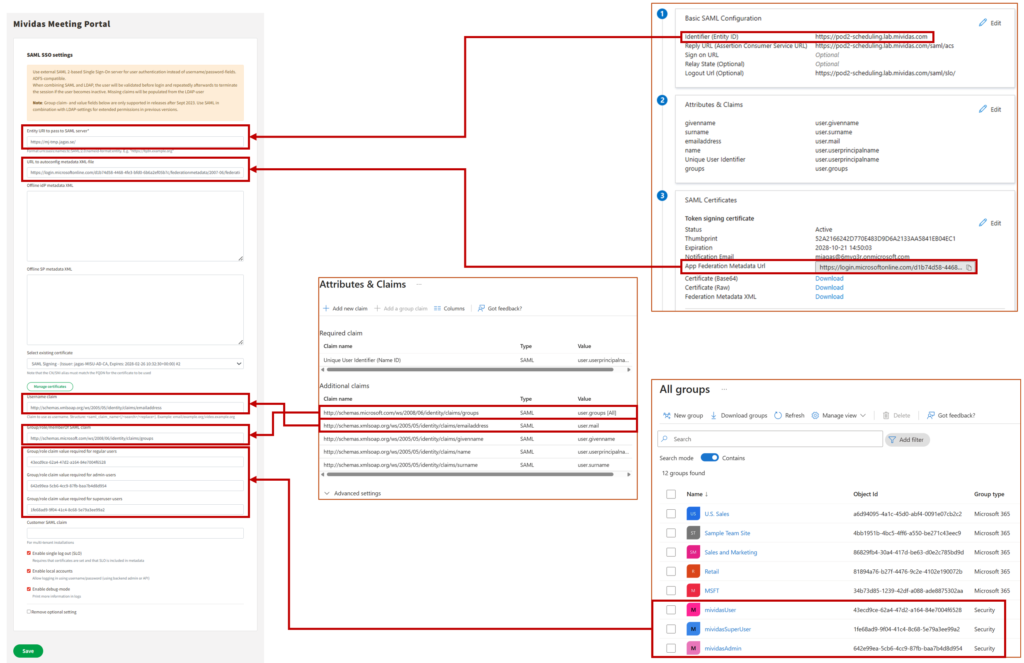
- Entity URI to pass to SAML server. It must match the Identifier (Entity ID) configured in Entra ID.
Normally you can use the product URL.
Example:https://portal.examples.com
- Entity URI to pass to SAML server. It must match the Identifier (Entity ID) configured in Entra ID.
- Paste the App Federation Metadata Url copied from Entra ID into the “URL to autoconfig metadata XML file” field.
- Select the certificate used for SAML signing.
- Enter the claim name in the Username claim field, as configured in Entra ID. This field must be formatted so that it matches the Users/JIDs in your meeting platform.
Example (if email is used):http://schemas.xmlsoap.org/ws/2005/05/identity/claims/emailaddress - Enter the claim name in the Group/role/memberOf SAML claim field, as configured in Entra ID.
Example:http://schemas.microsoft.com/ws/2008/06/identity/claims/groups - Enter the claim value (ex. Group Object ID) for each group, in the Group/role claim value fields.
- Group/role claim value required for regular users
- Group/role claim value required for admin-users
- Group/role claim value required for superuser-users
- Enable SAML SSLO if needed, by checking the Enable single log out (SLO) box.
- Note: If you want more information in the logs for troubleshooting, check the Enable local accounts box.
- Click Save.
- Click Deploy changes and wait for all services to start.
- When the services are running, download the Service Provider metadata.
Example:https://portal.examples.com/saml/metadata - Save this file.
- At this stage, you go back to your Entra ID setup.
- Go to the Mividas Installer
- Complete the Entra ID Configuration:
- Return to your Enterprise Application in Entra ID.
- Go to Single Sign-On (SAML).
- Upload the metadata file downloaded from Mividas.
Screenshots
Create and Assign Users to Groups
Create a new Enterprise Application
Log in to Microsoft Entra admin center.
Navigate to Enterprise apps and select New application.
Choose Create your own application, enter a name for your application and click Create.
Configure Single Sign-On (SSO):
Go to Set up Single sign on card on the page and click Get started.
Click on the SAML card on the page.

Fill in the Required Basic SAML Configuration and Save.
Copy the App Federation Metadata Url.
Configure Group Claims
Assign the Security groups to the Enterprise Application.
Continue configuration in Mividas – Configure the Mividas Application SAML/SSO (SP)
Go to the Mividas Installer (Ex. For Portal): https://portal.examples.com:8999 and login.
Troubleshooting
Logs
To retrieve detailed logs for troubleshooting, you need to turn on the Enable debug-mode in the SAML setup in Mividas.
- Go to the Mividas Installer
Example:https://portal.examples.com:8999 - Log in and select the product to configure.
- Click Details → Configure.
- Open SAML SSO Settings.
- Check Enable debug-mode.
- Save.
- Deploy Changes.
You can reach the logs Globally in the installer by selecting the menu logs at the top of the page or directly point to:https://fqdn.example.com:8999/logs/
When you are at the Log page, select the log that ends with _web for the product you are troubleshooting.
Problems with claims
Search for “Got identity data” in the log and you will see all claims coming from the IdP.
For example you can see all group claims comming in:'http://schemas.microsoft.com/ws/2008/06/identity/claims/groups': AttributeValue(values=['1fe68ad9-9f04-41c4-8c68-5e79a3ee99a2', 'cce0b4de-9f62-404b-aace-e934a889cfa0', '9555d513-bd06-48f9-b62d-d2a474295225', '63ac74df-d855-410d-b1f7-ecea6441a1de', 'aed49a21-0ef7-47de-bdfa-f7a5384ce035', 'be763f38-7989-4d6d-9067-3fa4ab38f345', 'f8eb83ae-5e45-443b-b174-7a112ade180e', '5815ac3c-1af5-4a7c-b446-46ea41d4d9b8', '34b73d85-1239-42df-a088-ade8875302aa', '24d09d3d-a752-4d6b-9b98-8ac78b78fb74']
You can also see if users are matched correctly based on group matching.
Example:event="User [email protected] matches superuser claim value"