
This page provides details on managing video infrastructure for platforms like Pexip, CMS, and Expressway/VCS. It covers tasks such as adding and configuring video meeting clusters, editing server settings, managing call routing rules, and synchronizing tenants.
| Page actions | |
|---|---|
| Click to add either Pexip, CMS , Webex, Expressway/VCS or CUCM. | |
| 1. Page refresh (
) allows you to manually refresh the monitoring view 2. Access relevant documentation ( ) |
Overview

| Option | Description |
|---|---|
| Search for a platform. | |
| Reload the data to apply any changed filters. | |
| 1. All types – Filter by all types. 2. Pexip – Filter by Pexip only. 3. Cisco Meeting Server – Filter by CMS only. Click to save, or to cancel. | |
| Shows the name of the cluster and what type of cluster it is. | |
| Shows the total amount of servers within the cluster. | |
Opens up Mividas Core > admin > backend admin > provider > Cluster > [chosen cluster] to be able to edit it. | |
| Opens up a sub-menu that differs depending on the cluster type: Pexip 1. Customer matching – Takes you to Mividas Core > admin > backend admin > Customer > Number matching rules, where you can add and edit the number matching rules.2. Call routing rules – Enables you to see and edit call routing rules within Pexip. Read more under Call routing rules. 3. Policy settings – Takes you to Mividas Core > admin > backend admin > Policy > Cluster policy.CMS 1. Add server – Takes you to Add CMS server. 2. Manage tenants – Takes you to Manage tenants Expressway/VCS 1. Add server – Takes you to Add Expressway/VCS. CUCM 1. Add server – Takes you to Add CUCM. Webex There are currently no options available. | |
| Opens up more settings for the chosen cluster. More information below. |
Pexip

| Option | Description |
|---|---|
| Displays the CDR / Eventsink-URL. Click ( ) to copy it. | |
| Displays the Policy URL. Click ( ) to copy it. | |
| Displays the server name. | |
| Takes you to the configuration page for that server in backend admin. | |
Takes you to Mividas Core > Meetings. | |
Takes you to Mividas Core > Admin > API CLient. | |
| Takes you to the web administration page for that server. |
CMS

| Option | Description |
|---|---|
| Displays the CDR / Eventsink-URL. Click ( ) to copy it. | |
| Displays the server name. | |
| Takes you to the configuration page for that server in backend admin. | |
Takes you to Mividas Core > Meetings. | |
Takes you to Mividas Core > Admin > API CLient. | |
| Takes you to the web administration page for that server. |
Expressway/VCS

| Option | Description |
|---|---|
| Displays the server name. | |
| Takes you to the configuration page for that server in backend admin. | |
Takes you to Mividas Core > Meetings. | |
| Takes you to the web administration page for that server. |
CUCM

| Option | Description |
|---|---|
| Displays the CDR / Eventsink-URL. Click ( ) to copy it. | |
| Displays the server name and FQDN. | |
| Takes you to the configuration page for that server in backend admin. | |
Takes you to Mividas Core > Meetings. | |
Takes you to Mividas Core > Admin > API CLient. | |
| Takes you to the web administration page for that server. |
Webex

| Option | Description |
|---|---|
| Displays the CDR / Eventsink-URL. Click ( ) to copy it. |
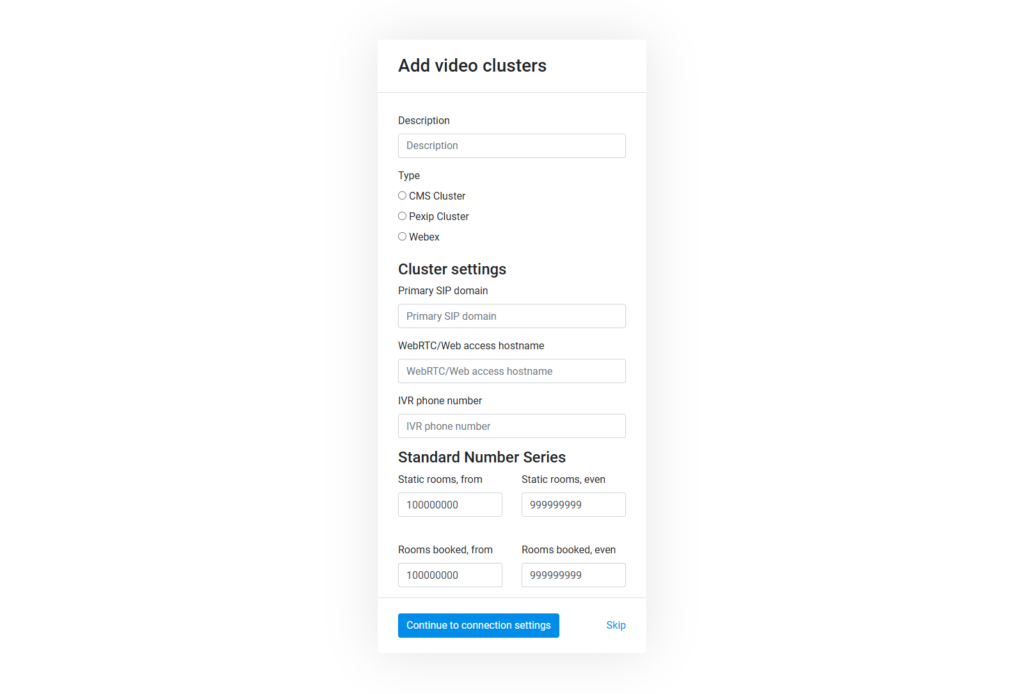
Add video cluster
| Option | Description |
|---|---|
| Description | Enter a description for the video cluster . |
| Type | Choose the cluster type, either CMS Cluster, Pexip Cluster or Webex. |
| Primary SIP domain | Enter the primary SIP domain that is beeing used in your video cluster. E.g. video.example.com |
| WebRTC/Web access hostname | Enter the Hostname/FQDN that is used for WebRTC in your video cluster. E.g. webrtc.example.com |
| IVR phone number | Enter the phone number that sends you to your video cluster IVR. |
| Static rooms number series | Enter the start and end of the range that should be used to create your static meeting rooms, e.g. 150000-159999. |
| Booked rooms number series | Enter the start and end of the range that should be used to create your booked meeting rooms, e.g. 160000-169999. |
Press to proceed or press Skip to cancel.
Pexip Infinity cluster
| Option | Description |
|---|---|
| Description | Is already filled in with what your wrote on the first step, here you can change it if you wish. |
| IP address | Enter the IP address of the Pexip Infinity management node, e.g. 192.168.0.1 or: |
| DNS Name | Enter the full DNS Name of the Pexip Infinity management node, including custom port if needed. E.g. pexip.example.com:444 |
| Opt. separate IP/host for API calls | If you have network separation for API calls, so that traffic will go through a separate hostname if you want to add firewall rules or the like. Enter the IP or Hostname including custom port. E.g. api.example.com:445 |
| Verify SSL certificates | Verifies the trust between servers with SSL certificates. |
| Username | Enter the Username of an API account with read-write permissions in Pexip. |
| Password | Enter the password of the username above. |
| Dial-out location for new participants | Type the default location in Pexip to be used when dialing out to new participants. |
| Prepare event sink and external policy | It adds objects to Pexip for event sink and external policy, which you can then add to the relevant system locations. |
Press to add the Pexip management node or press Skip to cancel.
Cisco Meeting Server cluster
| Option | Description |
|---|---|
| Description | Enter a description for the CMS server . |
| IP address | Enter the IP address of the CMS server, e.g. 192.168.0.1 or add a DNS name below. |
| Opt. separate IP/host for API calls | If you have network separation for API calls, so that traffic will go through a separate hostname if you want to add firewall rules or the like. Enter the IP or Hostname including custom port. E.g. api.example.com:445 |
| DNS Name | Enter the full DNS Name of the CMS server, including custom port if needed. E.g. cms01.example.com:444 |
| Verify SSL certificates | Verifies the trust between servers with SSL certificates. |
| Username | Enter the Username of an API or Administrator account. Must be Administrator to activate automatic backups. |
| Password | Enter the password of the username above. |
| Synchronize tenants from CMS | If checked Mividas Core will synchronize available tenants from the CMS node. |
| Set CDR Receiver for statistics | Option for retrieving call statistics from the connected CDR receiver and storing these within Mividas Core. This allows for local state on active calls and to speed up meeting views in bigger installations. |
Press to add the CMS server or press Skip to cancel.
The installer will find the other servers in the cluster and automatically fill in the information needed to add those as well. Continue to add all CMS Servers to the CMS Cluster until all of them have been added.
Webex
Webex Meeting
- Log in to developer.webex.com. You must use an admin account.
- Go to My Webex Apps -> Create a New App
- Select Create a Service App [Link]
- Select the following Scopes:
- guest-issuer:read
- guest-issuer:write
- meeting:admin_config_read
(Note admin) - meeting:admin_participants_read
(Note admin) - meeting:admin_preferences_read
(Note admin) - meeting:admin_schedule_read
(Note admin) - meeting:admin_schedule_write
(Note admin) - meeting:participants_write
- spark-admin:devices_read
(Note spark-admin) - spark-admin:people_read
(Note spark-admin)
- Copy Client ID and Client Secret and paste them below.
- Sign in to Webex Admin, and go to Apps > Service Apps to approve your app [Link]
- Find your Webex integration here: [Link]
- Select your organization, copy the Secret from the previous step to generate the access token and refresh token. Enter them in the form below

| Option | Description |
|---|---|
| Client ID | Enter the Client ID from the steps described above. |
| Client Secret | Enter the Client Secret from the steps described above. |
| Refresh token | Enter the Refresh token from the steps described above. |
| Access token | Enter the Access token from the steps described above. |
Click to proceed or click to cancel.
Webex Meeting Guest-to-Guest (G2G)
- Log in to developer.webex.com. You must use an admin account.
- Go to My Webex Apps -> Create a New App
- Select Create a Service App [Link]
- Select the following Scopes:
- guest-issuer:read
- guest-issuer:write
- guest-meeting:rw
- meeting:admin_config_read
(Note admin) - meeting:admin_participants_read
(Note admin) - meeting:admin_preferences_read
(Note admin) - meeting:admin_schedule_read
(Note admin) - meeting:admin_schedule_write
(Note admin) - meeting:participants_write
- spark-admin:devices_read
(Note spark-admin) - spark-admin:people_read
(Note spark-admin)
- Copy Client ID and Client Secret and paste them below.
- Sign in to Webex Admin, and go to Apps > Service Apps to approve your app [Link]
- Find your Webex integration here: [Link]
- Select your organization, copy the Secret from the previous step to generate the access token and refresh token. Enter them in the form below
| Option | Description |
|---|---|
| Client ID | Enter the Client ID from the steps described above. |
| Client Secret | Enter the Client Secret from the steps described above. |
| Refresh token | Enter the Refresh token from the steps described above. |
| Access token | Enter the Access token from the steps described above. |
Click to proceed or click to cancel.
Call control
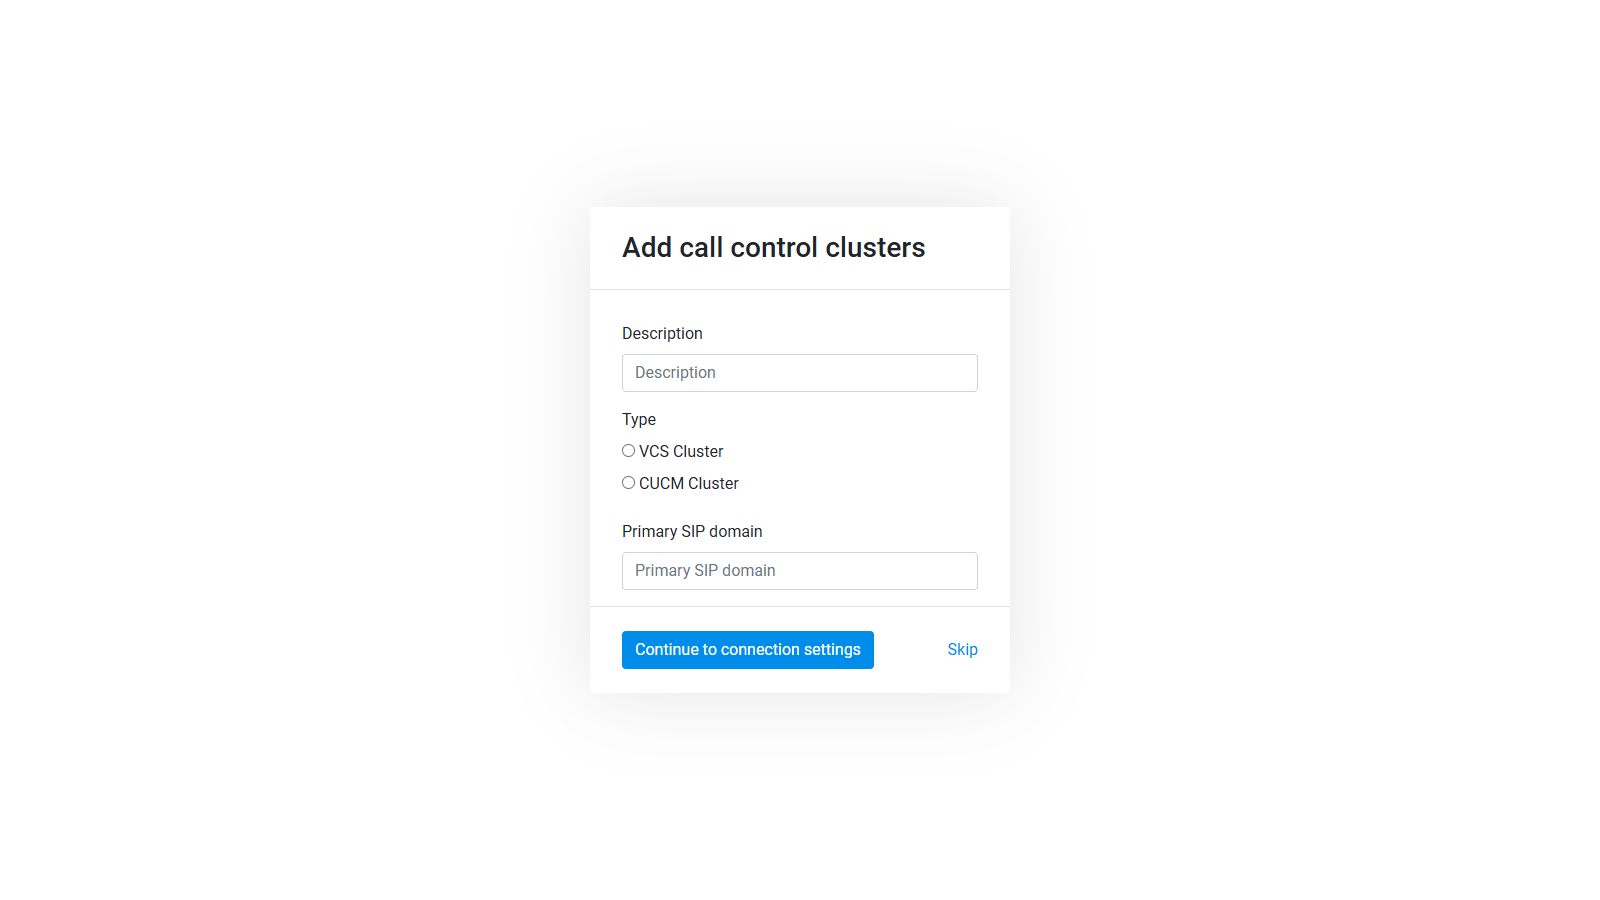
Add VCS/Expressway Cluster
| Option | Description |
|---|---|
| Description | Enter a description for the call control cluster . |
| Type | Select the type of cluster to add: VCS/Experssway or CUCM |
| Primary SIP domain | Enter the primary SIP domain that is used. E.g. video.example.com |
Click , or press Skip to cancel.

| Option | Description |
|---|---|
| Description | Enter a description for the call control server . |
| IP | Enter the IP address of the call control server, e.g. 192.168.0.1 or: |
| DNS Name | Enter the full DNS Name of the call control server, including custom port if needed. E.g. expressway-c.example.com:444 |
| Opt. separate api-ip/host | If you have network separation for API calls, so that traffic will go through a separate IP if you want to add firewall rules or the like. Enter the IP including custom port. E.g. 192.168.0.1:445 |
| Verify SSL certificates | Verifies the trust between servers with SSL certificates. |
| Username | Enter the Username of an Administrator account with API access, and both read and write privileges. |
| Password | Enter the password of the username above. |
Click
to add the VCS/Expressway server, or press Skip to skip or finish later.
If more than 1 VCS/Expressway is set up in the cluster, the installer will find other servers to be added to the cluster and automatically fill in the information needed to add them. Continue adding them manually until all servers in the cluster have been added.
After finishing your first cluster, you will be sent back to the start to be able to add more call control clusters if available. When you have added all call control clusters, press Skip to proceed.
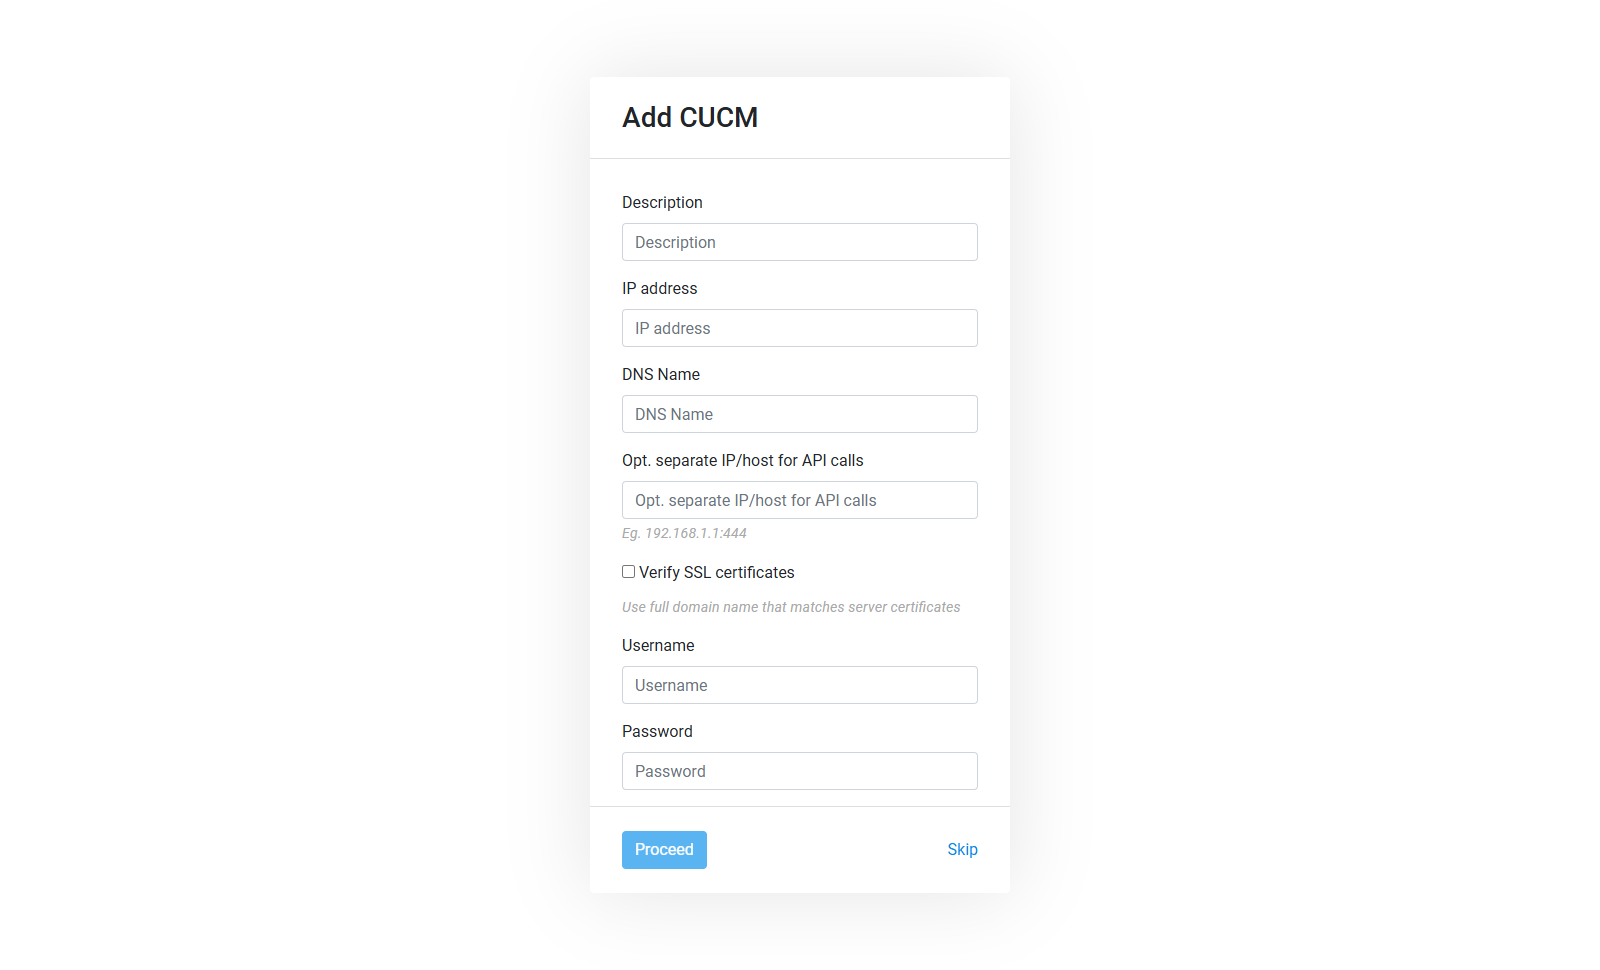
Add CUCM Cluster
| Option | Description |
|---|---|
| Description | Enter a description for the call control cluster . |
| Type | Select the type of cluster to add: VCS/Experssway or CUCM |
| Primary SIP domain | Enter the primary SIP domain that is used. E.g. video.example.com |
| Option | Description |
|---|---|
| Description | Enter a description for the call control server . |
| IP | Enter the IP address of the call control server, e.g. 192.168.0.1 or: |
| DNS Name | Enter the full DNS Name of the call control server, including custom port if needed. E.g. expressway-c.example.com:444 |
| Opt. separate api-ip/host | If you have network separation for API calls, so that traffic will go through a separate IP if you want to add firewall rules or the like. Enter the IP including custom port. E.g. 192.168.0.1:445 |
| Verify SSL certificates | Verifies the trust between servers with SSL certificates. |
| Username | Enter the Username of an Administrator account with API access, and both read and write privileges. |
| Password | Enter the password of the username above. |
Click
to add the CUCM server, or press Skip to skip or finish later.
After finishing your first cluster, you will be sent back to the start to be able to add more call control clusters if available. When you have added all call control clusters, press Skip to proceed.