Table of contents
1. Mividas Core

Mividas Core enhances video conferencing by enabling administrators to efficiently manage virtual meeting rooms, including scheduling features, call control, security, and room configuration. Designed for compatibility with Cisco Meeting Server and the Pexip Infinity platform.
Mividas Core is designed to enhance functionality and usability for both administrators and end-users by offering simplified controls, troubleshooting, and extensive reporting options.
- First time installing Mividas Core? continue here
- Release notes for Mividas Core can be found here
- A guick overview of the interface is found here
Mividas Scheduling Engine
The Mividas Scheduling Engine, enables the use of both the Mividas Outlook add-in and the Mividas Meeting Portal, offering seamless scheduling capabilities directly through Outlook or a web browser. This integration supports flexible meeting setup options, allowing users to manage virtual rooms, set recurring or dynamic meetings, and secure meetings with participant identification (via Mividas Identify).
By centralizing scheduling functions, the Mividas Scheduling Engine streamlines coordination across the Mividas product suite, simplifying both user experience and administrative control.
1.1. Installation and upgrades
The Mividas Core installation and deployment process involves three main steps:
- Mividas Virtual Machine (VM): You must first deploy the Mividas Installer virtual machine to your network. Ensure the VM is deployed and running. If not, refer to the VM deployment documentation.
- Mividas Installer Setup: Mividas Installer must be set up correctly and your license key activated. Refer to the Mividas Installer documentation if needed. After entering your license key, the Mividas Installer displays all product modules accessible with your license. The installation of Mividas Core can proceed as a stand-alone installation or alongside other Mividas products.
- Install the Mividas Core module: Follow the instructions below to install and deploy the Mividas Core product module from the Mividas Installer.
Configuration
On the Mividas Installer start screen, click under Mividas Core to start configuration before deployment. Choose Mividas Core, which will open up the configuration fields below.
Main domain name for management web interface
| Option | Description |
|---|---|
| Configure Hostname/FQDN | Enter the hostname/FQDN for your installation. Must be a valid DNS record. |
| Select existing certificate | Choose one of your previously uploaded certificates to be used for the installation. |
| Opens up a window of the installer certificate management, where you can upload certificates and more. |
Locale settings
| Option | Description |
|---|---|
| Default language | Set the preferred language for the system. Mividas Core uses the browser’s language setting if available; otherwise, it defaults to the language set here. |
| Timezone | Set the preferred time zone for the system. |
Outgoing Email (SMTP) Settings
Configure SMTP details for email notifications and invitations. If you configured this during the initial Installer setup, fields will be pre-filled but can be modified as needed.
| Option | Description |
|---|---|
| Display-name of sender | Enter the name to appear as the email sender. |
| Sender email-address | Enter the email address for outgoing messages (typically a no-reply address). |
| SMTP relay server hostname | Specify the SMTP server’s hostname. E.g. smtp-server.example.com. |
| TLS mode | Choose your preferred TLS mode. |
| Port | Specify the SMTP server port. E.g. 25. |
| Username | Enter the SMTP username. |
| Password | Enter the SMTP password. If no password is needed, enter a hyphen. |
Optional settings
OIDC (OpenID Connect) provider settings
| Option | Description |
|---|---|
| Enable | Enable OIDC provider support. |
| Select existing certificate | Select any already uploaded certificate to use with OIDC. |
| Click to open a new window where you Manage certificates. | |
| Remove optional setting | Check this box and click save to remove the settings. |
LDAP authentication settings
| Option | Description |
|---|---|
| Server | Enter the hostname of the current LDAP or AD server to use by default. Use “fqdn:389” to use a specific port. |
| Service account DN/username | Here you enter the path to the account to be used as a service account. The path is often unique to your particular organization. |
| Password | Enter the password for your LDAP or AD server. The field will get empty after pressing save. |
| Use LDAPS-connection | Connect to the server using SSL-based LDAPS-connection (port 636 by default). Make sure you have added any custom CA-certificates to make verification work. |
| Ignore TLS/SSL verification errors | Ignore TLS CA verification. TLS over regular LDAP port 389 may be used even if LDAPS is not enabled so unless you have added custom CA certificates for verification login may fail. |
| Disable referral chasing | Referrals occur when the queried server doesn’t have the requested information but points the client to another server that might. The client can then “chase” these referrals to retrieve the needed data. |
| Base dn | Specify where in the tree the initial search for results should begin. |
| User filter | Here you choose how users are filtered out and displayed. |
| End user group DN | Specify which group in the tree that will have access to the system and be able to use the product. |
| Admin group DN | Specify which group in the tree will have elevated admin rights in the system, which opens up additional settings and functions for the logged-in user. |
| Superuser group DN | Specify which group in the tree that will give members superuser status (highest). Use this with caution as these users will have full control over the system and should only be assigned to users with high technical knowledge. |
| Customer attribute | For dynamic multi-tenant Mividas Meeting Portal use. User LDAP-object attribute that contains customer shared keys, e.g. "customerAttribute". |
| Enable local accounts | Allow logging in to users added to the local user database. |
External database server (beta)
You can choose to run your own database server, instead of the bundled one.
| Option | Description |
|---|---|
| Hostname | Enter the Hostname/FQDN or IP of the database server. |
| Username | Enter the database username. |
| Password | Enter the database password. If no password is needed, enter a hyphen. |
| Authentication type | Choose authentication type. |
| TLS mode | Choose what level of TLS is needed. |
| Create new user/database autmatically for each component | Allows for the creation of a new database for each installation. Mostly useful for service providers to keep customer data in separate databases. |
External Redis server (beta)
You can choose to run your own Redis server, instead of the bundled one.
| Option | Description |
|---|---|
| Protocol | Choose the protocol for the communication. |
| Hostname | Enter the Hostname/FQDN or IP of the Redis server. |
| Username | Enter the Redis username. |
| Password | Enter the Redis password. If no password is needed, enter a hyphen. |
| Use as background task broker | All background task messages will be handled by Redis instead of RabbitMQ. |
Cisco Meeting Server
| Option | Description |
|---|---|
| Internal number series ranges | Set the number ranges that should apply for your internal number series. |
| Acano temp cospace callid range | Set the number range for your temporary meeting rooms. |
Separate domain name for scheduling API
Used in case of external Mividas Meeting Portal server
Choose if you want network separation for the scheduling API, so that traffic will go through a separate hostname if you want to add firewall rules or the like. These are also slimmed down so only the functions that apply to the scheduling API are used by this hostname.
| Option | Description |
|---|---|
| Hostname / FQDN | Enter the Hostname/FQDN you wish to use. |
| Select existing certificate | Choose one of you previously uploaded certificates to be used. |
| Public SSL-certificate | Choose a Full chain PEM-formatted certificate bundle to upload. |
| Private key | Choose the private key of the above chosen certificate to upload. |
Separate domain name for video conference system requests
This option is available for Mividas Core + Mividas Rooms installations. Should an event be sent to Mividas Rooms from the conference system, this can then go via a separate hostname to be able to distinguish this traffic and e.g. add firewall rules. This is something we recommend using to also simplify troubleshooting but also if there is e.g. any overload, one can also shut down this particular type of traffic temporarily in a simpler way.
| Option | Description |
|---|---|
| Hostname / FQDN | Enter the Hostname/FQDN you wish to use. |
| Select existing certificate | Choose one of you previously uploaded certificates to be used. |
| Public SSL-certificate | Choose a Full chain PEM-formatted certificate bundle to upload. |
| Private key | Choose the private key of the above chosen certificate to upload. |
SAML SSO settings
| Option | Description |
|---|---|
| Entity URI to pass to SAML server | This will normally be the address to the product you are setting this up for, e.g. https://core.example.com Ensure this name is exactly the same as configured in idp configuration as “Identifier” for the Relaying Party Trust! |
| URL to autoconfig metadata XML-file | The URL that is used for the product to automatically get the metadata XML-file. Example for ADFS: https://<ADFS server FQDN>/FederationMetadata/2007-06/FederationMetadata.xml Example for Keycloak: https://<Keycloak server FQDN>/auth/realms/<REALM>/protocol/saml/descriptor |
| Offline idP metadata XML | This is only needed if auto configuration is not used. Paste the iDP metadata XML in the text field. |
| Offline SP metadata XML | This is only needed if auto configuration is not used. Paste the SP metadata XML in the text field. |
| Select existing certificate | Choose one of you previously uploaded certificates to be used for encryption and signing of requests. |
| Public SSL-certificate | If you have not yet uploaded a certificate that can be selected in the previous step, choose a Full chain PEM-formatted certificate bundle to upload. |
| Private key | Choose the private key of the above chosen certificate to upload. |
| Username claim | SAML Claim to use for creating the username. For Cisco Meeting Server installations, this should correspond to the username in CMS (jid). Structure: <saml_claim_name>[/<search>/<replace>]. Example: email/example.org/video.example.org |
| Group/role/memberOf SAML claim | SAML Claim where you get the Group/role/memberOf to determine if the login is for a regular user, administrator or Superuser. What to enter here varies a lot depending on what service you use. Example: OU=Groups,DC=example,DC=com |
| Group/role claim value required for regular users | Enter the path for the group/role that is required for regular users. Example: CN=regular-users,OU=Groups,DC=example,DC=com |
| Group/role claim value required for admin-users | Enter the path for the group/role that is required for admin-users. Example: CN=admin-users,OU=Groups,DC=example,DC=com |
| Group/role claim value required for superuser-users | Enter the path for the group/role that is required for superusers-users. Example: CN=superusers-users,OU=Groups,DC=example,DC=com |
| Customer SAML claim | SAML Claim used in multi-tenant installations, to determin if the login is for a specific Customer. |
| Enable single log out (SLO | Single Logout (SLO) results in all user sessions being terminated simultaneously for the browser that initiated the logout. Closing all user sessions prevents unauthorized users from accessing resources at the Mividas products (SPs). |
| Enable local accounts | Allow logging in using username/password (using backend admin or API) with local accounts. |
| Enable debug-mode | Print more information in logs, good for troubleshooting. |
Separate domain name for incoming SMTP invites
You have the option to specify a separate domain to use for conference system email addresses. This is used, among other things, to redirect e-mails through external spam filters.
| Option | Description |
|---|---|
| Hostname / FQDN | Enter the Hostname/FQDN you wish to use. |
| Select existing certificate | Choose one of you previously uploaded certificates to be used. |
| Public SSL-certificate | Choose a Full chain PEM-formatted certificate bundle to upload. |
| Private key | Choose the private key of the above chosen certificate to upload. |
Save configuration
When you have filled in everything needed for your installation, or just want to save your progress, you need to save theese settings. Do so by clicking in the bottom left corner.
Deployment
Select Version and Deploy
After everything is configured it is time to deploy Mividas Core. Choose the Mividas Core version from the drop-down list![]() , then click
. A terminal window will display the installation progress. Once completed, reload the page to verify the correct version.
, then click
. A terminal window will display the installation progress. Once completed, reload the page to verify the correct version.
core_epm:  Running  15/18
core_epm:  Running  15/18
core_epm:  Running  16/18
core_epm:  Running  18/18
Finished
Reload
Update settings post-deployment
To update settings after deployment, select Mividas Core from the start screen and click . Adjust settings as needed, save changes, and redeploy by clicking .
Following these steps, you can complete the Mividas Core configuration and deployment while retaining the flexibility to update settings as requirements evolve.
Upgrade
Before upgrading
Before upgrading, we always recommend that you:
- Check your platform health and fix any current alerts affecting your installation.
- Check that you have disk space available.
- Take a snapshot of your installation in your hypervisor.
Upgrading
To upgrade, click
next to Mividas Core from the start screen. Select the version you wish to upgrade to in the drop-down list ![]() , and then click
.
, and then click
.
1.2. Onboarding
Upon initial login to your Mividas Core installation, the onboarding wizard will guide you through setup steps to configure the installation’s essential features. The wizard covers setting up an organization, configuring video clusters, and securing access.
Prerequisites
Before beginning your Mividas Core onboarding, confirm that:
- Mividas Installer installation: Ensure your Mividas Installer is up and running; refer to VM Deployment if needed.
- Mividas Core installation: Ensure that your Mividas Core installation is up an running, refer to Mividas Core Installation and Upgrade if needed.
- Check network functionality: Ensure the firewall(s) allow communication between Mividas Core and the video components you want to install. For more information, check the Network port requirement.
- Accounts to video components: Ensure you have access to accounts with the correct access within the video components that you wish to add.
- Cisco Meetings Server: API or Administrator. Must be Administrator to activate automatic backups.
- Pexip Infinity: API user with read and write privileges.
- Expressway/VCS: Administrator account with API access and both read and write privileges.
Onboarding wizard
1. Organization setup

| Option | Description |
|---|---|
| Organization | Enter the name of the default organization that will represent your Mividas Core installation. |
Click to proceed.
2. Configure video cluster

Option
Description
Description
Enter a description for the
video cluster
.
Type
Choose the cluster type, either CMS Cluster, Pexip Cluster or Webex.
Primary SIP domain
Enter the primary SIP domain that is beeing used in your video cluster. E.g.
video.example.com
WebRTC/Web access hostname
Enter the Hostname/FQDN that is used for WebRTC in your video cluster. E.g.
webrtc.example.com
IVR phone number
Enter the phone number that sends you to your video cluster IVR.
Static rooms number series
Enter the start and end of the range that should be used to create your static meeting rooms, e.g.
150000-159999.
Booked rooms number series
Enter the start and end of the range that should be used to create your booked meeting rooms, e.g.
160000-169999.
Press to proceed. If you want to finish this later instead, press Skip.
Cisco Meeting Server

Option
Description
Description
Enter a description for the
CMS server
.
IP address
Enter the IP address of the CMS server, e.g.
192.168.0.1 or add a DNS name below.
Opt. separate IP/host for API calls
If you have network separation for API calls, so that traffic will go through a separate hostname if you want to add firewall rules or the like. Enter the IP or Hostname including custom port. E.g.
api.example.com:445
DNS Name
Enter the full DNS Name of the CMS server, including custom port if needed. E.g.
cms01.example.com:444
Verify SSL certificates
Verifies the trust between servers with SSL certificates.
Username
Enter the Username of an API or Administrator account. Must be Administrator to activate automatic backups.
Password
Enter the password of the username above.
Synchronize tenants from CMS
If checked Mividas Core will synchronize available tenants from the CMS node.
Set CDR Receiver for statistics
Option for retrieving call statistics from the connected CDR receiver and storing these within Mividas Core. This allows for local state on active calls and to speed up meeting views in bigger installations.
Press to add the CMS server or press Skip to finish later.
The installer will find the other servers in the cluster and automatically fill in the information needed to add those as well. Continue to add all CMS Servers to the CMS Cluster until all of them have been added.

When the CMS cluster has been fully added, you will automatically proceed to a summary of the CMS cluster. Click to proceed to the next step.
Pexip Infinity

Option
Description
Description
Is already filled in with what your wrote on the first step, here you can change it if you wish.
IP address
Enter the IP address of the Pexip Infinity management node, e.g.
192.168.0.1 or:
DNS Name
Enter the full DNS Name of the Pexip Infinity management node, including custom port if needed. E.g.
pexip.example.com:444
Opt. separate IP/host for API calls
If you have network separation for API calls, so that traffic will go through a separate hostname if you want to add firewall rules or the like. Enter the IP or Hostname including custom port. E.g.
api.example.com:445
Verify SSL certificates
Verifies the trust between servers with SSL certificates.
Username
Enter the Username of an API account with read-write permissions in Pexip.
Password
Enter the password of the username above.
Dial-out location for new participants
Type the default location in Pexip to be used when dialing out to new participants.
Prepare event sink and external policy
It adds objects to Pexip for event sink and external policy, which you can then add to the relevant system locations.
Press to add the Pexip management node or press Skip to finish later.

When the Pexip cluster has been added, you will automatically proceed to a summary of the Pexip cluster. Click to proceed to the next step.
3. Add call control clusters
If you have separate call control, Cisco VCS/Expressway or CUCM, here is where to add it. If you don’t have anything to add or want to finish later, press Skip.
Add VCS/Expressway Cluster
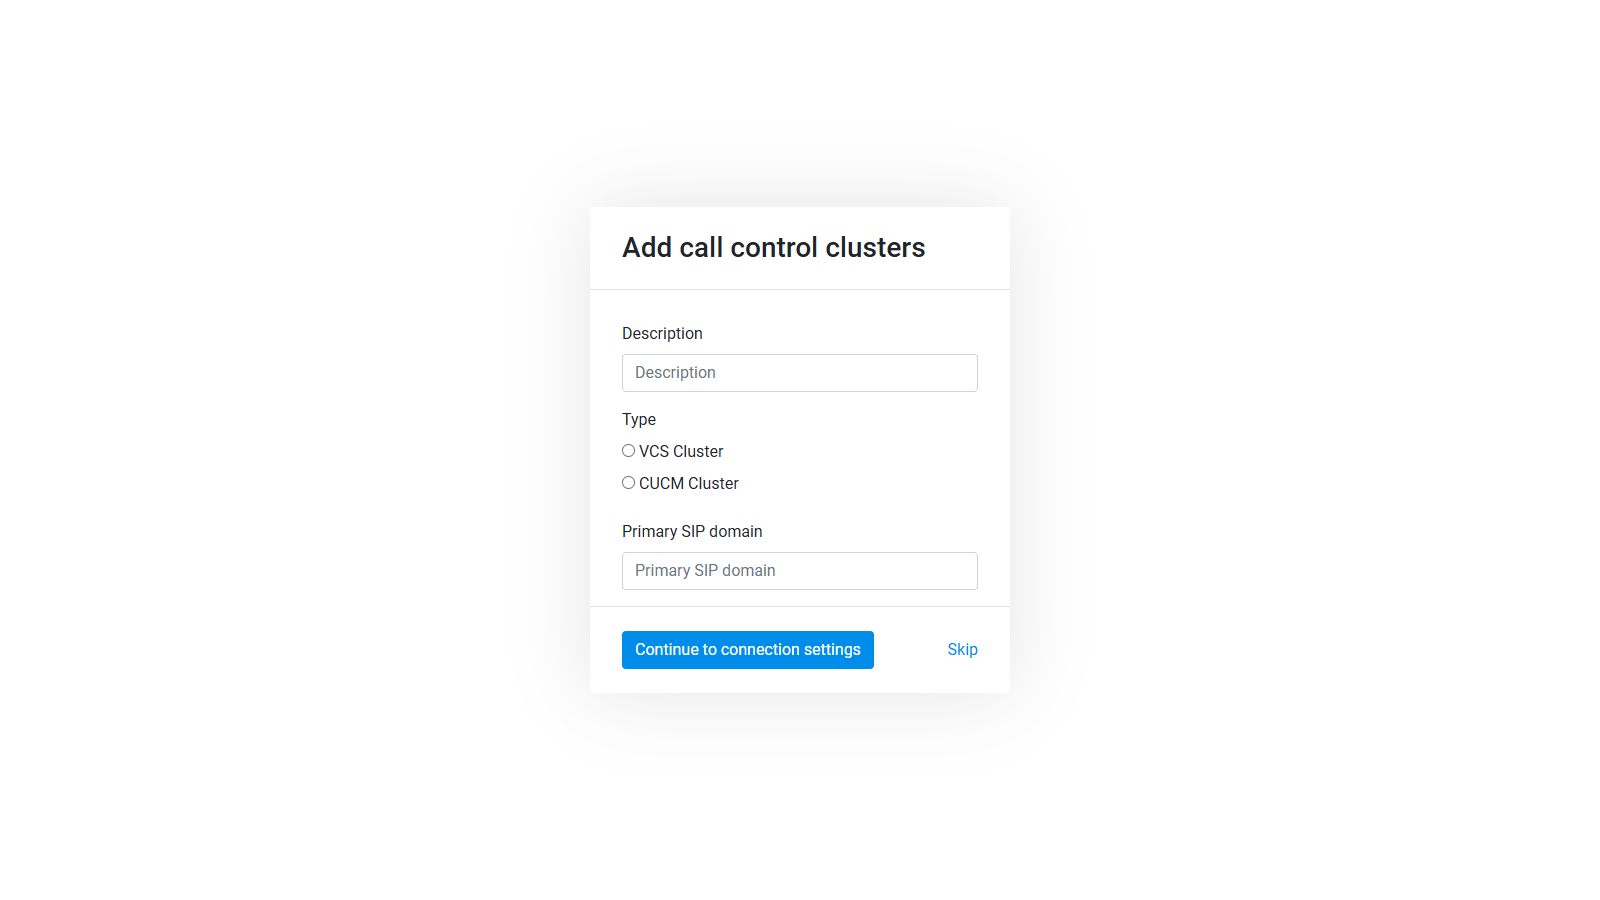
| Option | Description |
|---|---|
| Description | Enter a description for the call control cluster . |
| Type | Select the type of cluster to add: VCS/Experssway or CUCM |
| Primary SIP domain | Enter the primary SIP domain that is used. E.g. video.example.com |
Click , or press Skip to skip or finish later.

| Option | Description |
|---|---|
| Description | Enter a description for the call control server . |
| IP | Enter the IP address of the call control server, e.g. 192.168.0.1 or: |
| DNS Name | Enter the full DNS Name of the call control server, including custom port if needed. E.g. expressway-c.example.com:444 |
| Opt. separate api-ip/host | If you have network separation for API calls, so that traffic will go through a separate IP if you want to add firewall rules or the like. Enter the IP including custom port. E.g. 192.168.0.1:445 |
| Verify SSL certificates | Verifies the trust between servers with SSL certificates. |
| Username | Enter the Username of an Administrator account with API access, and both read and write privileges. |
| Password | Enter the password of the username above. |
Click to add the VCS/Expressway server, or press Skip to skip or finish later.
If more than 1 VCS/Expressway is set up in the cluster, the installer will find other servers to be added to the cluster and automatically fill in the information needed to add them. Continue adding them manually until all servers in the cluster have been added.
After finishing your first cluster, you will be sent back to the start to be able to add more call control clusters if available. When you have added all call control clusters, press Skip to proceed.
Add CUCM Cluster
| Option | Description |
|---|---|
| Description | Enter a description for the call control cluster . |
| Type | Select the type of cluster to add: VCS/Experssway or CUCM |
| Primary SIP domain | Enter the primary SIP domain that is used. E.g. video.example.com |
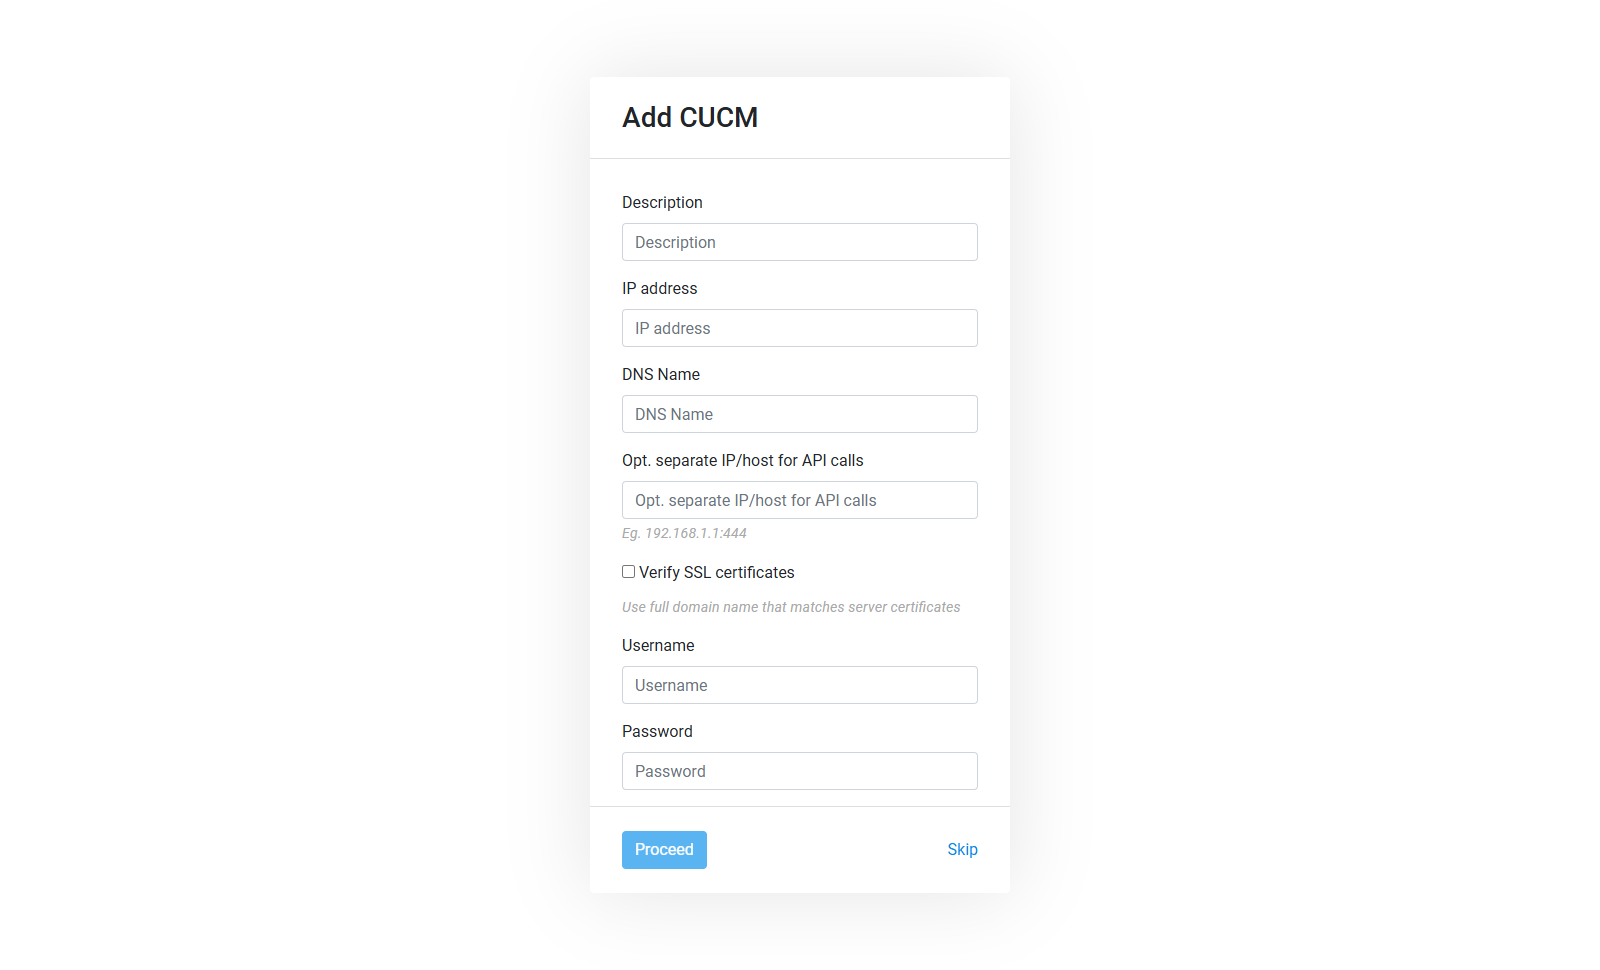
| Option | Description |
|---|---|
| Description | Enter a description for the call control server . |
| IP | Enter the IP address of the call control server, e.g. 192.168.0.1 or: |
| DNS Name | Enter the full DNS Name of the call control server, including custom port if needed. E.g. expressway-c.example.com:444 |
| Opt. separate api-ip/host | If you have network separation for API calls, so that traffic will go through a separate IP if you want to add firewall rules or the like. Enter the IP including custom port. E.g. 192.168.0.1:445 |
| Verify SSL certificates | Verifies the trust between servers with SSL certificates. |
| Username | Enter the Username of an Administrator account with API access, and both read and write privileges. |
| Password | Enter the password of the username above. |
Click to add the CUCM server, or press Skip to skip or finish later.
After finishing your first cluster, you will be sent back to the start to be able to add more call control clusters if available. When you have added all call control clusters, press Skip to proceed.
4. Choose password

| Option | Description |
|---|---|
| New password | Choose a password for the user “mividas_fallback”. Please document this password. |
| New password confirmation | Type the password again to verify it. |
Click to finish the setup. You can now proceed to manage and configure video conferencing functions within the platform.
1.3. User interface
All views in Mividas Core share a consistent layout, making it easy for you to quickly familiarize yourself with the interface. Below is a brief overview of its features and navigation.
Interface overview

Active customer
Select the customer (tenant) you are currently working with in the interface.
This option is only visible to users with access to multiple customers in multitenant installations; for others, it remains hidden.
Navigation
The main navigation is located in the left sidebar of the interface, with administrative views accessible at the bottom in an expandable section. Note that certain admin features are only visible to users with the appropriate permissions.


1. Global search
At the top of the page you will always have the global search available to quickly locate any part of Mividas Core, including virtual meeting rooms, users, scheduled meetings, and active meetings.
2. Product navigation
If you have multiple active Mividas products, you can switch between them here. This area also provides access to Mividas Debug views, language selection, and your user profile with an option to log out.

1. Page tabs
When a view includes subviews, they appear as tabs within the parent view.
2. Search and date range
Most views also feature a search field for quick, in-view searches. If the data is organized by date range, the select of the desired date span will be shown here as well.
1. View actions
In the top-right corner, you’ll find view actions. Frequently used functions appear as direct buttons, while less common actions are accessible via a dropdown menu in the action button.
2. View filtering
Below the view actions, you’ll find view filtering options, offering various filters based on the current view. If export functionality is available, it will also appear here.

In summary, this is how to navigate and work within the Mividas Core interface. While some views may vary slightly in appearance, the core functionality remains consistent across all views.
1.4. Dashboard

The Mividas Core dashboard provides a clear overview of the platform’s operational status. The interface is divided into several widgets that display essential information, enabling proactive support for the organization.
| Page actions | |
|---|---|
| 1. Page refresh (
) allows you to manually refresh the dashboard 2. Access relevant documentation ( ) |
Widgets overview
The main page grid features insight widgets from various parts of the system, providing a quick overview of the platform’s status.
| Widget | Description |
|---|---|
 |
Meeting Room – This widget displays the current number of static virtual meeting rooms. You can directly search for a meeting room or click Show All to navigate to the Meeting Rooms section. |
 |
Scheduled Meetings – This widget shows the number of meetings currently scheduled and upcoming. These can include dynamically created virtual meeting rooms as well as scheduled meetings using, for example, a static personal meeting room.
You can directly search for a booked meeting or click Show All to navigate to the Scheduled Meetings section. |
 |
Users – This widget displays the total number of users on the platform. You can directly search for a user or click Show All to navigate to the Users section. |
 |
Ongoing Meetings – This widget displays the current status of ongoing meetings. Clicking on the widget takes you to the Meetings section. |
 |
Participants – Shows the number of people and conference systems currently participating in video meetings. Clicking on the widget takes you to Meetings, where you can see the participants currently in meetings. |
 |
Calls Today – Displays the number of calls made during the current day. Clicking on View all calls takes you to detailed call statistics for the same date period. |
 |
Hours Today – Displays the total hours of video meetings held during the day. Clicking on View all calls takes you to detailed call statistics for the same date period. |
 |
Weekly Statistics – Meeting statistics for the past 7 days are displayed. This graph shows all organizational units for the selected tenant, but you can click on organizational units to hide/show them. |
Note: Several of these widgets are clickable, allowing access to detailed information about, for example, ongoing meetings, statistics, and incoming error messages.
Status overview
The right sidebar displays platform health and the status of connected servers.
| Status view | Description |
|---|---|
 |
Platform Status – Displays Mividas platform health, including: – Licensed products and their version numbers – License validity with expiration warnings – Platform error messages Status icon: |
Clusters and bridges
The sidebar also provides an overview of all connected servers and their current status.
- Notifications are displayed with severity level, event time, and the option to acknowledge and hide the notifications.
- Detailed information about notifications can be found in the Monitoring section in the left sidebar.
The status icon reflects the highest severity level of active server alerts.
| Status view | Description |
|---|---|
 |
Cisco Meeting Server (CMS) – Shows version numbers, uptime, active calls, and the number of participants in ongoing meetings. |
 |
Pexip Infinity – Displays active calls, the number of participants in ongoing meetings, the total number of available licenses, and the number of licenses currently in use. |
 |
Expressway/VCS – Displays uptime, license usage, IP address, and the number of active calls. |
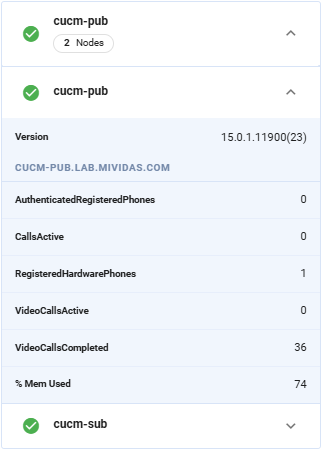 |
CUCM – Displays version, FQDN, AuthenticatedRegisteredPhones, Active calls, RegisteredHardwarePhones, Active video calls, Completed video calls and % memory usage. |
1.5. Monitoring

Monitoring in Mividas Core offers a powerful tool for users to manage warning and error notifications from servers connected to the platform. The notification system gives users control over what is displayed, regardless of which view they are using in the interface.
Quick guide
Severity levels
Throughout the platform, notifications are displayed with their corresponding severity levels. Mividas attempts to identify the severity level of notifications received from connected servers. If the severity level cannot be determined, the notification is assigned the status Unknown. A list of available severity levels is provided below:
- ( ) – Critical – Indicates a severe failure that requires immediate attention. The system might be unusable or crashing.
- ( ) – Error – Signals that the system might not operate fully, immediate action might be required, but the system can still run.
- ( ) – Warning – Something unexpected happened, or a potential issue was detected. The system is working, but attention is needed.
- ( ) – Info – Normal operational messages that indicate system status or changes. No action required, just for tracking purposes.
- ( ) – Debug – For debugging purposes, some notifications may be generated by the Mividas Core platform. Currently, there are no active debug notifications.
- ( ) – Unkown – Mividas Core is unable to determine the severity level of the notification.
Acknowledge and hide notifications
A key feature of monitoring in Mividas Core is the ability for users to acknowledge and hide notifications, removing them from the interface . This allows users to either address the issue on the affected server or, if it’s a known issue that doesn’t require fixing, simply hide the notification.
Hidden notifications can be viewed using the filtering function in the monitoring views. The hidden notifications will remain hidden until the same notification is triggered again, at which point it will automatically reappear in the interface.
User Permissions: Only users with staff status and permission to view all customers (in multi-tenant setups) have access to the acknowledge and hide functionality.
Note: Notifications can be acknowledged and hidden both from the monitoring views and directly from Mividas Core dashboard, alongside the server status in the sidebar.
If there is any notifications to show.
FAQ
Here are some frequently asked questions (FAQs) to help you find the answers you’re looking for.
Yes, Mividas Core’s monitoring feature gives users control over which notifications are displayed, regardless of the interface view they are using. This is managed through the acknowledge and hide function, accessible from both the monitoring view and the Mividas Core dashboard. For more details, refer to the Mividas Core Monitoring documentation.
1.5.1. Overview

The Overview tab displays all active notifications in Mividas Core. Each notification row can be expanded to reveal the servers affected by the selected notification.
| Page actions | |
|---|---|
| 1. Page refresh (
) allows you to manually refresh the monitoring view 2. Access relevant documentation ( ) |
| Search and filters | Description |
|---|---|
| Allows you to search in your list of notifications. | |
| Allows you to filter your list of notifications.
1. Filter by severity Click to apply chosen filters. |
Page widgets
At the top, you can see a summary of all alarms, their severity, and the number of affected servers.

Notification list

- Type – Displays the severity of the alarm.
- Details – Displays details of the alarm.
- Servers – Displays the number of servers affected by the alarm.
- ( ) – Expands the notification of the alarm with more information and options.
Expanded notification

| Option | Description |
|---|---|
| Hides and acknowledges the notification for the server until it is triggered again. | |
| If the alert was previously Acknowledged, this activates and shows it again. | |
| Edit the server object. | |
Navigates to Mividas Core > Meeting with the server selected. |
|
Navigate to Mividas Core > Admin > API Client with the server selected. |
|
| Links to the server web admin url. |
1.5.2. Per server

This tab organizes notifications by server rather than grouping them by notification type, as in the Overview view. This arrangement simplifies navigation for users who know which specific server they want to review.
| Page actions | |
|---|---|
| 1. Page refresh (
) allows you to manually refresh the monitoring view 2. Access relevant documentation ( ) |
| Search and filters | Description |
|---|---|
| Allows you to search in your list of servers. | |
| 1. Severity: Show only servers with notifications of the selected severity level. 2. Show All: Include servers with no active notifications in the list. Click to apply chosen filters. |
| Page widget | Description |
|---|---|
 |
Displays the total number of affected servers. |
 |
Displays the total number of active notifications. |
 |
Displays the total number of acknowledged notifications. |
Server list

- Server – Displays the server name.
- ( ) – Displays the total number of Critical alerts.
- ( ) – Displays the total number of Error alerts.
- ( ) – Displays the total number of Warning alerts.
- ( ) – Displays the total number of Info alerts.
- ( ) – Displays the total number of Debug alerts.
- ( ) – Displays the total number of Unknown alerts.
- Aknowledged – Displays the total number of Aknowledged alerts.
- ( ) – Expands the server with more information and options.
Expanded server
Expanding a server row reveals more details about its current notifications, including when the notification was first detected and when it was last triggered. Users can acknowledge and hide notifications or reactivate and display previously acknowledged ones.

- Type – Displays the severity of the alarm.
- Details – Displays details of the alarm.
- First seen – Displays the date and time of the first time this alarm was triggered.
- Last seen – Displays the date and time of the last time this alarm was triggered.
1.6. Users

This view displays users within the video platform who can, for instance, log in to the respective platform’s client software. For Cisco Meeting Server, users can also be owners and members of static virtual meeting rooms with different types of rights in the meeting.
Users in both Cisco Meeting Server and Pexip Infinity can be linked to one or more static virtual meeting rooms, which they can book and manage via the Mividas Meeting Portal and the Mividas Outlook add-in. A user can also belong to an organizational unit (OU), for example, to filter the user list and provide more granular statistics.
1.6.1. Search

| Page actions | |
|---|---|
| Manually synchronize user data. Users are typically added from an LDAP source, such as Mividas LDAP-Admin, ADFS, or similar. | |
| 1. Page refresh (
) allows you to manually refresh the user list. 2. Access relevant documentation ( ) |
| Filters and export | |
|---|---|
| Allows you to search for a user. | |
| If you use Mividas Core’s multi-tenant feature, you can select which tenant’s users should be displayed. Requires higher privileges (super admin). | |
| Choice to display users based on their organizational unit affiliation. | |
Where XXXX stands for the number of users currently visible by your chosen search/filters. Export the user list to Excel, with the data Name, Email address, LDAP user name, Video address of CMA (legacy support), Video address for personal virtual meeting room (VMR), Call ID for personal VMR, Web link to personal VMR, Organization unit. |
User list
This section provides an overview of all your current users. The list can be sorted by clicking on the header of each column. Clicking on a user’s name will take you to the detailed view for that specific user.

- Name – Displays the user’s first and last name. Clicking on the name will navigate you to the detailed view for that specific user.
- E-mail – The user’s email address.
- JID (CMS only) – The JID associated with the user.
- Customer (Multi-Tenant only) – This column appears if users in the list are from different customers. For example, if you’ve selected to display users from another cluster.
User list features
| Feature | Description |
|---|---|
| By selecting one or more users, you can send the user’s connection details for one or more meeting rooms linked to the user. You can also move one or more users to a different organizational unit. |
1.6.2. Track changes

Mividas Core automatically synchronizes users, but you can also trigger a manual synchronization from the user list view. In this view, you can track changes from user synchronizations within the selected date range.
Note: This feature is only available when managing Cisco Meeting Server customers.
| Page actions | |
|---|---|
| 1. Page refresh (
) allows you to manually refresh the view 2. Access relevant documentation ( ) |
| Filters and export | |
|---|---|
| Chose the From date for your filter. | |
| Choose the Until date for your filter. | |
| Manually refresh the results based on filters. | |
| Download an Excel report of changes from the selected date range |
Changes list

| Option | Description |
|---|---|
| This tab shows the list of new users. | |
| This tab shows the list of deleted users. |
- Username – Displays the username of the user.
- LDAP user name – The LDAP username of the user; if not available, it will say
-Unknown-. - Created/Last sync – The date and time of the user’s creation or last sync.
1.6.3. User details

When clicking on a user in the user list, you will navigate to that user’s page, where all relevant information about the user’s settings, permissions, and resources is presented in the form of virtual video meeting rooms.
| Page actions | |
|---|---|
| Used to associate additional meeting rooms with the user. This feature is only available when managing Cisco Meeting Server customers. | |
| 1. API (
) link to Mividas Core rest client with user selected 2. Page refresh ( ) allows you to refresh the view manually 3. Access relevant documentation ( ) |
The detail view varies depending on whether you are managing a Cisco Meeting Server or a Pexip Infinity platform.
Cisco Meeting Server
| Page widgets | Description |
|---|---|
 |
Showing if the user has active calls. |
 |
The date and time of the first call made by the user. |
 |
The date and time of the last call made by the user. |
 |
The number of virtual meeting rooms associated with the user. |
| Page details | Description |
|---|---|
 |
This section displays the user’s name, email, user ID (JID), customer/tenant, and organizational unit (OU). By clicking the OU field, you can select a different affiliation from the tree structure, if available. |
 |
This widget lists the meeting rooms associated with the user. These virtual meeting rooms may be auto-generated or created in Mividas Core or the Mividas Meeting Portal.
Auto-generated meeting rooms cannot be deleted. If the user has many meeting rooms, you can search for them using the search field. If you hover over a meeting room, two buttons appear: Takes you to the meeting room page, where you can find more information and do configurations. Bulk actions |
Pexip Infinity
| Option | Description |
|---|---|
 |
This section displays the user’s name, email, description, customer/tenant, and organizational unit (OU). By clicking the OU field, you can select a different affiliation from the tree structure, if available. |
 |
This widget lists the meeting rooms associated with the user. At the top you can search for a specific meeting room.
If you hover over a meeting room, two buttons appear: Takes you to the meeting room page, where you can find more information and do configurations. |
Invitation

This tab allows you to send instructions and access details for the user’s personal virtual meeting room and find dial information for the user’s meeting room in the sidebar.
Note: This feature is only available when managing Cisco Meeting Server customers.
| Page actions | |
|---|---|
| 1. Page refresh (
) allows you to manually refresh the view 2. Access relevant documentation ( ) |
Use the form on the page to send instructions to the user or any other recipients who should receive the details.
| Option | Description |
|---|---|
Select message template – Choose the template to be used. By default, the “Instructions for Users” template is selected, but you can choose a different one if desired. Templates can be edited in Mividas Core > Admin > Invite messages. |
|
| Subject – The subject of the mail the user will recive. | |
| Email addresses – Email addresses for the users that should recive the details. | |
 |
Mail content – The message body generated from the selected message template. |
| Sent from – Displays the “from” information of the email. | |
| Sends email(s) based on above chosen options. | |
| your email client | Opens your email client with the above chosen options ready to send. |
 |
Dial information – Displays the room number, SIP URI, web Link and moderator web link for the meeting room. |
 |
PIN codes – Displays the guest and moderator PIN for the meeting room, if any. |
1.7. Meeting rooms

A key feature of supported video conferencing bridges is static virtual meeting rooms. Dynamic meeting rooms can be scheduled through Mividas Core, Mividas Meeting Portal, and Mividas Rooms, where each meeting address is unique. Static meeting rooms remain an important feature for many organizations that prefer not to rely on scheduling every meeting. Instead, participants can join a well-established address, which can also be displayed in the address book of conferencing systems.
For example, static meeting rooms can be auto-generated so that each user has a personal meeting room immediately upon starting to use the meeting platform. Additionally, meeting rooms can be created individually, in bulk, or imported from systems such as Cisco TMS.
Depending on the meeting platform, users can be associated with multiple meeting rooms, which can be booked and self-managed in the Mividas Meeting Portal or used via the Mividas Outlook add-in/plug-in. For Cisco Meeting Server, native support allows users to be owners or members of a meeting room and to be assigned different permissions. These meeting rooms can also be restricted so only owners and members can join.
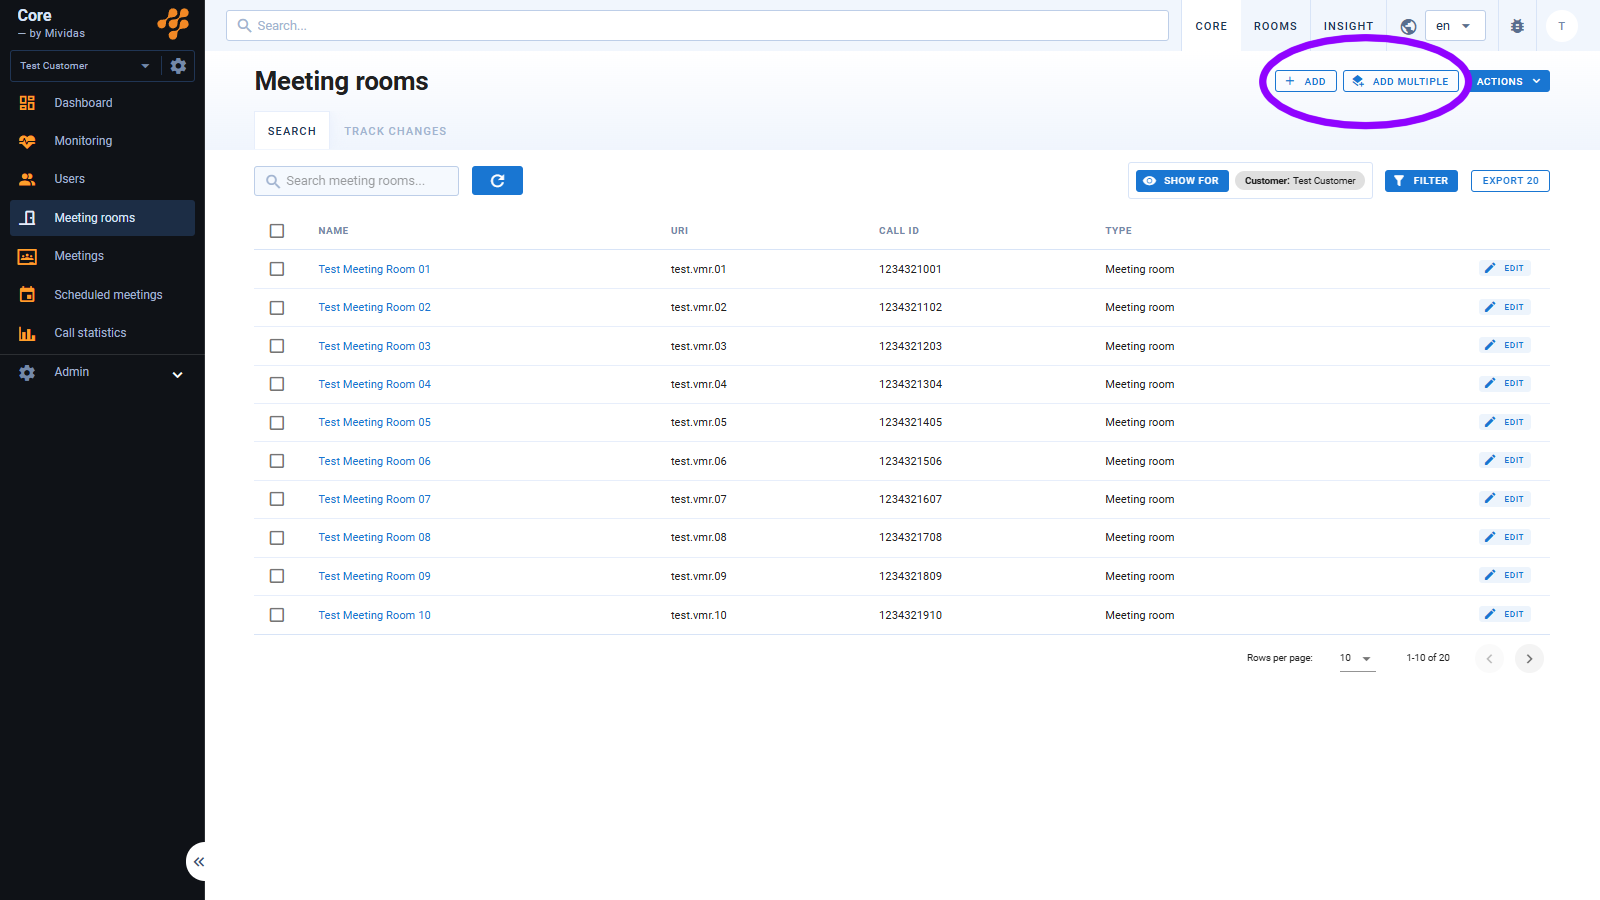
1.7.1. Search

| Page actions | |
|---|---|
| Allows you to manually add a new meeting room. | |
| Allows you to add several meeting rooms, either manually or imported via an Excel file. | |
| (
) Update – Allows you to manually refresh the dashboard. ( ) Documentation – Access relevant documentation. |
| Filters and export | |
|---|---|
| Search for a meeting room by name, URI or call id | |
| Reload the data to apply any changed filters. | |
| Choose to filter the data for a specific server/cluster. | |
| Organization unit: Display meeting rooms based on their organizational unit affiliation.
Meeting type: Display meeting rooms based on their meeting type. Set your choices by clicking |
|
| Exports and downloads the results as an Excel file. # will show the number of currently filtered results.. |
Meeting rooms list

- Name – The name of the meeting room.
- URI – The URI of the meeting room.
- Call ID – The call id of the meeting room.
- Type – Displays the meeting type.
| Option | Description |
|---|---|
| Allows you to modify a range of settings for the meeting room, except for auto-generated rooms where certain settings are non-editable. If there are settings on the meeting room that can not be edited from the quick view, a warning will be displayed with a link to the regular editing page. |
Bulk actions
Selecting one, multiple, or all meeting rooms will show bulk actions:
1.7.2. Track changes

This tab is only visible for CMS.
Get a history of deleted and added virtual meeting rooms based on a date range.
| Page actions | |
|---|---|
| 1. Page refresh (
) allows you to manually refresh the dashboard 2. Access relevant documentation ( ) |
| Filters and export | |
|---|---|
| Choose the start date. | |
| Choose the end date. | |
| Reload the data to apply any changed filters. | |
| Exports and downloads the results as an Excel file. |
Changes list

| Option | Description |
|---|---|
| This tab shows the list of new meeting rooms. | |
| This tab shows the list of deleted meeting rooms. |
- Name/URI – Name and URI of the meeting room.
- Call ID – The call id of the meeting room.
- Owner – The owner of the meeting room.
- Created/Last sync – The date and time of the creation or last sync.
1.7.3. Adding meeting rooms
Page actions
Allows you to manually add a new meeting room.
Allows you to add several meeting rooms, either manually or imported via an Excel file.
1. (
) – Allows you to manually refresh the dashboard
2. (
) – Access relevant documentation.
Add a single meeting room
Start by clicking the button.
Cisco Meeting Server
| Option | Description |
|---|---|
| Name | The name of the meeting room in plain text. |
| Type of room | Select the type of meeting room you would like to create. By default, your options are: Meeting room and Webinar. Settings below may change depending on the chosen meeting type. Below, we will show the details for the meeting type Meeting room.NOTE: For detailed information about creating meeting types and access methods, please see Configure and use custom meeting types and access methods. |
| URI | The meeting room’s URI is usually generated automatically but can also be specified manually if desired. |
| Generate numeric room number | When enabled, the room number is automatically assigned using one of the following options: Random numeric ID – Automatically generates a random numeric ID from within the configured number series. Next numeric ID in numerical order – Generates a numeric ID by selecting the next available number in sequential order. By disabling automation, you can assign a custom numeric ID. |
| Use PIN code | Used if the meeting room should be protected by a PIN code. The code can be generated randomly by clicking ( ) or entered manually. |
| Separate moderator PIN | When enabled, a separate PIN code is created for the meeting room host/moderator, who will have higher privileges in the meeting than regular guest participants. Generate a new PIN by clicking ( ) or enter one manually. |
| Use lobby for guest users | If enabled, guest users will be placed in a lobby until the first moderator/host connects to the meeting. |
| Lock lobby | If enabled, the moderator/host must manually admit participants to the meeting from the lobby. Only visible if lobby is enabled for guest users. |
| Layout | Choose your preferred layout for the meeting room; Automatic, Share space between participants, Speaker only, Speaker with other participants on overlay or Speaker with other participants below, Divided 2x2, Divided 3x3, Split 4x4, Split 5x5, Speaker + 5, Speaker + 7, Speaker + 9, Speaker + auto. |
| Organization unit | Select the organizational affiliation of the meeting room. This affects how statistics are displayed and how meeting rooms are filtered. |
| Owner | Specify whether the meeting room should be associated with a user. Additionally, you can choose to make the owner a member, which can affect rights assignment and visibility in booking tools. |
| Also add owner as member | Adds the owner of the meeting room as a member. This option is filled in by default. |
| Connect to email address | Normally, it is the same as the meeting room’s owner’s email address, but it can also be associated with another email address. |
| Require encryption | Enforces encryption for all connecting participants. |
| Enable chat | Choose if chat should be enabled. Global setting – Uses your global setting from within Cisco Meeting Server. Yes – Chat will be enabled. No – Chat will be disabled. |
| Access to meeting room members only | When enabled, only meeting room members can join, enhancing security. |
| Mute microphone for new participants | When enabled, participants will have their microphones muted upon joining the meeting. |
| Delete by time | A security feature that causes the meeting room to cease to exist at the specified date and time. |
Finish by clicking to create the room or to discard the configuration.
Pexip Infinity
| Option | Description |
|---|---|
| Name | The name of the meeting room in plain text. |
| Description | Give the meeting room a suitable description. |
| Type of room | Select the type of meeting room you would like to create. By default, your options are: Meeting room, Webinar and Test meeting. Settings below may change depending on the chosen meeting type. Below, we will show the details for the meeting type Meeting room.NOTE: For detailed information about creating meeting types and access methods, please see Configure and use custom meeting types and access methods. |
| Host PIN | Set a host PIN code for the meeting room. |
| Moderator layout | Choose the layout for the meeting. If it is a Meeting room, the layout choice applies to all participants. If it is a Webinar, the choice only applies to moderators. |
| Guest connection | Allow guests in the meeting room. |
| Guest PIN | Set a PIN code for guests. The code can be generated randomly by clicking ( ) or entered manually. |
| Guest layout | Choose the layout for guests. Only applies if the meeting type is Webinar. |
| Email address | Choose an email address to be associated with the meeting room. |
| Enable chat | Choose if chat should be enabled. Global setting – Uses your global setting from within Pexip. Yes – Chat will be enabled. No – Chat will be disabled. |
| Organization unit | Choose to associate the meeting rooms to a organizational unit. |
| Delete by time | A security feature where the meeting room ceases to exist at the specified date and time. |
| Alias | Choose how the numeric ID is assigned: Random numeric ID – Automatically generates a random numeric ID from within the configured number series. Next numeric ID in numerical order – Generates a numeric ID by selecting the next available number in sequential order. You can also add more aliases below by typing the chosen alias and an optional description. |
Finish by clicking to create the room or to discard the configuration.
Add/import multiple meeting rooms
Start by clicking the button.
Cisco Meeting Server
| Option | Description |
|---|---|
| Choose some default settings that will apply to all the meeting rooms you are about to create. The options are: Send email – Send a notification email to the provided email address. Number generation: Choose how the room numbers are assigned: either randomly based on the selected number series or as the next available numeric ID after the last added room. Add owner as a member: Automatically adds the owner as a member of that meeting room. |
Each meeting room has the following fields to configure:
- Name – The name of the meeting room.
- Type of room – Select the type of meeting room you would like to create. By default, your options are:
Meeting roomandWebinar.
NOTE: For detailed information about creating meeting types and access methods, please see Configure and use custom meeting types and access methods. - URI – Set the URI for the meeting room. Leave blank to generate automatically, based on your default setting.
- Call ID – Set the Call ID for the meeting room. Leave blank to generate automatically, based on your default setting.
- PIN – Set the PIN code for guests. Click ( ) to generate a random one.
- PIN moderator – Set the PIN code for moderators. Click ( ) to generate a random one.
- Owner (JID) – The owner of the meeting room.
- Email address – Choose an email address to be associated with the meeting room.
- Organization unit – Choose to associate the meeting rooms to a organizational unit.
- Members – Choose member(s) to be added to the meeting room.
Import from Excel
Choose an Excel file to import. The file table does not need to match the form precisely; instead, you map each column in the file to the corresponding column.
Pexip Infinity
| Option | Description |
|---|---|
| Choose some default settings that will apply to all the meeting rooms you are about to create. The options are: Type of meeting room: Virtual meeting room or WebinarSend email: Send a notification email to the provided email address. Number generation: Choose how the room numbers are assigned: either randomly based on the selected number series or as the next available numeric ID after the last added room. |
Each meeting room has the following fields to configure:
- Name – The name of the meeting room.
- Type of room – Select the type of meeting room you would like to create. By default, your options are:
Meeting room,WebinarandTest meeting.
NOTE: For detailed information about creating meeting types and access methods, please see Configure and use custom meeting types and access methods. - Description – Set the URI for the meeting room. Leave blank to generate automatically.
- PIN – Set the moderator PIN code for the meeting room. Click to generate a random one.
- Layout moderators – Choose the type of layout that the moderator(s) should have in the meeting.
- Allow guests – Choose if guests should be allowed.
- Guest PIN – Set the guest PIN code for the meeting room. Click to generate a random one.
- Layout guests – Choose the type of layout that the guests should have in the meeting.
- Primary number alias – Set the Primary number alias for the meeting room. Leave blank to generate automatically.
- Other aliases – Set any other aliases for the meeting room. Leave blank to generate automatically.
- Email address – Choose an email address to be associated with the meeting room.
- Organization unit – Choose to associate the meeting rooms to a organizational unit.
Import from Excel
Choose an Excel file to import. The file table does not need to match the form precisely; instead, you map each column in the file to the corresponding column.
1.7.4. Meeting Room Details

Each meeting room has its own dashboard that provides an overview of the room’s settings and status. The dashboard’s appearance depends on how the room is configured and may, therefore, display more or fewer widgets and other information.
Below the meeting room’s name, there can be one or several status labels showing different parameters that are relevant to each meeting room, visible to give you quick information about the meeting room:
Overview
| Page actions | |
|---|---|
| Takes you to the statistics page for that meeting room. | |
| Allows you to edit the configuration of the meeting room. | |
| 1. (
) Shows the diagnostic information for the meeting room. 2. ( ) Takes you to the API page for that meeting room. 3. ( ) Allows you to manually refresh the dashboard. 4. ( ) Access relevant documentation. 5. Allows you to delete the meeting room. |
If there is currently an active meeting, a notification will be shown.

| Option | Description |
|---|---|
| Takes you to Active Meeting where you can administrate the meeting. | |
| Allows you to end the meeting. |
Cisco Meeting Server
| Option | Description |
|---|---|
 |
SIP: This field displays the SIP address of the meeting room, typically associated with video conferencing systems or clients that use SIP as the standard for video calls. ( ) Copies the SIP address directly from the address field. ( ) Opens a direct link if the operator’s computer has a compatible client installed, such as Cisco Jabber or a VoIP client. |
 |
Web Link: This field displays the web link to the meeting room via a WebRTC client, i.e., the client packaged with the meeting platforms from Cisco and Pexip. The client requires no installation. ( ) Copies the SIP address directly from the address field. ( ) Opens the link in a browser window and connects to the meeting room. |
 |
Web Link Moderator: Just like the previous, this field displays the web link to the meeting room via a WebRTC client, i.e., the client packaged with the meeting platforms from Cisco and Pexip. The client requires no installation. Difference here is that this link gives a participant moderator/host privilegies in the meeting. ( ) Copies the SIP address directly from the address field. ( ) Opens the link in a browser window and connects to the meeting room. |
| Call Participants: Activates the meeting room by calling a user or a conference system. | |
| Enable Meeting: Activates the meeting room without adding participants. Once the meeting room is activated, an operator can call participants and manage/monitor the meeting. |
| Page widgets | Description |
|---|---|
 |
PIN Number: This widget indicates whether the meeting room has a PIN enabled for participants in general and whether a specific PIN is configured for the meeting’s moderator/host. |
 |
Member: This widget displays the number of members in the meeting room, not to be confused with active participants. If the meeting room is configured for members only, no other participants will be able to join. |
 |
Chat: Enables the chat function for Cisco Meeting Server (CMS). This feature is not supported by Pexip Infinity. |
 |
Microphone: This widget indicates whether participants’ microphones are active or muted when the meeting starts. |
 |
Encryption: This widget indicates whether ‘force encryption’ is configured for the meeting room. This means no participants can join without encryption being used. This feature applies only to Cisco Meeting Server (CMS). |
 |
Auto Delete: Displays the date and time when the meeting room will be automatically deleted. This is a useful feature for both record maintenance and security. |
| Page details | Description |
|---|---|
 |
Information: This section provides brief details on the following: – The organizational unit the meeting room is associated with – The owner of the meeting room – URI – Call ID |
 |
Additional connection methods: If there are any additional access methods configured for this space, information about these will be shown here. |
  |
Automatic Dial-Out: Used when one or more video addresses should be called automatically as soon as the meeting is activated by the first participant or an operator. When using Mividas Rooms, conference systems can be added directly from the address book. Also commonly referred to as ‘burst calling’ or ‘burst dialing’.Click to open the add form. |
 |
Call History: Displays the most recent calls in the meeting room. The information shown includes when the meeting started and ended, the meeting duration, and the number of participants. The debug button provides additional information about the meeting participants, logs, and other relevant details for troubleshooting. The link button ( ) redirects to the debug page for all meeting details. |
Pexip Infinity
| Option | Description |
|---|---|
|
SIP: This field displays the SIP address of the meeting room, typically associated with video conferencing systems or clients that use SIP as the standard for video calls. ( ) Copies the SIP address directly from the address field. ( ) Opens a direct link if the operator’s computer has a compatible client installed, such as Cisco Jabber or a VoIP client. |
|
Web Link: This field displays the web link to the meeting room via a WebRTC client, i.e., the client packaged with the meeting platforms from Cisco and Pexip. The client requires no installation. ( ) Copies the SIP address directly from the address field. ( ) Opens the link in a browser window and connects to the meeting room. |
|
Web Link Moderator: Just like the previous, this field displays the web link to the meeting room via a WebRTC client, i.e., the client packaged with the meeting platforms from Cisco and Pexip. The client requires no installation. Difference here is that this link gives a participant moderator/host privilegies in the meeting. ( ) Copies the SIP address directly from the address field. ( ) Opens the link in a browser window and connects to the meeting room. |
| Call Participants: Activates the meeting room by calling a user or a conference system. |
| Page widgets | Description |
|---|---|
 |
PIN code participant: Displays the current PIN code that should be used by guest users. |
 |
PIN moderator: Displays the current PIN code that should be used by moderators. |
 |
Does not allow guests: This indicates whether there is; either no PIN for guests or no PIN at all. This means that everyone who connects will be a moderator. |
 |
Layout: Shows what the layout is for the meeting room. |
|
Auto Delete: Displays the date and time when the meeting room will be automatically deleted. This is a useful feature for both record maintenance and security. |
| Page details | Description |
|---|---|
 |
Information: This section provides brief details on the following: – Description of the meeting room. – Email address of the owner. – Which customer it belongs to. – Which Organization unit it belongs to. |
 |
Alias: Displays the different aliases available for the meeting room. |
 |
Automatic Dial-Out: Used when one or more video addresses should be called automatically as soon as the meeting is activated by the first participant or an operator. When using Mividas Rooms, conference systems can be added directly from the address book. Also commonly referred to as ‘burst calling’ or ‘burst dialing’.Click to open the add form. |
|
Call History: Displays the most recent calls in the meeting room. The information shown includes when the meeting started and ended, the meeting duration, and the number of participants. The debug button provides additional information about the meeting participants, logs, and other relevant details for troubleshooting. The link button ( ) redirects to the debug page for all meeting details. |
Members
This view is available for CMS only.
| Page actions | |
|---|---|
| Allows you to add members to the meeting room. | |
| 1. (
) Allows you to manually refresh the dashboard. 2. ( ) Access relevant documentation. |
Invitation
Here you can view and test the available email templates for this meeting room.
| Page actions | |
|---|---|
| 1. (
) Allows you to manually refresh the dashboard. 2. ( ) Access relevant documentation. |
Note that the send invitation is primarily for testing the message template and will e.g. not be added to the recipient’s calendar.
| Option | Description |
|---|---|
| Select message template – Choose one of the pre-defined templates. | |
| Subject – Shows the pre-defined subject of the template. | |
| Email addresses – Enter email addresses to which you wish to send a test email. | |
|
Mail content – Displays the content of the pre-defined email template you have chosen. |
| Sent from – Displays the “from” information of the email. | |
|
Dial information – Displays the room number, SIP URI, web Link and moderator web link for the meeting room. |
|
PIN codes – Displays the guest and moderator PIN for the meeting room. |
| Send email(s) based on the above chosen options by clicking or click your email client to open your email client with the above chosen options ready to send. |
This page will become active when the meeting room is active with participants.
| Page actions | |
|---|---|
| Used to call participants. Select a conference system from the list or enter a manual address (SIP, H.323, IP). More details here. | |
| Ends the meeting for all participants, after confirming the action. | |
| 1. (
) Takes you to the API page for that meeting room. 2. ( ) Allows you to manually refresh the dashboard. 3. ( ) Access relevant documentation. |
Calling participants
Click the button to add a new participant. The process will vary slightly depending on whether the active meeting is for Cisco Meeting Server or Pexip Infinity.
Cisco Meeting Server
| Option | Description |
|---|---|
| Select meeting room | Search and select the meeting room to use for the meeting. |
| Call address | Enter the address you wish to connect to. |
| Layout | Choose your preferred layout for the meeting; Automatic, Share space between participants, Speaker only, Speaker with other participants on overlay or Speaker with other participants below. |
| Click to start the meeting. |
Pexip Infinity
| Option | Description |
|---|---|
| Select meeting room | Search and select the meeting room to use for the meeting. |
| Call address | Enter an address you wish to connect to. This can be H.323, MS-SIP, SIP, RTMP, Google Meet or MS Teams. |
| Moderator | Choose if the participant should be a moderator. |
| System location | Choose the outgoing location, from within Pexip, for the call. |
| Automatic routing | Choose if automatic routing should be used, or if the outgoing call is one of the following; H.323, MS-SIP, SIP, RTMP, Google Meet or MS Teams. |
| Video and audio | Choose media for the call; Audio only, Main video + presentation, Video only, Streaming. |
| Click to start the meeting. |
Meeting controls
| Option | Description |
|---|---|
| SIP – This field displays the SIP address of the meeting room, typically associated with video conferencing systems or clients that use SIP as the standard for video calls.
(
) Copies the SIP address directly from the address field. |
|
| Web Link – This field displays the web link to the meeting room via a WebRTC client, i.e. the client packaged with the meeting platforms from Cisco and Pexip. The client requires no installation.
(
) Copies the SIP address directly from the address field. |
|
 |
Participants – Shows the total number of active participants. |
| The blue banner displays how long the meeting have been going on for as well as buttons with actions that will apply for all participants.
Mutes the video for all participants. |
Participant list

- ( ) – Participant status symbol.
- ( ) – The symbol indicates that the participant is sharing their screen.
- Participants – Displays all participants by name and connection type/system address.
- Length – Displays how long they have been connected.
- Host – Displays if they are a host or not. You can also change this setting here by using the button ( ).
- Layout (CMS only) – Choose what layout to display to the participant, if supported by the participating system/client.
- Video (CMS only) – Displays if their video is active or not. You can also change this setting here by using the button ( ).
- Microphone – Displays if their microphone is active or not. You can also change this setting here by using the button ( ).
Additional notes
Additional notes on virtual meeting rooms and meeting control:
- If a meeting room is configured to automatically call one or more participants and/or conference systems, these will be dialed as soon as an operator or a participant “triggers” the meeting room. For example, when you as an operator activate a meeting room by calling conference system A, conference systems B and C will also be dialed immediately if they are configured for automatic dialing.
- Keep in mind that automatic dialing can be disruptive to operations if someone joins a meeting room with this feature enabled to test the connection or calls in earlier than the scheduled meeting time. This could interfere with other ongoing meetings where these conference systems are already participating.
- For privacy reasons, avoid monitoring and managing ongoing meetings without a clear purpose or assignment. Familiarize yourself with your organization’s policies and guidelines regarding applicable restrictions.
- Ensure proper record maintenance to prevent meeting rooms from remaining active unnecessarily. For example, use the automatic deletion feature to remove rooms at a specified time.
- Make it a habit to always secure meeting rooms with at least a PIN code and update the PIN periodically.
- Users can be assigned static meeting rooms and self-manage them in the Mividas Meeting Portal. For example, they can update PIN codes and add or remove members from the meeting room. The Mividas Meeting Portal also allows enforcing PIN codes to reduce the risk of having completely open meeting rooms.
1.7.4.1. Overview

Page actions
Takes you to the statistics page for that meeting room.
Allows you to edit the configuration of the meeting room.
(
) Diagnostics – Display diagnostic information for the meeting room.
(
) API – Takes you to the API page for that meeting room.
(
) Update – Allows you to manually refresh the dashboard.
(
) Documentation – Access relevant documentation.
– Delete the meeting room.
Active meeting
If there is an active meeting, a notification will appear:
| Option | Description |
|---|---|
| Takes you to Active Meeting where you can administrate the meeting. | |
| Allows you to end the meeting. |
Cisco Meeting Server
| Option | Description |
|---|---|
|
SIP: This field displays the SIP address of the meeting room, typically associated with video conferencing systems or clients that use SIP as the standard for video calls. ( ) Copies the SIP address directly from the address field. ( ) Opens a direct link if the operator’s computer has a compatible client installed, such as Cisco Jabber or a VoIP client. |
|
Web Link: This field displays the web link to the meeting room via a WebRTC client, i.e., the client packaged with the meeting platforms from Cisco and Pexip. The client requires no installation. ( ) Copies the SIP address directly from the address field. ( ) Opens the link in a browser window and connects to the meeting room. |
|
Web Link Moderator: Just like the previous, this field displays the web link to the meeting room via a WebRTC client, i.e., the client packaged with the meeting platforms from Cisco and Pexip. The client requires no installation. Difference here is that this link gives a participant moderator/host privilegies in the meeting. ( ) Copies the SIP address directly from the address field. ( ) Opens the link in a browser window and connects to the meeting room. |
| Call Participants: Activates the meeting room by calling a user or a conference system. | |
| Enable Meeting: Activates the meeting room without adding participants. Once the meeting room is activated, an operator can call participants and manage/monitor the meeting. |
| Page widgets | Description |
|---|---|
|
PIN Number: This widget indicates whether the meeting room has a PIN enabled for participants in general and whether a specific PIN is configured for the meeting’s moderator/host. |
|
Member: This widget displays the number of members in the meeting room, not to be confused with active participants. If the meeting room is configured for members only, no other participants will be able to join. |
|
Chat: Enables the chat function for Cisco Meeting Server (CMS). This feature is not supported by Pexip Infinity. |
|
Microphone: This widget indicates whether participants’ microphones are active or muted when the meeting starts. |
|
Encryption: This widget indicates whether ‘force encryption’ is configured for the meeting room. This means no participants can join without encryption being used. This feature applies only to Cisco Meeting Server (CMS). |
|
Auto Delete: Displays the date and time when the meeting room will be automatically deleted. This is a useful feature for both record maintenance and security. |
| Page details | Description |
|---|---|
|
Information: This section provides brief details on the following: – The organizational unit the meeting room is associated with – The owner of the meeting room – URI – Call ID |
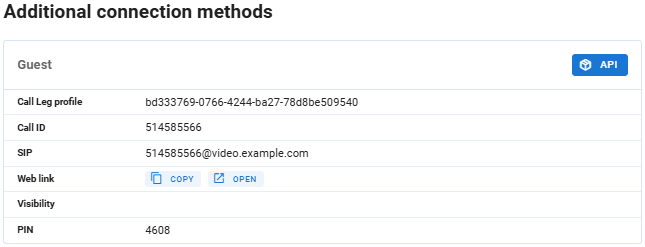 |
Additional connection methods: Each available access method will have its own widget that displays information about it. |
|
Automatic Dial-Out: Used when one or more video addresses should be called automatically as soon as the meeting is activated by the first participant or an operator. When using Mividas Rooms, conference systems can be added directly from the address book. Also commonly referred to as ‘burst calling’ or ‘burst dialing’.Click to open the add form. |
|
Call History: Displays the most recent calls in the meeting room. The information shown includes the start and end times, the meeting duration, and the number of participants. The debug button provides additional information about the meeting participants, logs, and other relevant details for troubleshooting. The link button ( ) redirects to the debug page for all meeting details. |
Pexip Infinity
| Option | Description |
|---|---|
|
SIP: This field displays the SIP address of the meeting room, typically associated with video conferencing systems or clients that use SIP as the standard for video calls. ( ) Copies the SIP address directly from the address field. ( ) Opens a direct link if the operator’s computer has a compatible client installed, such as Cisco Jabber or a VoIP client. |
|
Web Link: This field displays the web link to the meeting room via a WebRTC client, i.e., the client packaged with the meeting platforms from Cisco and Pexip. The client requires no installation. ( ) Copies the SIP address directly from the address field. ( ) Opens the link in a browser window and connects to the meeting room. |
|
Web Link Moderator: Just like the previous, this field displays the web link to the meeting room via a WebRTC client, i.e., the client packaged with the meeting platforms from Cisco and Pexip. The client requires no installation. Difference here is that this link gives a participant moderator/host privilegies in the meeting. ( ) Copies the SIP address directly from the address field. ( ) Opens the link in a browser window and connects to the meeting room. |
| Call Participants: Activates the meeting room by calling a user or a conference system. |
| Page widgets | Description |
|---|---|
|
PIN code participant: Displays the current PIN code that should be used by guest users. |
|
PIN moderator: Displays the current PIN code that should be used by moderators. |
|
Does not allow guests: This indicates whether there is; either no PIN for guests or no PIN at all. This means that everyone who connects will be a moderator. |
|
Layout: Shows what the layout is for the meeting room. |
|
Auto Delete: Displays the date and time when the meeting room will be automatically deleted. This is a useful feature for both record maintenance and security. |
| Page details | Description |
|---|---|
|
Information: This section provides brief details on the following: – Description of the meeting room. – Email address of the owner. – Which customer it belongs to. – Which Organization unit it belongs to. |
|
Alias: Displays the different aliases available for the meeting room. |
|
Additional connection methods: Each available access method will have its own widget that displays information about it. |
|
Automatic Dial-Out: Used when one or more video addresses should be called automatically as soon as the meeting is activated by the first participant or an operator. When using Mividas Rooms, conference systems can be added directly from the address book. Also commonly referred to as ‘burst calling’ or ‘burst dialing’.Click to open the add form. |
|
Call History: Displays the most recent calls in the meeting room. The information shown includes when the meeting started and ended, the meeting duration, and the number of participants. The debug button provides additional information about the meeting participants, logs, and other relevant details for troubleshooting. The link button ( ) redirects to the debug page for all meeting details. |
1.7.4.2. Members

This view is available for CMS only.
| Page actions | |
|---|---|
| Allows you to add members to the meeting room. | |
| 1. (
) Allows you to manually refresh the dashboard. 2. ( ) Access relevant documentation. |

- Member – Displays the name of the member.
- Rights – Displays the member’s current rights. If it’s green, it means that the user has that permission.
- – The user is allowed to remove the meeting room.
- – The user is allowed to add and remove members of the meeting room.
- – The user is allowed to change the name of the meeting room.
- – The user is allowed to change the URI of the meeting room.
- – The user is allowed to change the call id of the meeting room.
- – The user is allowed to change the PIN codes of the meeting room.
- – The user is allowed to remove themselves as members of the meeting room.
- – The user is a member of this room and is allowed to schedule a meeting in this room from the Mividas Meeting Portal and Outlook add-in.
- – The user is allowed to change the scope of access methods
- – The user is allowed to control camera and audio for the meeting room, e.g., muting a participant’s microphone.
1.7.4.3. Invitation

Here you can view and test the available email templates for this meeting room.
| Page actions | |
|---|---|
| 1. (
) Allows you to manually refresh the dashboard. 2. ( ) Access relevant documentation. |
Note that the send invitation is primarily for testing the message template and will e.g. not be added to the recipient’s calendar.
| Option | Description |
|---|---|
| Select message template – Choose one of the pre-defined templates. | |
| Subject – Shows the pre-defined subject of the template. | |
| Email addresses – Enter email addresses to which you wish to send a test email. | |
|
Mail content – Displays the content of the pre-defined email template you have chosen. |
| Sent from – Displays the “from” information of the email. | |
|
Dial information – Displays the room number, SIP URI, web Link and moderator web link for the meeting room. |
|
PIN codes – Displays the guest and moderator PIN for the meeting room. |
| Send email(s) based on the above chosen options by clicking or click your email client to open your email client with the above chosen options ready to send. |
1.7.4.4. Active meeting

This page will become active when the meeting room is active with participants.
| Page actions | |
|---|---|
| Used to call participants. Select a conference system from the list or enter a manual address (SIP, H.323, IP). More details here. | |
| Ends the meeting for all participants, after confirming the action. | |
| 1. (
) Takes you to the API page for that meeting room. 2. ( ) Opens up debug information for the meeting. 3. ( ) Allows you to manually refresh the dashboard. 4. ( ) Access relevant documentation. |
Calling participants
Click the button to add a new participant. The process will vary slightly depending on whether the active meeting is for Cisco Meeting Server or Pexip Infinity.
Cisco Meeting Server
| Option | Description |
|---|---|
| Call address | Enter the address you wish to connect to, or select one of your existing systems by clicking . |
| Name | Set the name that should be displayed for this participant. (optional)
NOTE: This will override any name set by the participant you are connecting to. |
| Moderator | Select if the participant should be connected as a moderator. |
| Layout | Choose your preferred layout for the meeting; Automatic, Share space between participants, Speaker only, Speaker with other participants on overlay or Speaker with other participants below, Divided 2x2, Divided 3x3, Split 4x4, Split 5x5, Speaker + 5, Speaker + 7, Speaker + 9, Speaker + auto. |
| DTMF sequence | Enter a sequence that you wish to send to the address you are calling upon getting connected. |
| Click to call the participant. |
Pexip Infinity
| Option | Description |
|---|---|
| From | This will be pre-filled with information for the current active meeting. |
| Call address | Enter an address you wish to connect to. This can be H.323, MS-SIP, SIP, RTMP, Google Meet, MS Teams or RTMP. Or select one of your existing systems by clicking
. |
| Name | Set the name that should be displayed for this participant. (optional)
NOTE: This will override any name set by the participant you are connecting to. |
| Moderator | Choose if the participant should be a moderator. |
| System location | Choose the outgoing location, from within Pexip, for the call. |
| Automatic routing | Choose if automatic routing should be used, or if the outgoing call is one of the following; H.323, MS-SIP, SIP, RTMP, Google Meet or MS Teams. |
| Video and audio | Choose media for the call; Audio only, Main video + presentation, Video only, Streaming. |
| Click to call the participant. |
Meeting controls
Cisco Meeting Server
Meeting information and bulk actions

| Option | Description |
|---|---|
| Displays the start date and time of the meeting. | |
| Displays the current duration of the meeting. | |
| SIP – This field displays the SIP address of the meeting room, typically associated with video conferencing systems or clients that use SIP as the standard for video calls.
(
) Copies the SIP address. |
|
| Web Link – This field displays the web link to the meeting room via a WebRTC client, i.e. the client packaged with the meeting platforms. The client requires no installation.
(
) Copies the link. |
|
| Web Link Moderator – This field displays the moderator web link to the meeting room via a WebRTC client, i.e. the client packaged with the meeting platforms. The client requires no installation.
(
) Copies the link. |
|
| Participants – Shows the total number of active participants. | |
| Send notification – Allows you to write a message and set its duration. The message will be shown for all meeting participants. | |
| Turn off video – Mutes the video for all participants.
( ) – Unmutes the video for all participants. |
|
| Mute microphone – Mutes the microphone for all participants.
( ) – Unmutes the microphone for all participants. |
|
| Lock meeting – Locks the meeting room, so no more participants can join.
( ) – Unlocks the meeting if it has been locked. |
Lobby and filters

| Option | Description |
|---|---|
| If the lobby is activated, this becomes visible.
– Let everyone in the lobby into the meeting. |
|
| Connected | Display only connected participants. |
| Calling | Display only participants that are currently being called. |
| Moved | Display only participants who are currently calling. |
| Disconnected | Display only disconnected participants. |
| Presents | Display only participants who are currently presenting. |
| Important | Display only participants who have been moved. |
| Raised hand | Display only participants who are set as important. |
Participant list

- Status – Display different statuses of the participant:
- ( ) – The participant is connected.
- ( ) – The participant has been moved into the meeting and is connected.
- ( ) – The participant has been moved to another meeting and is disconnected from this meeting. Clicking the icon takes you to the meeting that the participant has been moved to.
- ( ) – The participant has been disconnected.
- ( ) – The participant is currently being called.
- ( ) – The participant is currently not marked as important ; clicking the icon makes that participant important .
- ( ) – The participant is currently marked as important ; clicking the icon removes the participant’s important status.
- ( ) – The participant has not raised their hand. Clicking the icon will raise the hand for the participant.
- ( ) – The participant has their hand raised. Clicking the icon will remove the participant’s raised hand.
- ( ) – The participant is currently not sharing any presentation.
- ( ) – The participant is currently sharing a presentation.
- Participants – Displays all participants by name and connection type/system address.
- Length – Displays how long the participant has been connected.
- Moderator – Displays whether the participant is a moderator or not.
- ( ) – The participant is currently not a moderator. Clicking the icon will make them a moderator.
- ( ) – The participant is currently a moderator. Clicking the button will remove the participant as a moderator.
- Layout – Choose what layout to display to the participant, if supported by the participating system/client.
- Video – Displays if the participant’s video is active or not.
- ( ) – The participant’s video is currently turned off. Clicking the icon will turn on the participant’s video.
- ( ) – The participant’s video is currently turned on. Clicking the icon will turn off the participant’s video.
- Microphone – Displays if their microphone is active or not.
- ( ) – The participant’s microphone is currently turned off. Clicking the icon will turn on the participant’s microphone.
- ( ) – The participant’s microphone is currently turned on. Clicking the icon will turn off the participant’s microphone.
Bulk actions

You can apply bulk actions to all selected participants by selecting one or more from the participant list.
Pexip
Meeting information and bulk actions
| Option | Description |
|---|---|
| Displays the start date and time of the meeting. | |
| Displays the current duration of the meeting. | |
| SIP – This field displays the SIP address of the meeting room, typically associated with video conferencing systems or clients that use SIP as the standard for video calls.
(
) Copies the SIP address. |
|
| Web Link – This field displays the web link to the meeting room via a WebRTC client, i.e. the client packaged with the meeting platforms. The client requires no installation.
(
) Copies the link. |
|
| Web Link Moderator – This field displays the moderator web link to the meeting room via a WebRTC client, i.e. the client packaged with the meeting platforms. The client requires no installation.
(
) Copies the link. |
|
| Participants – Shows the total number of active participants. | |
| Send notification – Allows you to write a message and set its duration. The message will be shown for all meeting participants. | |
| Mute microphone – Mutes the microphone for all participants.
( ) – Unmutes the microphone for all participants. |
|
| Lock meeting – Locks the meeting room, so no more participants can join.
( ) – Unlocks the meeting if it has been locked. |
|
| Change layout – Change the layout for all participants, if supported by the participating system/client. |
Lobby and filters

| Option | Description |
|---|---|
| If the lobby is activated, this becomes visible.
– Let everyone in the lobby into the meeting. |
|
| Connected | Display only connected participants. |
| Calling | Display only participants that are currently being called. |
| Moved | Display only participants who are currently calling. |
| Disconnected | Display only disconnected participants. |
Participant list

- Status – Display different statuses of the participant:
- ( ) – The participant is connected.
- ( ) – The participant has been moved into the meeting and is connected.
- ( ) – The participant has been moved to another meeting and is disconnected from this meeting. Clicking the icon takes you to the meeting that the participant has been moved to.
- ( ) – The participant has been disconnected.
- ( ) – The participant is currently being called.
- ( ) – The participant is currently not sharing any presentation.
- ( ) – The participant is currently sharing a presentation.
- Participants – Displays all participants by name and connection type/system address.
- Length – Displays how long the participant has been connected.
- Host – Displays whether the participant is a moderator or not.
- ( ) – The participant is currently not a moderator. Clicking the icon will make them a moderator.
- ( ) – The participant is currently a moderator. Clicking the button will remove the participant as a moderator.
- Microphone – Displays if their microphone is active or not.
- ( ) – The participant’s microphone is currently turned off. Clicking the icon will turn on the participant’s microphone.
- ( ) – The participant’s microphone is currently turned on. Clicking the icon will turn off the participant’s microphone.
Bulk actions

You can apply bulk actions to all selected participants by selecting one or more from the participant list.
Additional notes
Additional notes on virtual meeting rooms and meeting control:
- If a meeting room is configured to automatically call one or more participants and/or conference systems, these will be dialed as soon as a moderator or a participant “triggers” the meeting room. For example, when you as an moderator activate a meeting room by calling conference system A, conference systems B and C will also be dialed immediately if they are configured for automatic dialing.
- Keep in mind that automatic dialing can be disruptive to operations if someone joins a meeting room with this feature enabled to test the connection or calls in earlier than the scheduled meeting time. This could interfere with other ongoing meetings where these conference systems are already participating.
- For privacy reasons, avoid monitoring and managing ongoing meetings without a clear purpose or assignment. Familiarize yourself with your organization’s policies and guidelines regarding applicable restrictions.
- Ensure proper record maintenance to prevent meeting rooms from remaining active unnecessarily. For example, use the automatic deletion feature to remove rooms at a specified time.
- Make it a habit to always secure meeting rooms with at least a PIN code and update the PIN periodically.
- Users can be assigned static meeting rooms and self-manage them in the Mividas Meeting Portal. For example, they can update PIN codes and add or remove members from the meeting room. The Mividas Meeting Portal also allows enforcing PIN codes to reduce the risk of having completely open meeting rooms.
1.8. Meetings
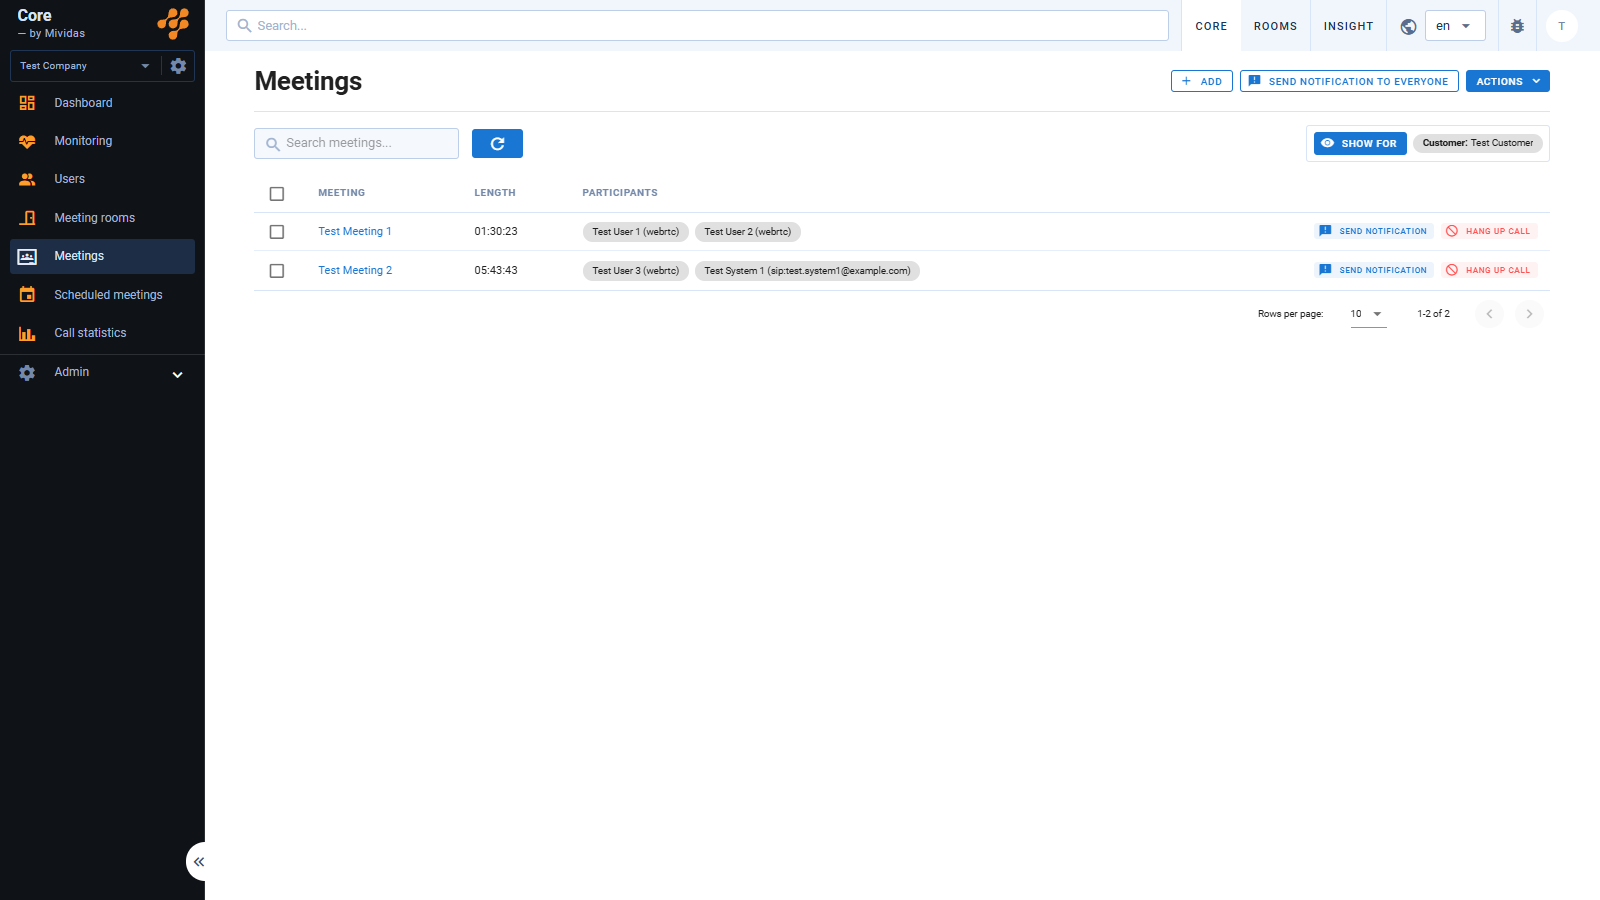
This page displays active meetings and enables them to be managed in real time. The page provides an overview of all current meetings for the selected customer or tenant. If there are numerous meetings, you can use the search field to locate a specific one and adjust the number of meetings displayed per page. The overview includes the meeting name, duration, and current participants.
Search and filter

| Search and filter | |
|---|---|
| Search for an ongoing meeting by name. | |
| Reload the data to apply any changed filters. | |
| Choose to filter the data for a specific customer or cluster. |
Meeting list

- Meeting – The name of the meeting. Click on it to take you to Active meeting.
- Length – The amount of time that the meeting has been going for.
- Participants – A list of participants in the meeting, with their name and connection type. If all participants cannot fit in the column, the remaining are summarized as a count, e.g.
[+3].
Start a meeting
By clicking in the top right corner, you can start a meeting in a meeting room.
Cisco Meeting Server
Pexip Infinity
Control a meeting
Click on a meeting to view meeting details and access meeting controls. Read more about how to use these controls under Active meeting.
Additional notes
Additional notes on virtual meeting rooms and meeting control:
- If a meeting room is configured to automatically call one or more participants and/or conference systems, these will be dialed as soon as an operator or a participant “triggers” the meeting room. For example, when you as an operator activate a meeting room by calling conference system A, conference systems B and C will also be dialed immediately if they are configured for automatic dialing.
- Keep in mind that automatic dialing can be disruptive to operations if someone joins a meeting room with this feature enabled to test the connection or calls in earlier than the scheduled meeting time. This could interfere with other ongoing meetings where these conference systems are already participating.
- For privacy reasons, avoid monitoring and managing ongoing meetings without a clear purpose or assignment. Familiarize yourself with your organization’s policies and guidelines regarding applicable restrictions.
- Ensure proper record maintenance to prevent meeting rooms from remaining active unnecessarily. For example, use the automatic deletion feature to remove rooms at a specified time.
- Make it a habit to always secure meeting rooms with at least a PIN code and update the PIN periodically.
- Users can be assigned static meeting rooms and self-manage them in the Mividas Portal. For example, they can update PIN codes and add or remove members from the meeting room. The Mividas Portal also allows enforcing PIN codes to reduce the risk of having completely open meeting rooms.
1.9. Schedule meetings

Using this page, an operator can get an overview of the organization’s scheduled meetings, both past and upcoming, depending on the selected time range. The search field can be used to search for meetings, as the number of scheduled meetings can be very large.
Meetings are primarily booked via the Mividas Meeting Portal or the Mividas Outlook add-in/plug-in, but they can also be scheduled directly in Mividas Core.
| Page actions | |
|---|---|
| Press this button to add a scheduled meeting. | |
| 1. Page refresh (
) allows you to refresh the user list manually. 2. Access relevant documentation ( ) |
| Filters and exports | |
|---|---|
| Search for a scheduled meeting by title. | |
| Set the From time for the filter. | |
| Set the To time for the filter. | |
| 1. Meeting room – Filter by the meeting’s name. Since Mividas scheduling supports recurring meetings, the same meeting name may appear multiple times in the list. This also applies when booking static meeting rooms, where the room name remains consistent over time. 2. Find created by – Filter meetings created by a specific user. 3. Organization unit – Display meetings belonging to a specific organizational unit. 4. Select system – Display meetings where one or more room systems are booked. 5. Active only – Check to only search for active meetings. 6. View all customers – Available only to super admins in a multi-tenant environment, allowing cross-tenant viewing of scheduled meetings. Apply your chosen filter by clicking |
Add a scheduled meeting
This feature is primarily intended for testing or troubleshooting, as these meetings cannot be edited.
For booking meetings to support users and organizations, it is recommended to use the ‘Schedule on-behalf’ function available in the Mividas Meeting Portal. This feature allows support staff to book meetings on behalf of another user.
Cisco Meeting Server
| Option | Description |
|---|---|
| Title | The name of the meeting. |
| Start time | The date and time when the meeting will start. |
| End time | The daie and time when the meeting will end. |
| Use PIN code | Choose If the meeting should be protected by a PIN code. |
| Use lobby for guest users | Creates a PIN code for the meeting’s host/moderator. |
| Separate moderator PIN | Sets the moderator PIN. |
| Lock lobby | Requires a moderator to admit participants from the lobby manually. |
| Owner | The user associated with the booking. |
| Auto dial-out | Automatically dials room systems when the meeting starts. |
| Recurring meeting | Recurring meetings can be created using syntax that is compliant with the iCalendar RFC 5545 standard. E.g. RRULE:FREQ=WEEKLY;COUNT=2 |
| Webinar | Uses the webinar meeting profile, where connected guests do not have active cameras or microphones. |
Pexip Infinity
| Option | Description |
|---|---|
| Title | The name of the meeting. |
| Start time | The date and time when the meeting will start. |
| End time | The daie and time when the meeting will end. |
| Use PIN code | Choose If the meeting should be protected by a PIN code. |
| Use lobby for guest users | Creates a PIN code for the meeting’s host/moderator. |
| Separate moderator PIN | Sets the moderator PIN. |
| Owner | The user associated with the booking. |
| Auto dial-out | Automatically dials room systems when the meeting starts. |
| Recurring meeting | Recurring meetings can be created using syntax that is compliant with the iCalendar RFC 5545 standard. E.g. RRULE:FREQ=WEEKLY;COUNT=2 |
| Webinar | Uses the webinar meeting profile, where connected guests do not have active cameras or microphones. |
Meeting list

- Title: Displays a meeting icon; ( ) is a one-time meeting and ( ) is a recurring meeting. It also shows the name of the meeting and who booked it. Clicking on the meeting name reveals more details about the booking.
- Customer (only multi-tenant): Displays the customer of the meeting.
- Systems: Shows information about room systems, if they are included in the booking.
- Status: Displays the following statuses for scheduled meetings:
- The meeting has been held.
- The meeting has been deprovisioned.
- The meeting has been cancelled.
- The meeting is scheduled and upcoming.
- The meeting has started.
- In call: Indicates if the meeting has active participants.
- ( ) No participant is active.
- ( ) At least one participant is active.
- Start time: The date and time of the meeting start.
- End time: The date and time of the meeting end.
- Type: Displays the type of meeting, as Mividas scheduling tools support defining various meeting types.
1.9.1. Scheduled meeting details

Each scheduled meeting has its own dashboard that provides an overview of the meeting’s settings and status. The dashboard’s appearance depends on how the meeting is configured and may, therefore, display more or fewer widgets and other information.
Below the meeting’s name, there can be one or several key details visible to give you quick information about the meeting room:
1.9.1.1. Overview

| Page actions | |
|---|---|
| Press this button to cancel the meeting. | |
| 1. Diagnostics (
) Shows the diagnostic information of the meeting. 2. Page refresh ( ) allows you to refresh the user list manually. 3. Access relevant documentation ( ) |
Active meeting
If there is currently an active meeting, a notification will be shown.
| Option | Description |
|---|---|
| Takes you to Active Meeting where you can administrate the meeting. | |
| Allows you to end the meeting. |
Overview
| Page options | Description |
|---|---|
| SIP – This field displays the SIP address of the meeting.
(
) Copies the SIP address directly from the address field. |
|
| Web Link – This field displays the web link to the meeting room via a WebRTC client, i.e. the client packaged with the meeting platforms from Cisco and Pexip. The client requires no installation.
(
) Copies the SIP address directly from the address field. |
|
| Web Link Moderator: Like the previous field, this field displays the web link to the meeting room via a WebRTC client, i.e. the client packaged with the meeting platforms from Cisco and Pexip. The client requires no installation. The difference here is that this link gives a participant moderator/host privileges in the meeting.
(
) Copies the SIP address directly from the address field. |
|
| Takes you to the meeting room of the meeting. |
| Page widgets | Description |
|---|---|
 |
This widget will display the status of the meeting, either Ongoing, Completed, Derovisioned, Cancelled, Ongoing or Upcoming. |
 |
Displays the date and time of when the meeting starts and when it ends. |
 |
Displays the PIN codes for the meeting, if any. |
 |
Displays the date and time of when this meeting was created and when it was first activated. |
 |
Displays the date and time when the meeting was provisioned and if applicable, also when it was deprovisioned. |
 |
Displays the total number of calls made in to this meeting. |
 |
Displays the total number of automatic dial-out and systems. |
| Page details | Description |
|---|---|
 |
Displays more information about the meeting.
Scheduled by: Shows who scheduled the meeting. |
 |
If it is a recurring meeting, you can see this calendar with all the meetings in the series. Clicking on one of the meetings in the calendar will take you to that specific occurrence meeting page. If you click the List the meetings will be displayed in list format instead. |
 |
If you choose to show the recurring meeting information as a list, this is what will be displayed. Clicking it will take you to that specific occurrence meeting page. |
| Displays the Recurrence ID of the meeting. | |
 |
Displays the recurring rule in the format of; iCalendar RFC5545
allows you to copy the full rule. |
1.9.1.2. Automatic dial-out

| Page actions | |
|---|---|
| 1. Page refresh (
) allows you to refresh the user list manually. 2. Access relevant documentation ( ) |
On this page you can find information about systems that have been added for automatic dial-out.
| Widget | Description |
|---|---|
| Systems within Mividas Rooms that are scheduled. | |
| Calls made to the meeting. | |
 |
All scheduled addresses, includes systems and external addresses. |
1.9.1.3. Calls

| Page actions | |
|---|---|
| 1. Page refresh (
) allows you to refresh the user list manually. 2. Access relevant documentation ( ) |
On this page you can find all the calls made to this meeting, grouped by meetings. E.g. if 3 participants was connected at the same time to a meeting, they will be grouped as “Calls ##”.
| Widget | Description |
|---|---|
 |
Each time at least one participant connects, it will show up as a Call. If two or more participants is connected during the same time, they will be grouped in the same Call. Click on one of the Calls to open up more information, |
| Shows the total amount of time between the first participant connects until the last participant disconnects. | |
| Opens up the debug view for the call. | |
 |
Displays the date and time of the meeting start. |
 |
Displays the date and time of the meeting end. |
 |
Displays the total amount of participants connected during this call. |
Participant list

- Name – The name of the participant.
- URI/ID – The URI/ID of the participant, along with its call ID.
- Time – Date and time when the participant connected and disconnected.
- – Opens up the debug view for the participant.
1.9.1.4. Invitation

Here you can view and test the available email templates for this meeting room.
| Page actions | |
|---|---|
| 1. (
) Allows you to manually refresh the dashboard. 2. ( ) Access relevant documentation. |
Note that the send invitation is primarily for testing the message template and will e.g. not be added to the recipient’s calendar.
| Option | Description |
|---|---|
| Select message template – Choose one of the pre-defined templates. | |
| Subject – Shows the pre-defined subject of the template. | |
| Email addresses – Enter email addresses to which you wish to send a test email. | |
|
Mail content – Displays the content of the pre-defined email template you have chosen. |
| Sent from – Displays the “from” information of the email. | |
|
Dial information – Displays the room number, SIP URI, web Link and moderator web link for the meeting room. |
|
PIN codes – Displays the guest and moderator PIN for the meeting room. |
| Send email(s) based on the above chosen options by clicking or click your email client to open your email client with the above chosen options ready to send. |
1.9.1.5. Active meeting

This page will become active when the meeting room is active with participants.
| Page actions | |
|---|---|
| Used to call participants. Select a conference system from the list or enter a manual address (SIP, H.323, IP). More details here. | |
| Ends the meeting for all participants, after confirming the action. | |
| 1. (
) Takes you to the API page for that meeting room. 2. ( ) Allows you to manually refresh the dashboard. 3. ( ) Access relevant documentation. |
Calling participants
Click the button to add a new participant. The process will vary slightly depending on whether the active meeting is for Cisco Meeting Server or Pexip Infinity.
Cisco Meeting Server
| Option | Description |
|---|---|
| Select meeting room | Search and select the meeting room to use for the meeting. |
| Call address | Enter the address you wish to connect to. |
| Layout | Choose your preferred layout for the meeting; Automatic, Share space between participants, Speaker only, Speaker with other participants on overlay or Speaker with other participants below. |
| Click to start the meeting. |
Pexip Infinity
| Option | Description |
|---|---|
| Select meeting room | Search and select the meeting room to use for the meeting. |
| Call address | Enter an address you wish to connect to. This can be H.323, MS-SIP, SIP, RTMP, Google Meet or MS Teams. |
| Moderator | Choose if the participant should be a moderator. |
| System location | Choose the outgoing location, from within Pexip, for the call. |
| Automatic routing | Choose if automatic routing should be used, or if the outgoing call is one of the following; H.323, MS-SIP, SIP, RTMP, Google Meet or MS Teams. |
| Video and audio | Choose media for the call; Audio only, Main video + presentation, Video only, Streaming. |
| Click to start the meeting. |
Meeting controls
| Option | Description |
|---|---|
| SIP – This field displays the SIP address of the meeting room, typically associated with video conferencing systems or clients that use SIP as the standard for video calls.
(
) Copies the SIP address directly from the address field. |
|
| Web Link – This field displays the web link to the meeting room via a WebRTC client, i.e. the client packaged with the meeting platforms from Cisco and Pexip. The client requires no installation.
(
) Copies the SIP address directly from the address field. |
|
|
Participants – Shows the total number of active participants. |
| The blue banner displays how long the meeting have been going on for as well as buttons with actions that will apply for all participants.
Mutes the video for all participants. |
Participant list
- ( ) – Participant status symbol.
- ( ) – The symbol indicates that the participant is sharing their screen.
- Participants – Displays all participants by name and connection type/system address.
- Length – Displays how long they have been connected.
- Host – Displays if they are a host or not. You can also change this setting here by using the button ( ).
- Layout (CMS only) – Choose what layout to display to the participant, if supported by the participating system/client.
- Video (CMS only) – Displays if their video is active or not. You can also change this setting here by using the button ( ).
- Microphone – Displays if their microphone is active or not. You can also change this setting here by using the button ( ).
Additional notes
Additional notes on virtual meeting rooms and meeting control:
- If a meeting room is configured to automatically call one or more participants and/or conference systems, these will be dialed as soon as an operator or a participant “triggers” the meeting room. For example, when you as an operator activate a meeting room by calling conference system A, conference systems B and C will also be dialed immediately if they are configured for automatic dialing.
- Keep in mind that automatic dialing can be disruptive to operations if someone joins a meeting room with this feature enabled to test the connection or calls in earlier than the scheduled meeting time. This could interfere with other ongoing meetings where these conference systems are already participating.
- For privacy reasons, avoid monitoring and managing ongoing meetings without a clear purpose or assignment. Familiarize yourself with your organization’s policies and guidelines regarding applicable restrictions.
- Ensure proper record maintenance to prevent meeting rooms from remaining active unnecessarily. For example, use the automatic deletion feature to remove rooms at a specified time.
- Make it a habit to always secure meeting rooms with at least a PIN code and update the PIN periodically.
- Users can be assigned static meeting rooms and self-manage them in the Mividas Meeting Portal. For example, they can update PIN codes and add or remove members from the meeting room. The Mividas Meeting Portal also allows enforcing PIN codes to reduce the risk of having completely open meeting rooms.
1.10. Call statistics

This page provides detailed insights into video meetings. Users can filter and analyze data such as total meeting hours, guest participation, unique calls, and concurrent users. It also supports exporting results, debugging specific calls, and viewing details for meeting rooms, participants, and groups. Filters include criteria like protocol, organizational units, and meeting rooms. The page is designed for tracking call performance and troubleshooting.
| Page actions | |
|---|---|
| 1. Page refresh (
) allows you to manually refresh the dashboard 2. Access relevant documentation ( ) |
| Filters | |
|---|---|
| Choose the start date and time for your data. | |
| Choose the end date and time for your data. | |
| Reload the data to apply changed filters. | |
| By checking this box, you enable Debug mode. In this mode, your results will be shown as calls and participants, allowing you to check technical details on specific calls. | |
| 1. Meeting room: A search box to find specific meeting room(s). 2. Protocol: Choice to show only a specific protocol. 3: Participants: Choice to show only a specific participant. 4. Organization unit: Choice to display meeting rooms based on their organizational unit affiliation. 5. Debug info: By checking this box, you enable Debug mode. In this mode, your results will be shown as calls and participants, allowing you to check data on specific calls. 6. Gateway calls only: Choose only to show Gateway calls. Set your choices by clicking |
|
| Generate data based on your choices. |
Overview tab
When it is time to show your search data, the results will be shown below. Of course, all results will be based on your chosen filters.
| Page widgets | |
|---|---|
 |
Shows the total amount of hours in video meetings. |
 |
Shows the total number of hours spent in video meetings by guest users. |
 |
Shows the total number of participants in video meetings. |
 |
Shows the total number of unique calls in video meetings. |
Graphs
Concurrent users

Shows the total number of concurrently connected users per day.
Simultaneous calls

Shows the total number of simultaneous calls per day.
Total hours of calls per day

Shows the total hours of video calls per day.
Meeting rooms tab

- Meeting room – The name of the meeting room.
- Hours – Shows the total number of hours spent in that room.
- Guest hours – Shows the total number of hours spent in that room by guests.
- Participants – Shows the total number of participants.
- Calls – Shows the total number of calls.
| Option | Description |
|---|---|
| Applies this meeting room name as a filter. | |
| Takes you to the configuration page of that meeting room, is grayed out if no longer available. | |
| Opens the debug statistics for that meeting. |
Participants tab

- Participants – Shows the name or address of the participant.
- Hours – Shows the total number of time in calls.
- Calls – Shows the total number of calls.
| Option | Description |
|---|---|
| Applies this participant name as a filter. | |
| Takes you to the configuration page of that participant, is grayed out if not available. | |
| Opens the debug statistics for that participant. |
Group tab

- Group – Shows the name of the group.
- Hours – Shows the total amount of time in calls within the group.
- Calls – Shows the total amount of calls within the group.
| Option | Description |
|---|---|
| Applies this group name as a filter. |
Debug

The debug option is available in different places on this page. Its function is to provide you with more technical details about the calls, such as details about the meeting, log files, and more. If you choose to filter with debug mode enabled from the start, the results are shown as seen below. You can also reach debug mode from other places even if you haven’t enabled it from the start.
Calls tab
| Debug calls results | |
|---|---|
 |
Shows the total number of calls. |
 |
Shows the total number of participants. |
| Exports and downloads the results debug data as an Excel file. |

- Title – Shows a description of the call.
- Group – Shows if the call is related to a group and if so which.
- Start – Date and time of the call started.
- Stop – Date and time of when the call ended.
- Participants – The total number of participants in the call.
- Length – The total length of the call.
| Option | Description |
|---|---|
| Opens the debug data for that meeting. It is the same as the call report, but it opens it as an overlay without leaving this page. | |
| Takes you to the call report of that meeting. |
Participants tab

- Opposing party – The remote participant.
- Local party – The local participant.
- Calls – Shows call-information.
- Group – Shows what group the participant is associated with, if any.
- Start – The start date and time of the call.
- Stop – The end date and time of the call.
| Option | Description |
|---|---|
| Opens the debug data for that call. It is the same as the call report, but it opens it as an overlay without leaving this page. | |
| Takes you to the call report of that call. |
1.11. Admin
This menu covers administrative tools and configurations available in Mividas Core, enabling effective management of users, organizations, and infrastructure. It includes the customization of Invite Messages, allowing personalized communication when onboarding new users. The Organization Tree provides a visual representation of your organization’s hierarchy, making it easy to assign roles and manage departments for statistics.
Administrators can use the API Client to access meeting platforms where direct access is not available. The Customers section facilitates the creation and management of customers, allocation of services, and monitoring of usage.
The Video Meeting Bridges section supports the configuration and monitoring of servers, tenant management, and resource allocation. Within this, Call Routing Rules allow administrators to define how calls are directed based on specific conditions. Together, these features streamline organizational operations, user management, and video meeting infrastructure in Mividas Core.
1.11.1. Invite messages

This page allows administrators to manage and customize invite messages for meetings. Administrators can edit the text and layout of messages, activate custom messages, and use replacement codes to personalize content dynamically (e.g., meeting PINs, URLs, and participant details). Conditional variables provide further customization options based on meeting attributes. This feature ensures that invite messages are tailored to the organization’s needs while maintaining flexibility and clarity.
| Page actions | |
|---|---|
| 1. Page refresh (
) allows you to manually refresh the dashboard 2. Access relevant documentation ( ) |
Overview

- Type – Displays the name of the message.
- Description – A more descriptive text about where the message is used.
- Customer customized – All messages are by default set to use the standard text. If it shows a ( ), if it shows a ( ) you have enabled a customized text that is in use.
Edit a message
When you open up a message you first have to activate the custom message to be able to edit it. With the same button, you can also disable the custom message which means that the standard message will be used instead.

| Option | Description |
|---|---|
| Toggle to enable, or disable, the custom message. | |
| Close this window without saving. | |
| Click to save your changes. |

| Option | Description |
|---|---|
| Toggle to disable, or enable, the custom message. | |
| Edit the title of your custom message. | |
 |
Edit the content of your custom message. |
 |
This widget provides you with information. First it mentions that you can leave the header or message blank to restore the default message when clicking
.
Below that are a list of replacement codes and other information, read more about this below. |
Replacement codes
To get more control over the content of the message, there are replacement codes that can be used. By adding these to the text, they will automatically be replaced before the message is sent.
Conditional variables
You can also use the structure of {if} and {if not} for even more control:
{if <variabel>}
    <conditional content>
{if not <variabel>}
    <conditional content>
{endif}
As an example, you can use this to show information about PIN codes only if there are a PIN code to the meeting:
{if pin}
    Here is the PIN: {pin}
{endif}
1.11.2. Organization tree

Organize your video platform with the ‘Organization Tree’ feature. Assign affiliations to both users and virtual meeting rooms, making it easier to filter relevant data and enabling deeper statistical insights.
| Page actions | |
|---|---|
| Add a post. | |
| 1. Page refresh (
) allows you to refresh the view manually 2. Access relevant documentation ( ) |
| Option | Description |
|---|---|
| Search for an organization unit. | |
| Reload the data to apply any changed filters. | |
 |
Displays the current organization tree. Checking one of the checkboxes allows you to delete all selected. |
| Adds a post as a child to that parent. | |
| Edit the post. | |
| Remove the post. |
1.11.3. API Client

Most of the administration and support of meeting platforms can be done directly from the Mividas Core interface. Mividas Core has a built-in API client for cases where direct access to the meeting platform is needed.
| Option | Description |
|---|---|
 |
Select which endpoint you want to use in this list. The names in bold are cluster names, and the actual servers are below them. |
| Enter the API enpoint to use; clicking one of the URLs in the list at the bottom right will enter it in this field. | |
 |
Enter the arguments you wish to use, either as key = value or as <key>value</key> for CMS and { "key": "value"} for Pexip. |
| Click Filter to open the filters. Filter: Enter a string to filter by. Tenant: Choose a tenant to filter by. |
|
 |
Here is a list of all available API endpoints. Clicking on one will apply it to the top API left field. |
Choose between sending GET, PUT, PATCH, POST or DELETE. |
|
| Shows where you are currently navigated. | |
| Shows the response of your last request. | |
 |
Shows the headers of your last request. |
1.11.4. Customers

For service providers and larger organizations, there would be too much data to have a clear overview in one single installation of the Mividas product suite. That is why we have developed the Mividas product suite with multi-tenant support for better handling.
| Page actions | |
|---|---|
| Click to add a new tenant/customer. | |
| 1. Page refresh (
) allows you to manually refresh the monitoring view 2. Access relevant documentation ( ) |
| Option | Description |
|---|---|
| Search for a customer. | |
| Reload the data to apply any changed filters. | |
| Choose one or more clusters to filter by.
Click to save, or to cancel. |
|
| 1. All types – Filter by all types. 2. Pexip – Filter by Pexip only. 3. Cisco Meeting Server – Filter by CMS only. Click to save, or to cancel. |

- Name – The name of the customer/tenant. Clicking its name takes you to the Mividas Core dashboard of that customer/tenant.
- Cluster – Shows which cluster they are using. If applicable, the customer’s tenant ID is in the CMS.
- Endpoints – Shows the total amount of endpoints that are registered. Clicking its number will take you to
Mividas Rooms > Systemsfor that customer/tenant. - Proxy clients – Shows the total number of proxy clients in use. Clicking its number will take you to
Mividas Rooms > Admin > Proxy clientsfor that customer/tenant. - Address books – Shows the total number of address books in use. Clicking its number will take you to
Mividas Rooms > Address booksfor that customer/tenant. - Meetings – Shows the total number of meetings they have had. Clicking its number will take you to
Mividas Core > Scheduled meetingsfor that customer/tenant. - Matching rules – Shows the total number of matching rules. Clicking its number will take you to
Mividas Core > Admin > Backend admin > Provider > Customer > [Customer-name]. - Admin users – Shows the total number of admin users. Clicking its number will take you to
Mividas Core > Admin > Backend admin > Authentication and authorization > Userswith filters applied to show only admin users for that customer/tenant.
| Option | Description |
|---|---|
Takes you to Mividas Core > Admin > Backend admin > Provider > Customer > [Customer-name] where you can edit the customer. |
Add customer
When clicking , you will first have to choose which cluster to attach that customer to.
Cisco Meeting Server
| Option | Description |
|---|---|
| Name | Enter the customer/tenant name. |
| Callbranding URL | Enter a callbranding URL. |
| Invite text URL | Enter an IVR branding URL. |
| IVR branding URL | Enter a IVR branding URL. |
| Create Core customer | Choose if it should create the customer in Mividas Core. |
| Customer API keys | Enter Customer API key. |
| Create LDAP Source | Choose if it should create a LDAP source. |
| LDAP server | Choose a LDAP server. |
| LDAP mapping | Choose a LDAP mapping. |
| LDAP base dn | Specify where in the tree the initial search for results should begin. Eaxmple: dc=example,dc=com |
| LDAP filter | Here you choose how users are filtered out and displayed. Example: (&(objectClass=person)(cn=*)(!(ou=ou=Demo))) |
| Enable Streaming | Choose to enable streaming. |
| Enable Recording | Choose to enable recording. |
| Click to add the customer. |
Below the form and the Add-button, you will find available options from your chosen CMS to use when you create the customer. You will find available Tenants, Call brandings, IVR brandings, System profiles and LDAP sources. Clicking on will take you to that place in the API client.

| Option | Description |
|---|---|
| Manage name conflict with existing customers | Manage what happens when there is a conflict with existing customers. Click to choose: Skip import, Add suffix, Create duplicate, Link tenant ID to existing customer without changing settings. |
| Synchronize existing tenants. |
Pexip Infinity
Customer info
| Option | Description |
|---|---|
| Title | Enter the name fo the Customer/tenant. |
| Video Provider | Select which provider the customer should be under. Usually filled in by the choice you made before you got here. |
| Add x seconds before a meeting | Adds the amount of seconds you choose to the start time of the meeting. E.g. if you have entered 360 and you book a meeting to start at 14:00, it will start at 13:55. |
| Add x seconds after a meeting | Adds the amount of seconds you choose to the end time of the meeting. E.g. if you have entered 360 and you book a meeting to end at 15:00, it will end at 15:05. |
| CMS tenant ID | Enter the CMS tenant ID, must be available within the CMS. |
| Pexip tenant ID | Automatically generated if this customer is not set as the default customer for the cluster. |
| Possible SEEVIA API Key | Deprecated |
| Enable access to Core | Choose if the customer should have access to Mividas Core. |
| Enable access to Rooms | Choose if the customer should have access to Mividas Rooms. |
| Logo URL | Enter a URL to a customer logo. Is used for invitations. |
Customer key
| Option | Description |
|---|---|
| Add another Customer key | Adds a row to add a shared key. |
| Shared key | Enter the customer shared key. |
| Active | Activate or disable the shared key. |
| Delete | Delete the shared key. |
Cluster settings
| Option | Description |
|---|---|
| Cluster | Choose which cluster to add settings to. |
| Default SIP domain | Enter the primary SIP domain that will be used in the video cluster. E.g. video.example.com |
| Separate domain WebRTC access | Enter the Hostname/FQDN that will be used for WebRTC in your video cluster. E.g. webrtc.example.com |
| IVR phone number | Enter the phone number that sends you to your video cluster IVR. |
| Alternative SIP domains | If the customer uses more than one domain, you can add them here, comma-separated. |
| Scheduled room number range | Enter the start and end of the range that should be used to create your booked meeting rooms, e.g. 160000-169999. |
| Static room number range | Enter the start and end of the range that should be used to create your static meeting rooms, e.g. 150000-159999. |
| Provision meetings | 1. Directly upon booking – Meeting rooms will be created directly upon bookings. 2. Scheduled before and after the meeting (beta) – Meetings will be created before and after the meeting, the time depends on your settings below. |
| Provision meeting rooms x min before scheduled meeting | The amount of minutes before the meeting when the meeting room should be created. |
| Delete meeting room x min after scheduled meeting | The amount of minutes after the meeting when the meeting room should be deleted. |
| Disconnect all participants x min after booked meeting | The amount of minutes after the meeting when all participants should be disconnected. |
| Show message x min before the end time of the meeting time | The amount of minutes before the end of the meeting when a message about the meeting ending should be shown. |
| Skype domain | Customers Skype domain. |
| Rewrite for Skype SIP domain | Lets you rewrite the Skype SIP domain. Use {conf} to replace with conference ID, {url} for URL (without protocol). |
| Add another Cluster settings | Adds another cluster configuration for the customer. Fields will be the same as above. |
Number matching rules
| Option | Description |
|---|---|
| Cluster | Choose which cluster this rule should apply to. |
| SIP-URI / alias starts with | Add a prefix to match with. E.g. 123 will match with [email protected]. |
| SIP-URI / alias ends with | Add a suffix to match with, this is usually a domain. E.g. example.com will match with [email protected]. |
| Type of matching | Choose how the rules should match: Both prefix and suffix match, Either prefix or suffix match, Use the Regexp field. |
| Regexp | Allows you to use regular expressions to match rules. |
| Require external authentication before participants are admitted | Allows you to force participants to be authenticated by a external policy server before getting admitted to a meeting. Requires policy server and cluster rules to be enabled. |
| Priority | Set a priority for the rules. 1 has priority over 2. |
| Delete | Allows you to delete a rule. |
| Add another Number matching rule | Adds another row for a new rule. |
Customer policies
| Option | Description |
|---|---|
| Add another Customer policy | Adds a new row for a customer policy. |
| Participant normal limit | Sets the total number of allowed calls before the normal limit is reached. |
| Participant gateway limit | Set the total number of allowed gateway calls. |
| Participant hard limit | Sets the total number of allowed calls before the hard limit is reached. |
| Valid from | Set the date from when this policy should be active. |
| Soft limit action | Choose what should happen if the soft limit is reached: Default value, Ignore, Log, Reject. |
| Hard limit action | Choose what should happen if the hard limit is reached: Default value, Ignore, Log, Reject. |
| Delete | Allows you to delete a policy. |
Click to save.
Expressway/VCS
Customer info
| Option | Description |
|---|---|
| Title | Enter the name fo the Customer/tenant. |
| Video Provider | Select which provider the customer should be under. Usually filled in by the choice you made before you got here. |
| Add x seconds before a meeting | Adds the amount of seconds you choose to the start time of the meeting. E.g. if you have entered 360 and you book a meeting to start at 14:00, it will start at 13:55. |
| Add x seconds after a meeting | Adds the amount of seconds you choose to the end time of the meeting. E.g. if you have entered 360 and you book a meeting to end at 15:00, it will end at 15:05. |
| CMS tenant ID | Enter the CMS tenant ID, must be available within the CMS. |
| Pexip tenant ID | Automatically generated if this customer is not set as the default customer for the cluster. |
| Possible SEEVIA API Key | Deprecated |
| Enable access to Core | Choose if the customer should have access to Mividas Core. |
| Enable access to Rooms | Choose if the customer should have access to Mividas Rooms. |
| Logo URL | Enter a URL to a customer logo. Is used for invitations. |
Customer keys
| Option | Description |
|---|---|
| Add another Customer key | Adds a row to add a shared key. |
| Shared key | Enter the customer shared key. |
| Active | Activate or disable the shared key. |
| Delete | Delete the shared key. |
Cluster settings
| Option | Description |
|---|---|
| Cluster | Choose which cluster to add settings to. |
| Default SIP domain | Enter the primary SIP domain that will be used in the video cluster. E.g. video.example.com |
| Separate domain WebRTC access | Enter the Hostname/FQDN that will be used for WebRTC in your video cluster. E.g. webrtc.example.com |
| IVR phone number | Enter the phone number that sends you to your video cluster IVR. |
| Alternative SIP domains | If the customer uses more than one domain, you can add them here, comma-separated. |
| Scheduled room number range | Enter the start and end of the range that should be used to create your booked meeting rooms, e.g. 160000-169999. |
| Static room number range | Enter the start and end of the range that should be used to create your static meeting rooms, e.g. 150000-159999. |
| Provision meetings | 1. Directly upon booking – Meeting rooms will be created directly upon bookings. 2. Scheduled before and after the meeting (beta) – Meetings will be created before and after the meeting, the time depends on your settings below. |
| Provision meeting rooms x min before scheduled meeting | The amount of minutes before the meeting when the meeting room should be created. |
| Delete meeting room x min after scheduled meeting | The amount of minutes after the meeting when the meeting room should be deleted. |
| Disconnect all participants x min after booked meeting | The amount of minutes after the meeting when all participants should be disconnected. |
| Show message x min before the end time of the meeting time | The amount of minutes before the end of the meeting when a message about the meeting ending should be shown. |
| Skype domain | Customers Skype domain. |
| Rewrite for Skype SIP domain | Lets you rewrite the Skype SIP domain. Use {conf} to replace with conference ID, {url} for URL (without protocol). |
| Add another Cluster settings | Adds another cluster configuration for the customer. Fields will be the same as above. |
Number matching rules
| Option | Description |
|---|---|
| Cluster | Choose which cluster this rule should apply to. |
| SIP-URI / alias starts with | Add a prefix to match with. E.g. 123 will match with [email protected]. |
| SIP-URI / alias ends with | Add a suffix to match with, this is usually a domain. E.g. example.com will match with [email protected]. |
| Type of matching | Choose how the rules should match: Both prefix and suffix match, Either prefix or suffix match, Use the Regexp field. |
| Regexp | Allows you to use regular expressions to match rules. |
| Require external authentication before participants are admitted | Allows you to force participants to be authenticated by a external policy server before getting admitted to a meeting. Requires policy server and cluster rules to be enabled. |
| Priority | Set a priority for the rules. 1 has priority over 2. |
| Delete | Allows you to delete a rule. |
| Add another Number matching rule | Adds another row for a new rule. |
Customer policies
| Option | Description |
|---|---|
| Add another Customer policy | Adds a new row for a customer policy. |
| Participant normal limit | Sets the total number of allowed calls before the normal limit is reached. |
| Participant gateway limit | Set the total number of allowed gateway calls. |
| Participant hard limit | Sets the total number of allowed calls before the hard limit is reached. |
| Valid from | Set the date from when this policy should be active. |
| Soft limit action | Choose what should happen if the soft limit is reached: Default value, Ignore, Log, Reject. |
| Hard limit action | Choose what should happen if the hard limit is reached: Default value, Ignore, Log, Reject. |
| Delete | Allows you to delete a policy. |
Click to save.
1.11.5. Video meeting bridges

This page provides details on managing video infrastructure for platforms like Pexip, CMS, and Expressway/VCS. It covers tasks such as adding and configuring video meeting clusters, editing server settings, managing call routing rules, and synchronizing tenants.
| Page actions | |
|---|---|
| Click to add either Pexip, CMS , Webex, Expressway/VCS or CUCM. | |
| 1. Page refresh (
) allows you to manually refresh the monitoring view 2. Access relevant documentation ( ) |
Overview

| Option | Description |
|---|---|
| Search for a platform. | |
| Reload the data to apply any changed filters. | |
| 1. All types – Filter by all types. 2. Pexip – Filter by Pexip only. 3. Cisco Meeting Server – Filter by CMS only. Click to save, or to cancel. |
|
| Shows the name of the cluster and what type of cluster it is. | |
| Shows the total amount of servers within the cluster. | |
Opens up Mividas Core > admin > backend admin > provider > Cluster > [chosen cluster] to be able to edit it. |
|
| Opens up a sub-menu that differs depending on the cluster type:
Pexip CMS Expressway/VCS CUCM Webex |
|
| Opens up more settings for the chosen cluster. More information below. |
Pexip

| Option | Description |
|---|---|
| Displays the CDR / Eventsink-URL. Click ( ) to copy it. | |
| Displays the Policy URL. Click ( ) to copy it. | |
| Displays the server name. | |
| Takes you to the configuration page for that server in backend admin. | |
Takes you to Mividas Core > Meetings. |
|
Takes you to Mividas Core > Admin > API CLient. |
|
| Takes you to the web administration page for that server. |
CMS

| Option | Description |
|---|---|
| Displays the CDR / Eventsink-URL. Click ( ) to copy it. | |
| Displays the server name. | |
| Takes you to the configuration page for that server in backend admin. | |
Takes you to Mividas Core > Meetings. |
|
Takes you to Mividas Core > Admin > API CLient. |
|
| Takes you to the web administration page for that server. |
Expressway/VCS

| Option | Description |
|---|---|
| Displays the server name. | |
| Takes you to the configuration page for that server in backend admin. | |
Takes you to Mividas Core > Meetings. |
|
| Takes you to the web administration page for that server. |
CUCM

| Option | Description |
|---|---|
| Displays the CDR / Eventsink-URL. Click ( ) to copy it. | |
| Displays the server name and FQDN. | |
| Takes you to the configuration page for that server in backend admin. | |
Takes you to Mividas Core > Meetings. |
|
Takes you to Mividas Core > Admin > API CLient. |
|
| Takes you to the web administration page for that server. |
Webex

| Option | Description |
|---|---|
| Displays the CDR / Eventsink-URL. Click ( ) to copy it. |
Add video cluster
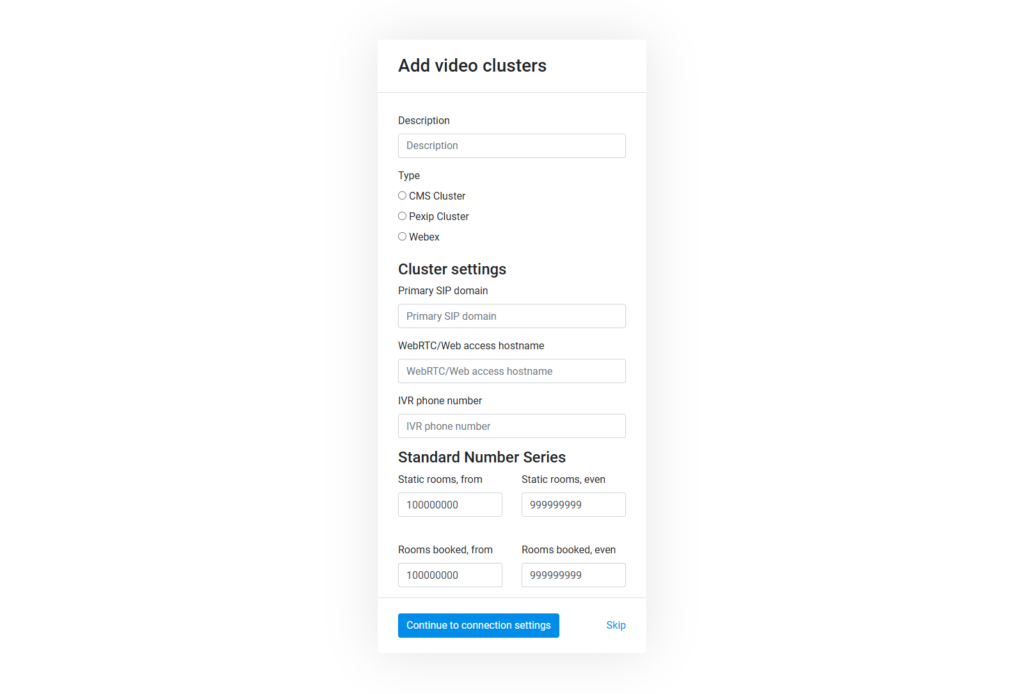
| Option | Description |
|---|---|
| Description | Enter a description for the video cluster . |
| Type | Choose the cluster type, either CMS Cluster, Pexip Cluster or Webex. |
| Primary SIP domain | Enter the primary SIP domain that is beeing used in your video cluster. E.g. video.example.com |
| WebRTC/Web access hostname | Enter the Hostname/FQDN that is used for WebRTC in your video cluster. E.g. webrtc.example.com |
| IVR phone number | Enter the phone number that sends you to your video cluster IVR. |
| Static rooms number series | Enter the start and end of the range that should be used to create your static meeting rooms, e.g. 150000-159999. |
| Booked rooms number series | Enter the start and end of the range that should be used to create your booked meeting rooms, e.g. 160000-169999. |
Press to proceed or press Skip to cancel.
Pexip Infinity cluster
| Option | Description |
|---|---|
| Description | Is already filled in with what your wrote on the first step, here you can change it if you wish. |
| IP address | Enter the IP address of the Pexip Infinity management node, e.g. 192.168.0.1 or: |
| DNS Name | Enter the full DNS Name of the Pexip Infinity management node, including custom port if needed. E.g. pexip.example.com:444 |
| Opt. separate IP/host for API calls | If you have network separation for API calls, so that traffic will go through a separate hostname if you want to add firewall rules or the like. Enter the IP or Hostname including custom port. E.g. api.example.com:445 |
| Verify SSL certificates | Verifies the trust between servers with SSL certificates. |
| Username | Enter the Username of an API account with read-write permissions in Pexip. |
| Password | Enter the password of the username above. |
| Dial-out location for new participants | Type the default location in Pexip to be used when dialing out to new participants. |
| Prepare event sink and external policy | It adds objects to Pexip for event sink and external policy, which you can then add to the relevant system locations. |
Press to add the Pexip management node or press Skip to cancel.
Cisco Meeting Server cluster
| Option | Description |
|---|---|
| Description | Enter a description for the CMS server . |
| IP address | Enter the IP address of the CMS server, e.g. 192.168.0.1 or add a DNS name below. |
| Opt. separate IP/host for API calls | If you have network separation for API calls, so that traffic will go through a separate hostname if you want to add firewall rules or the like. Enter the IP or Hostname including custom port. E.g. api.example.com:445 |
| DNS Name | Enter the full DNS Name of the CMS server, including custom port if needed. E.g. cms01.example.com:444 |
| Verify SSL certificates | Verifies the trust between servers with SSL certificates. |
| Username | Enter the Username of an API or Administrator account. Must be Administrator to activate automatic backups. |
| Password | Enter the password of the username above. |
| Synchronize tenants from CMS | If checked Mividas Core will synchronize available tenants from the CMS node. |
| Set CDR Receiver for statistics | Option for retrieving call statistics from the connected CDR receiver and storing these within Mividas Core. This allows for local state on active calls and to speed up meeting views in bigger installations. |
Press to add the CMS server or press Skip to cancel.
The installer will find the other servers in the cluster and automatically fill in the information needed to add those as well. Continue to add all CMS Servers to the CMS Cluster until all of them have been added.
Webex
Webex Meeting
- Log in to developer.webex.com. You must use an admin account.
- Go to My Webex Apps -> Create a New App
- Select Create a Service App [Link]
- Select the following Scopes:
- guest-issuer:read
- guest-issuer:write
- meeting:admin_config_read
(Note admin) - meeting:admin_participants_read
(Note admin) - meeting:admin_preferences_read
(Note admin) - meeting:admin_schedule_read
(Note admin) - meeting:admin_schedule_write
(Note admin) - meeting:participants_write
- spark-admin:devices_read
(Note spark-admin) - spark-admin:people_read
(Note spark-admin)
- Copy Client ID and Client Secret and paste them below.
- Sign in to Webex Admin, and go to Apps > Service Apps to approve your app [Link]
- Find your Webex integration here: [Link]
- Select your organization, copy the Secret from the previous step to generate the access token and refresh token. Enter them in the form below

| Option | Description |
|---|---|
| Client ID | Enter the Client ID from the steps described above. |
| Client Secret | Enter the Client Secret from the steps described above. |
| Refresh token | Enter the Refresh token from the steps described above. |
| Access token | Enter the Access token from the steps described above. |
Click to proceed or click to cancel.
Webex Meeting Guest-to-Guest (G2G)
- Log in to developer.webex.com. You must use an admin account.
- Go to My Webex Apps -> Create a New App
- Select Create a Service App [Link]
- Select the following Scopes:
- guest-issuer:read
- guest-issuer:write
- guest-meeting:rw
- meeting:admin_config_read
(Note admin) - meeting:admin_participants_read
(Note admin) - meeting:admin_preferences_read
(Note admin) - meeting:admin_schedule_read
(Note admin) - meeting:admin_schedule_write
(Note admin) - meeting:participants_write
- spark-admin:devices_read
(Note spark-admin) - spark-admin:people_read
(Note spark-admin)
- Copy Client ID and Client Secret and paste them below.
- Sign in to Webex Admin, and go to Apps > Service Apps to approve your app [Link]
- Find your Webex integration here: [Link]
- Select your organization, copy the Secret from the previous step to generate the access token and refresh token. Enter them in the form below
| Option | Description |
|---|---|
| Client ID | Enter the Client ID from the steps described above. |
| Client Secret | Enter the Client Secret from the steps described above. |
| Refresh token | Enter the Refresh token from the steps described above. |
| Access token | Enter the Access token from the steps described above. |
Click to proceed or click to cancel.
Call control
Add VCS/Expressway Cluster
| Option | Description |
|---|---|
| Description | Enter a description for the call control cluster . |
| Type | Select the type of cluster to add: VCS/Experssway or CUCM |
| Primary SIP domain | Enter the primary SIP domain that is used. E.g. video.example.com |
Click , or press Skip to cancel.
| Option | Description |
|---|---|
| Description | Enter a description for the call control server . |
| IP | Enter the IP address of the call control server, e.g. 192.168.0.1 or: |
| DNS Name | Enter the full DNS Name of the call control server, including custom port if needed. E.g. expressway-c.example.com:444 |
| Opt. separate api-ip/host | If you have network separation for API calls, so that traffic will go through a separate IP if you want to add firewall rules or the like. Enter the IP including custom port. E.g. 192.168.0.1:445 |
| Verify SSL certificates | Verifies the trust between servers with SSL certificates. |
| Username | Enter the Username of an Administrator account with API access, and both read and write privileges. |
| Password | Enter the password of the username above. |
Click to add the VCS/Expressway server, or press Skip to skip or finish later.
If more than 1 VCS/Expressway is set up in the cluster, the installer will find other servers to be added to the cluster and automatically fill in the information needed to add them. Continue adding them manually until all servers in the cluster have been added.
After finishing your first cluster, you will be sent back to the start to be able to add more call control clusters if available. When you have added all call control clusters, press Skip to proceed.
Add CUCM Cluster
| Option | Description |
|---|---|
| Description | Enter a description for the call control cluster . |
| Type | Select the type of cluster to add: VCS/Experssway or CUCM |
| Primary SIP domain | Enter the primary SIP domain that is used. E.g. video.example.com |
| Option | Description |
|---|---|
| Description | Enter a description for the call control server . |
| IP | Enter the IP address of the call control server, e.g. 192.168.0.1 or: |
| DNS Name | Enter the full DNS Name of the call control server, including custom port if needed. E.g. expressway-c.example.com:444 |
| Opt. separate api-ip/host | If you have network separation for API calls, so that traffic will go through a separate IP if you want to add firewall rules or the like. Enter the IP including custom port. E.g. 192.168.0.1:445 |
| Verify SSL certificates | Verifies the trust between servers with SSL certificates. |
| Username | Enter the Username of an Administrator account with API access, and both read and write privileges. |
| Password | Enter the password of the username above. |
Click to add the CUCM server, or press Skip to skip or finish later.
After finishing your first cluster, you will be sent back to the start to be able to add more call control clusters if available. When you have added all call control clusters, press Skip to proceed.
1.11.5.1. Manage tenants
Tenant sink
| Option | Description |
|---|---|
| Manage name conflict with existing customers | Manage what happens when there is a conflict with existing customers. Click to choose: Skip import, Add suffix, Create duplicate, Link tenant ID to existing customer without changing settings. |
| Synchronize existing tenants. |
Create tenant
| Option | Description |
|---|---|
| Name | Enter the customer/tenant name. |
| Callbranding URL | Enter a callbranding URL. |
| Invite text URL | Enter an IVR branding URL. |
| IVR branding URL | Enter a IVR branding URL. |
| Create Core customer | Choose if it should create the customer in Mividas Core. |
| Customer API keys | Enter Customer API key. |
| Create LDAP Source | Choose if it should create a LDAP source. |
| LDAP server | Choose a LDAP server. |
| LDAP mapping | Choose a LDAP mapping. |
| LDAP base dn | Specify where in the tree the initial search for results should begin. Eaxmple: dc=example,dc=com |
| LDAP filter | Here you choose how users are filtered out and displayed. Example: (&(objectClass=person)(cn=*)(!(ou=ou=Demo))) |
| Enable Streaming | Choose to enable streaming. |
| Enable Recording | Choose to enable recording. |
| Click to add the customer. |
Below the form and the Add-button, you will find available options from your chosen CMS to use when you create the customer. You will find available Tenants, Call brandings, IVR brandings, System profiles and LDAP sources. Clicking on will take you to that place in the API client.
1.11.5.2. Call routing rules

This page explains how to manage and configure call routing rules for Pexip within Mividas Core. It includes options to create, edit, or test rules, prioritize them, and define specific conditions for routing calls, such as protocol, location, and media settings. It also covers rule synchronization with Pexip, fallback configurations, and bandwidth limitations. A “Test Rule” feature allows validation of rule behavior for troubleshooting.
| Page actions | |
|---|---|
| Opens a form to add a new rule. | |
| Downloads the latest set of rules from Pexip. | |
| 1. Page refresh (
) allows you to refresh the view manually 2. Access relevant documentation ( ) |
Overview
| Search and filters | Description |
|---|---|
| Search for a rule. | |
| Choose to display rules based on a specific cluster. This option only shows if there is multiple Pexip Infinity clusters. | |
| Opens the Test Rule window. More details can be found under Test Rule. |

- Active – Displays whether the rule is active and if it matches on incoming and/or outgoing calls:
- ( ) – The rule is enabled.
- ( ) – The rule is disabled.
- ( ) – Matches on incoming calls.
- ( ) – Does not match on incoming calls.
- ( ) – Matches on outgoing calls.
- ( ) – Does not match on outgoing calls.
- Prio – Shows the priority of the rule. The lower the value, the earlier it triggers.
- Name – Displays the rule’s name; clicking on the name allows you to edit the rule. It also displays some information about the rule:
- – Shows that the rule is synchronized.
-
– Shows the call target of the rule. Can be either:
external,registered,mssip_conference_id,mssip_server,gms_conferenceorteams_conference. -
– Displays the outgoing protocol for this rule. Can be either:
SIP,H.323,MS-SIP,RTMP,Google meetorMicrosoft Teams.
- Match incoming – Displays what protocols of incoming calls it should match on.
is enabled and
is disabled.
- – Matches only on registered devices.
- – Matches on WebRTC calls.
- – Matches on SIP calls.
- – Matches on Lync/Skype calls.
- – Matches on H.323 calls.
- Local in / out – Displays selected incoming and outgoing locations for the rule.
- LocationA – The rule is matching on “LocationA” for incoming calls.
- No – No specific incoming location has been chosen for the rule match.
- LocationB – The rule is matching on “LocationB” for outgoing calls.
- No – No specific outgoing location has been chosen for the rule match.
- Hits – Displays the total amount of times this rule has been triggered since its creation.
- 6m – Displays the total amount of times this rule has been triggered during the last 6 months.
Add rule
General
| Option | Description |
|---|---|
| Enable this rule | Enable or disable this rule. Any disabled rules are still displayed in the rules list but are ignored. This can be used to test configuration changes or temporarily disable a specific rule, e.g., during troubleshooting. |
| Is fallback | Select if this should be a fallback rule. Fallback rules are always placed last. |
| Sync back to Pexip | Select if this rule should be synced back to Pexip. |
| Name | Type the name of the rule. |
| Service tag | Type unique identifier that can be used to track usage of this rule. |
| Description | Type a description of the rule. |
| Priority | The priority of this rule. Rules are checked in ascending priority until the first matching rule is found. Range: 1-200 |
| Click to go to the next page, or click to cancel. |
Match
| Option | Description |
|---|---|
| Match incoming gateway calls | Choose to apply this rule to incoming calls that have not been routed to a conference service within Pexip, and should be routed via Pexip’s distributed gateway service. |
| Match outgoing calls from a conference | Choose to apply this rule to outgoing calls made from a conference service (e.g. adding a participant to a virtual meeting room). |
| Match against full alias URI | This is for advanced use cases and will not normally be required. By default, Pexop matches against a parsed version of the destination alias, i.e., it ignores the URI scheme, other parameters, and host IP addresses. So, if the original alias is sip:[email protected];transport=tls by default the rule will match against [email protected]. Select this option to match against the full, unparsed alias instead. |
| Destination alias regex match | The regular expression that the destination alias(the dialed alias) is checked against to see if the rules apply to this call. |
| Destination alias regexs replace string | The regular expression string used to transform the originally dialed alias. Leave blank to leave the original dialed alias unchanged. |
| Click to go to the next page, or click to cancel. |
Media settings
| Option | Description |
|---|---|
| Call capabillity | Choose the media capabilities of the call, between; Audio only, Main video + presentation, Main video only, Same as incoming call. The participant will not be able to escalate beyond the selected capability. |
| Maximum inbound call bandwidth | This field allows you to limit the bandwidth Pexip receives from each participant dialed via this rule. Range: 128-8192. |
| Maximum outbound call bandwidth | This field allows you to limit the bandwidth Pexip sends to each participant dialed via this rule. Range: 128-8192. |
| Maximum call quality | This rule sets the maximum call quality for each participant dialing via this rule. |
| Media encryption | Controls the media encryption requirements for participants connecting via this rule.
Default – Use the global media encryption setting from Pexip. |
| Theme | Select what theme to use for this rule. If no theme is selected here, the theme selected as the default theme will be used. |
| Click to go to the next page, or click to cancel. |
Outgoing
| Option | Description |
|---|---|
| Call target | Choose how the call should be routed:
Registered devices or external systems – Routes the call to a matching registered device if available; otherwise, call via an external system, chosen under Protocol. |
| Outgoing location | Choose a location to use for the outgoing call. Select automatic to allow Pexip to select which conferencing node to use automatically. |
| Protocol | Select which protocol to use for the outgoing call: h323, mssip, sip, rtmp, gms, teams. |
The last few steps differ slightly depending on the protocol you choose. To see more information, select the protocol you chose.
h323
| Option | Description |
|---|---|
| H.323 gatekeeper | Select one of your configured H.323 gatekeepers to send your matching calls to. |
mssip
| Option | Description |
|---|---|
| Lync / Skype for Business server | Select one of your configured Lync / Skype for Business server to send your matching calls to. |
| STUN server | Select one of your existing STUN servers to use. |
| TURN server | Select one of your existing TURN servers to use. |
sip
| Option | Description |
|---|---|
| SIP proxy | Select one of your configured Sip Proxies to send your matching calls to. |
rtmp
No more information is needed.
gms
| Option | Description |
|---|---|
| Access token | Select one of your configured Access tokens to use for your matching calls. |
| STUN server | Select one of your existing STUN servers to use. |
| TURN server | Select one of your existing TURN servers to use. |
teams
| Option | Description |
|---|---|
| Teams Connector | Select one of your configured Teams Connector to use for your matching calls. |
| External participant avatar lookup | Determines whether or not avatars from external participants will be retrieved using the method appropriate for the external meeting type. You can use it to override the global configuration setting. |
Last steps
| Treat as trusted | This indicates that the target of this routing rule will treat the caller as part of the target organization for trust purposes. |
| Click to save and create the rule, or click to cancel. |
Test rules
Here, you can test your rules to see if they behave as you expect, troubleshoot, and more.
New test
| Option | Description |
|---|---|
| Destination alias | Enter the alias you wish to reach. E.g. [email protected]. |
| Source alias address | Enter the source alias to use for the test. E.g. [email protected]. |
| Incoming or Outgoing | Choose if the test is an incoming or outgoing call. If outgoing, no more fields need to be filled in. |
| Call being handled in location | Choose at which location this test should come in to. |
| Registered device | Select if it is a registered device. |
| Source location type | Choose the call type for the source. SIP, WebRTC/RTMP, MS-SIP or H.323. |
| Click to run the test or click to cancel. |
Results
| Option | Description |
|---|---|
| Prio | If matching any rules, this will display the Prio of the matched rule. |
| Name | If you match any rules, this will display the Name of the matched rule; clicking the name allows you to edit it. |
1.11.6. Backend admin

This section is accessible only to super users.
This section allows you to adjust various settings and enforce certain features based on the company’s policy. It provides an overview of all your current settings. Below is a short description of each part. For more information regarding settings under backend admin, please contact us at [email protected].
- Address – Created address books per customer. You can create, edit, and export these address books.
- API key – API keys for connections between Mividas Meeting Portal and Mividas Core, plus connections where you need Oauth like WebAPI or O365 Calendar.
- Authentication and authorization – You can create, edit, and delete users. Groups are not in use at the moment.
- Axes – A framework for tracking and limiting login attempts to enhance security by protecting against brute-force attacks. Often used to enforce restrictions like rate limits or account lockouts.
- Calendar invite – Calendar connection per customer and endpoints. Here, you can connect specific email addresses to a system.
- Customer – View, remove, edit, and add number matching rules, matching call patterns with customers.
- Endpoint – View, remove, edit, and add endpoints.
- Endpoint network – View, remove, edit, and add endpoints networks.
- Endpoint provision – View, remove, edit, and add endpoint templates for provisioning.
- Exchange – View, remove, edit, and add EWS connections.
- Ext sync – View, remove, edit, and add external LDAP synchronisation.
- Housekeeper – Edit the values for automatic cleaning of data, e.g., logs or call detail records.
- Monitoring – View, remove, edit, and add alert rules.
- MSGraph – View, remove, edit, and add MS Graph API connections.
- Numberseries – View, remove, edit, and add number ranges for tenants.
- Policy – View, remove, edit, and add policies for clusters and customers. Set limits for usage and other external policies.
- Policy auth – See history of MFA-authentications for protected meetings, and – for Pexip Infinity with configured external policy – setup pre-authenticated participants
- Policy script – Add scripts for incoming Pexip Infinity external policy scripts
- Provider – View, remove, edit, and add meeting platforms, clusters, customers and more.
- Statistics – Manage call statistics data storage containers (Server), and setup automatic domain rewrites e.g. for default SIP-domains in incoming call statistics participants
- Tracelog – View, remove, edit, and add trace logs.
- UI message – View, remove, edit, and add messages for UI and invitations.
- Webex API – View, remove, edit, and add authorizations for Webex API.
1.12. User guides
1.12.1. Monitoring guide
The guide below offers a brief introduction to how users interact with monitoring in Mividas Core.
1. Navigate to Mividas Core
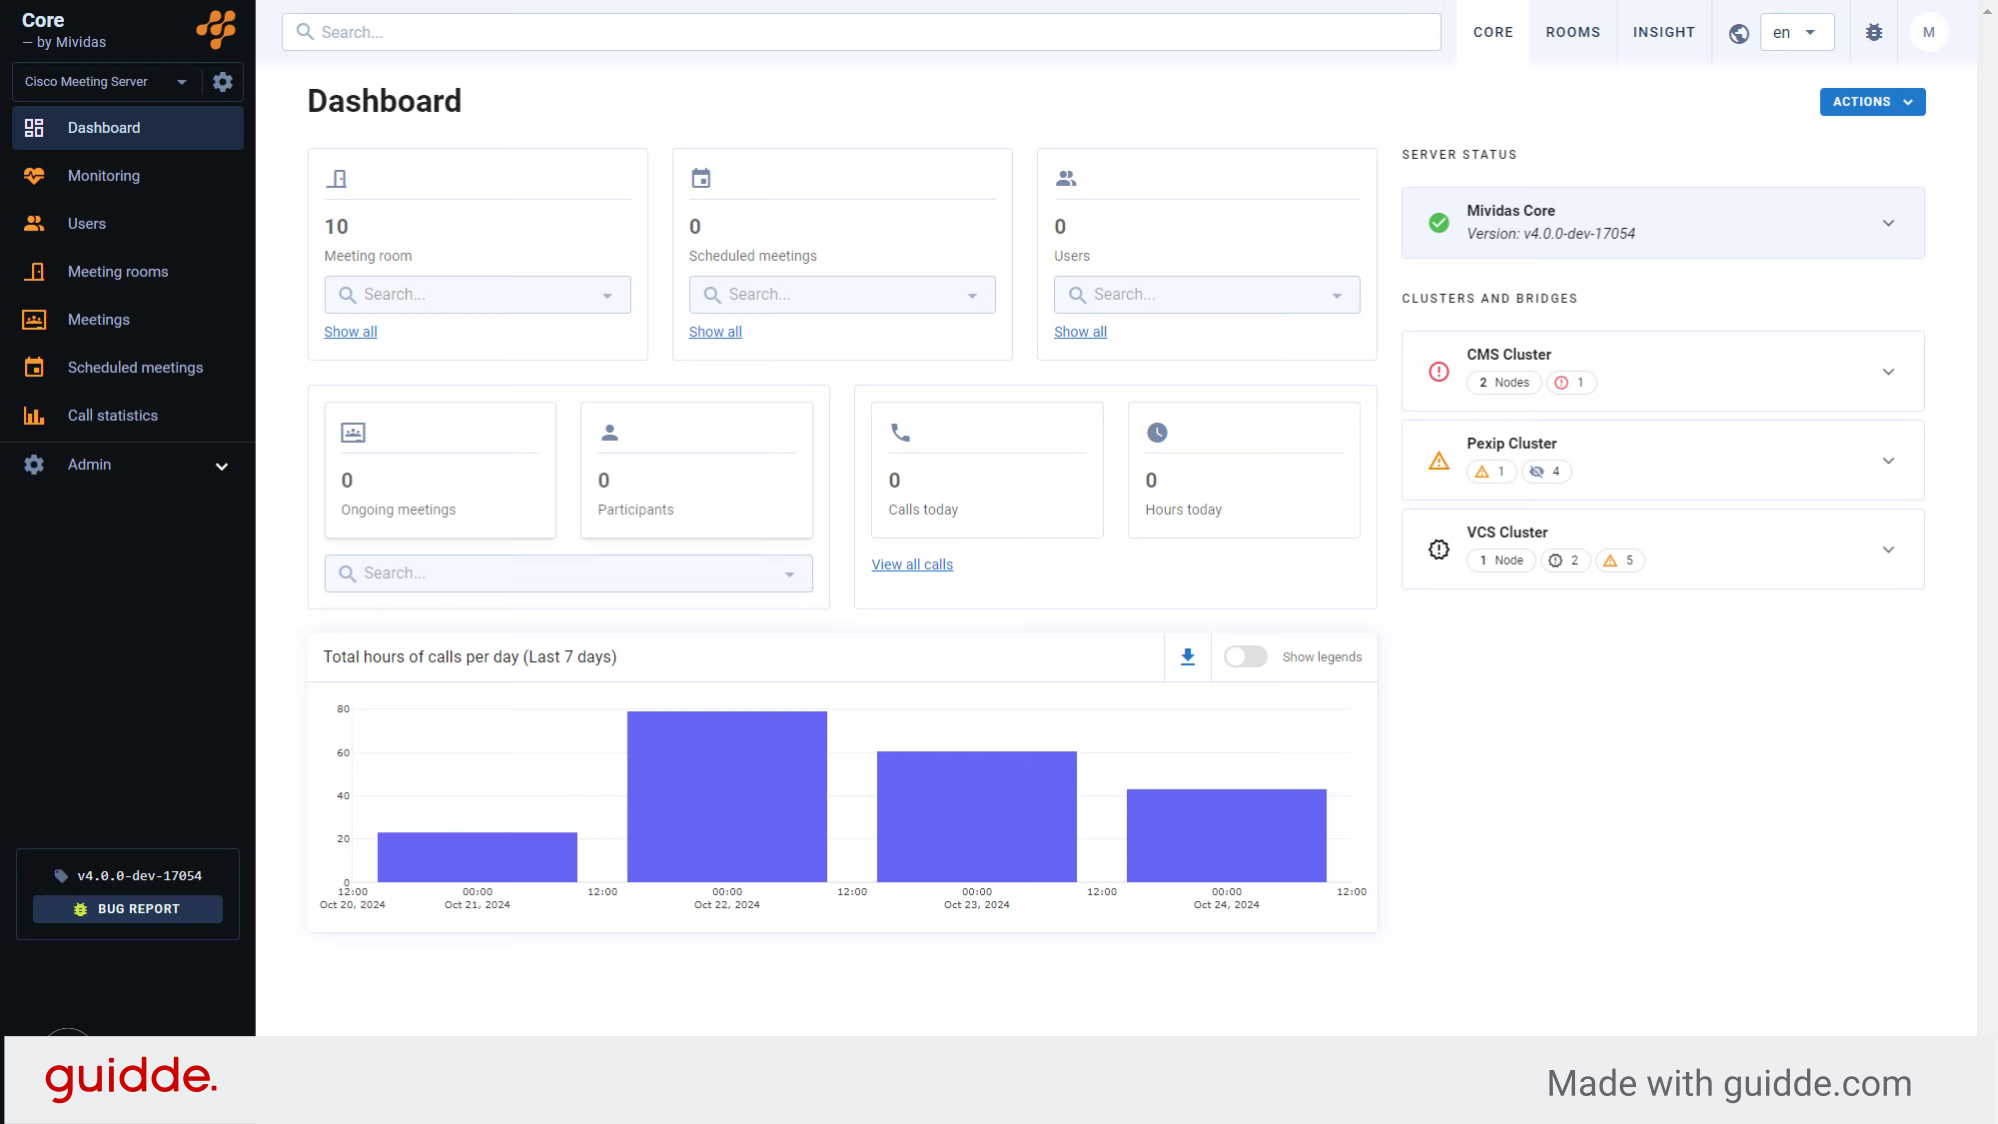
Start by navigating to your Mividas Core installation.
2. CMS Cluster notifications

On the Mividas Core dashboard, you’ll find an overview of all call bridges along with their notifications and severity levels. In this example “CMS Cluster” is displaying a single notification marked with a severity level of “Error”. Continue by clicking on the accordion.
3. Expanded cluster
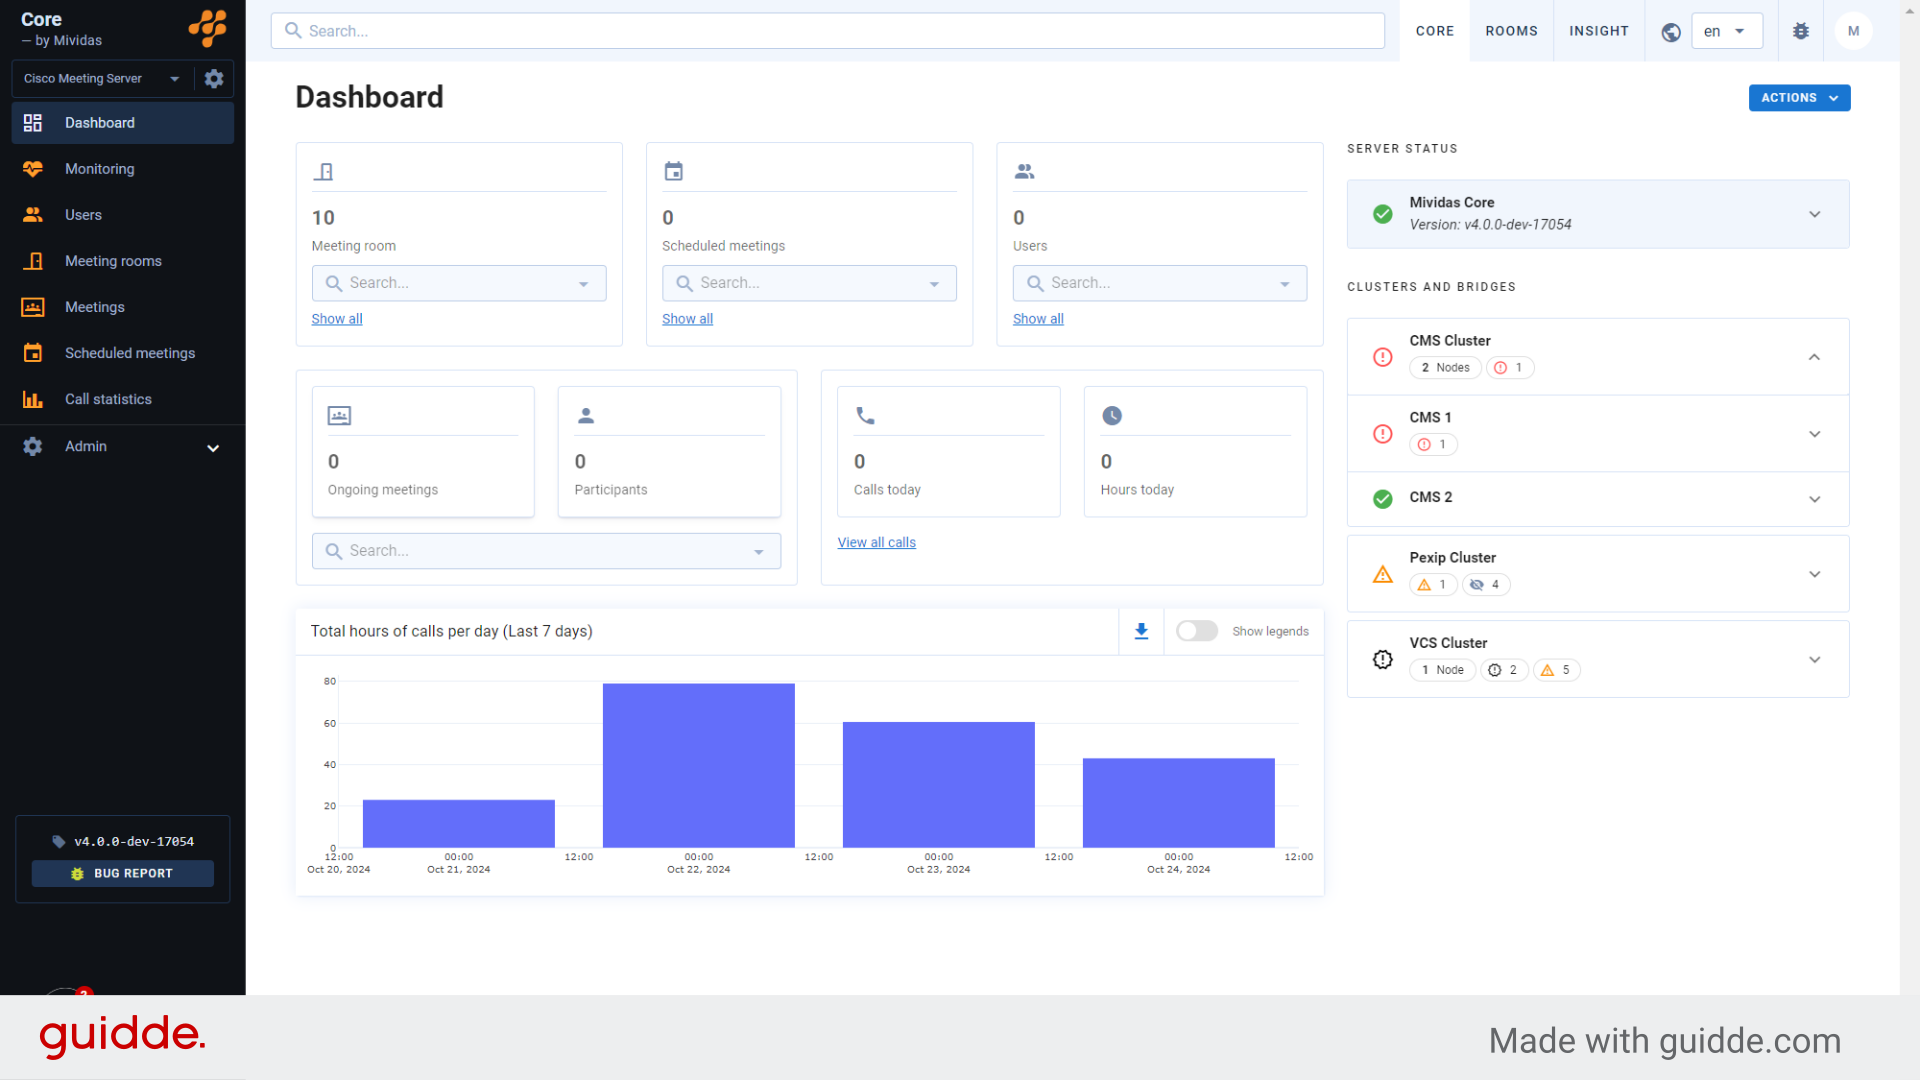
This will expand the accordion to reveal all servers within the cluster, showing that the “CMS 1” server has an error.
4. Click on server “CMS 1”
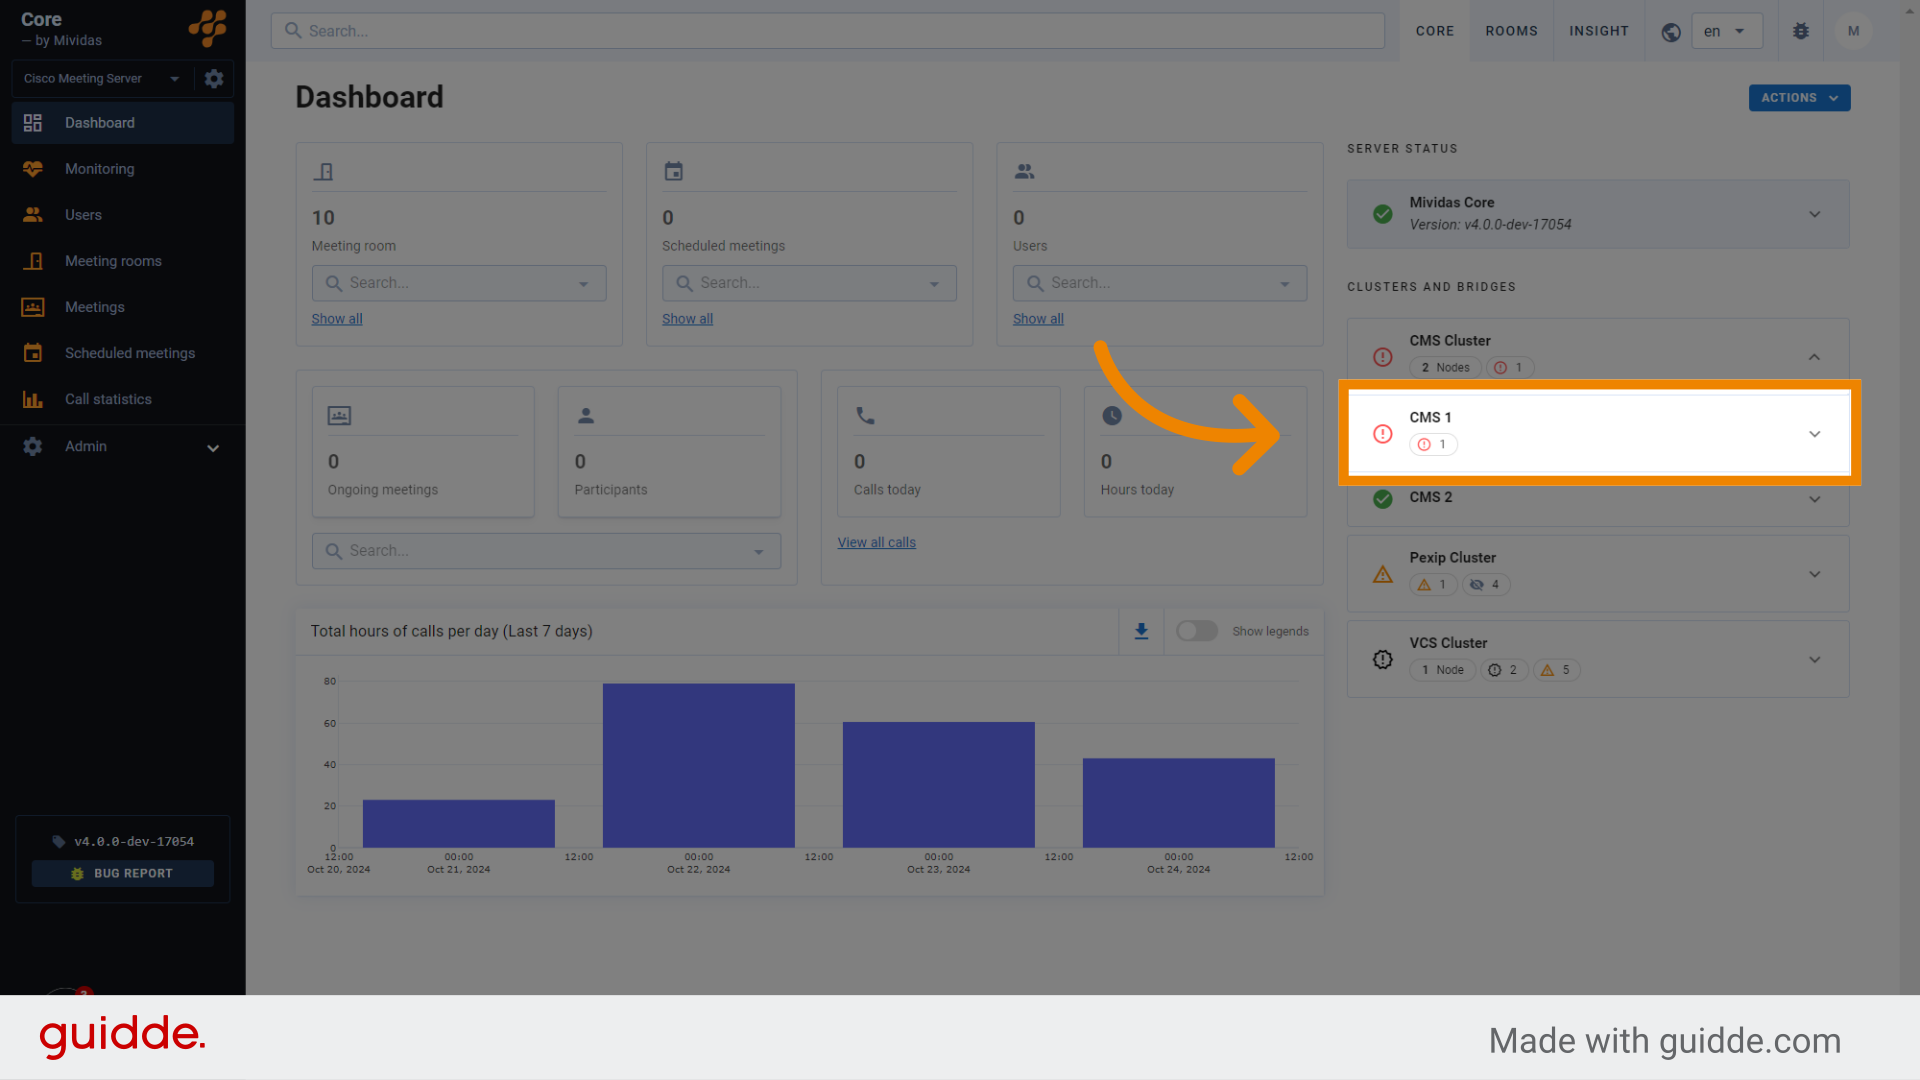
Continue by clicking on the “CMS 1” server.
5. Expanded server
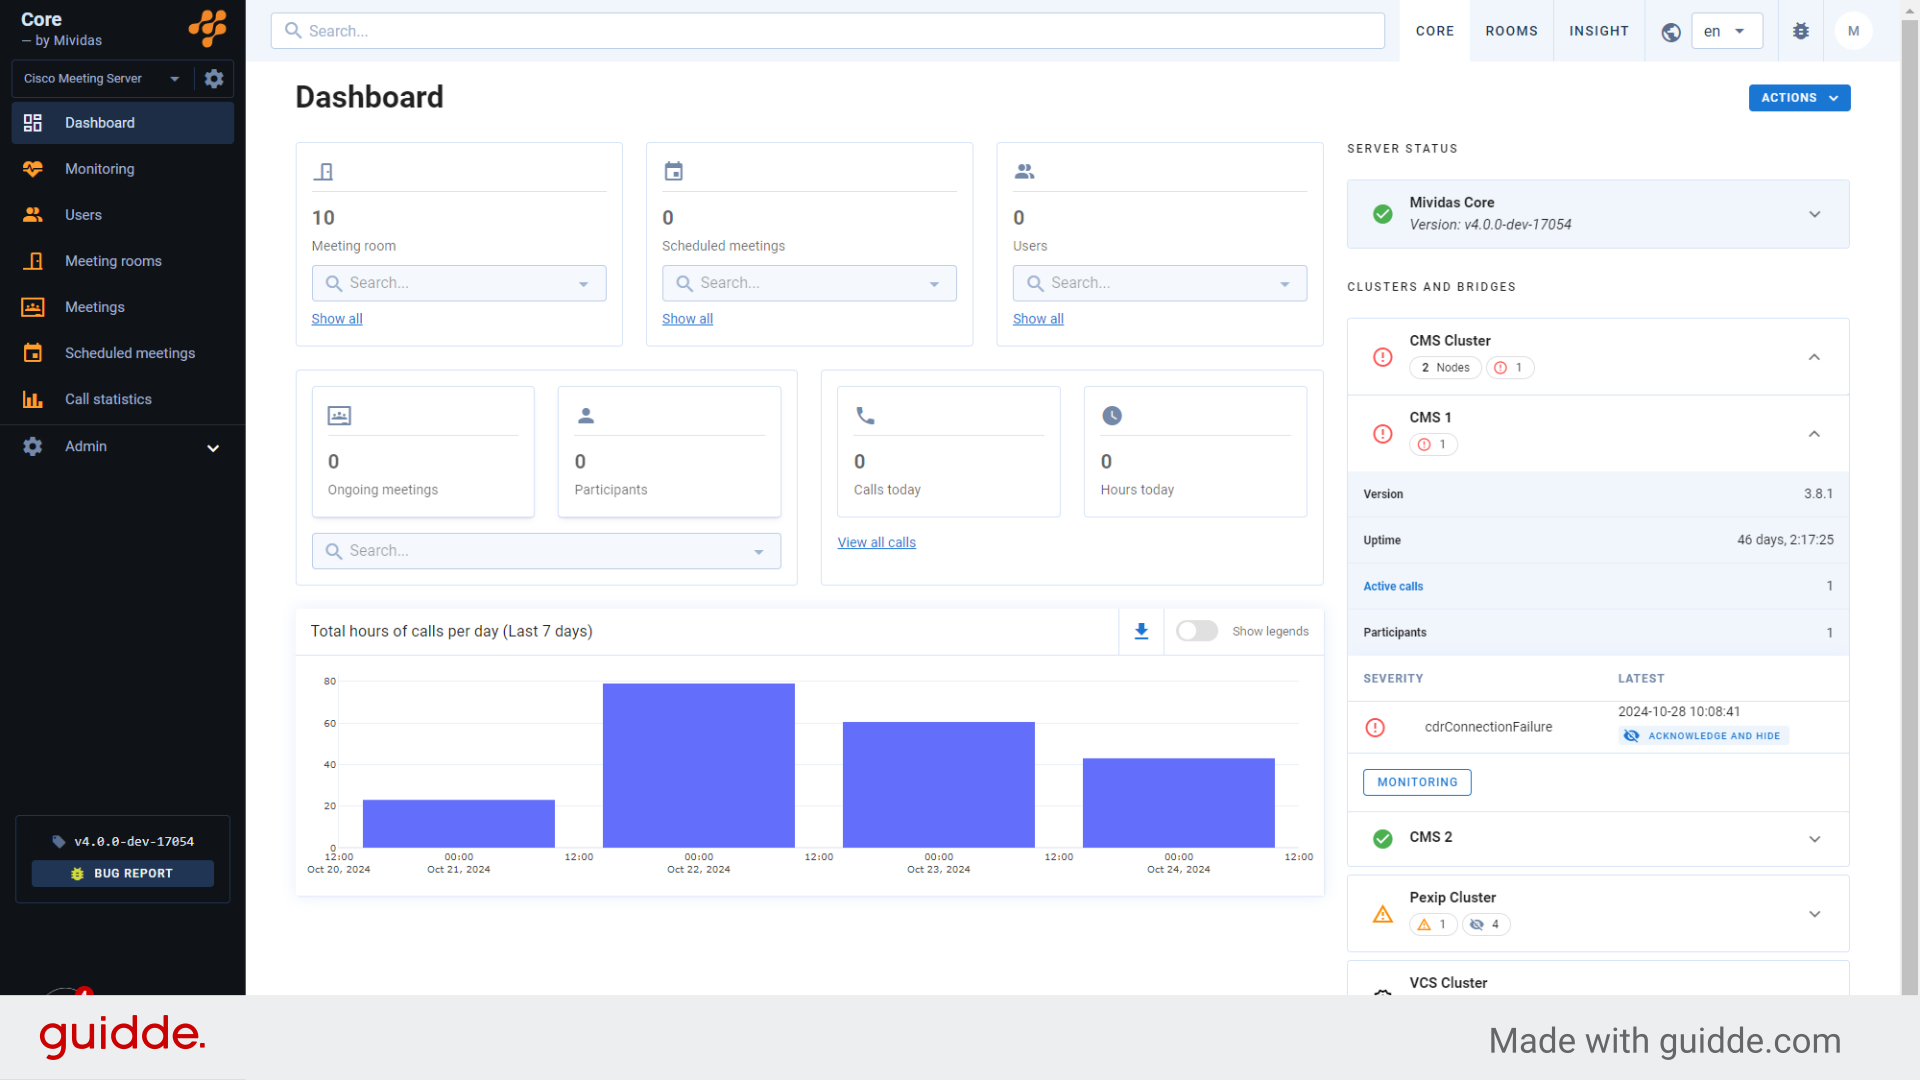
Clicking the server will expand the accordion, revealing additional server details along with current notifications and their severity levels.
6. “cdrConnectionFailure” error notification
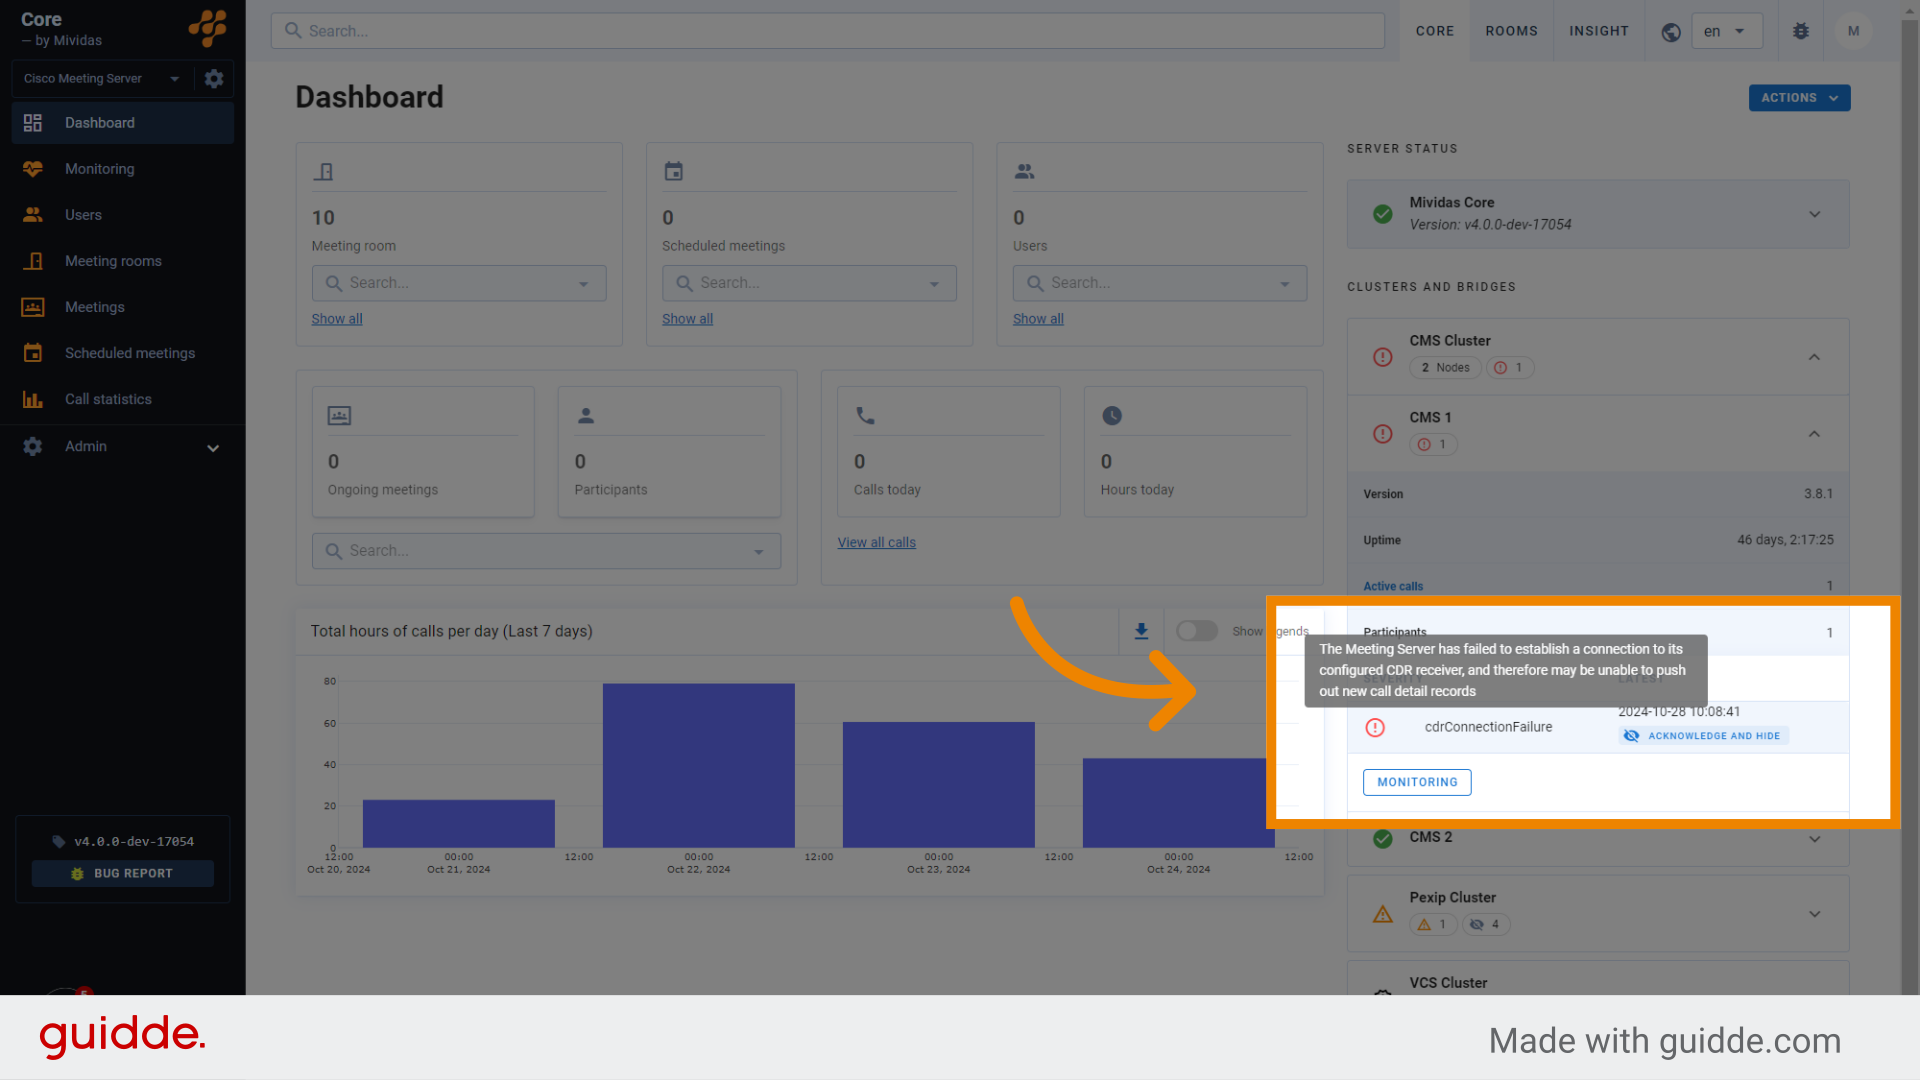
The “CMS 1” server currently shows an error notification: “cdrConnectionFailure.” You can either acknowledge the error—hiding it in the Mividas Core interface until it is triggered again—or address and resolve the issue directly on the server.
7. Click “Monitoring”
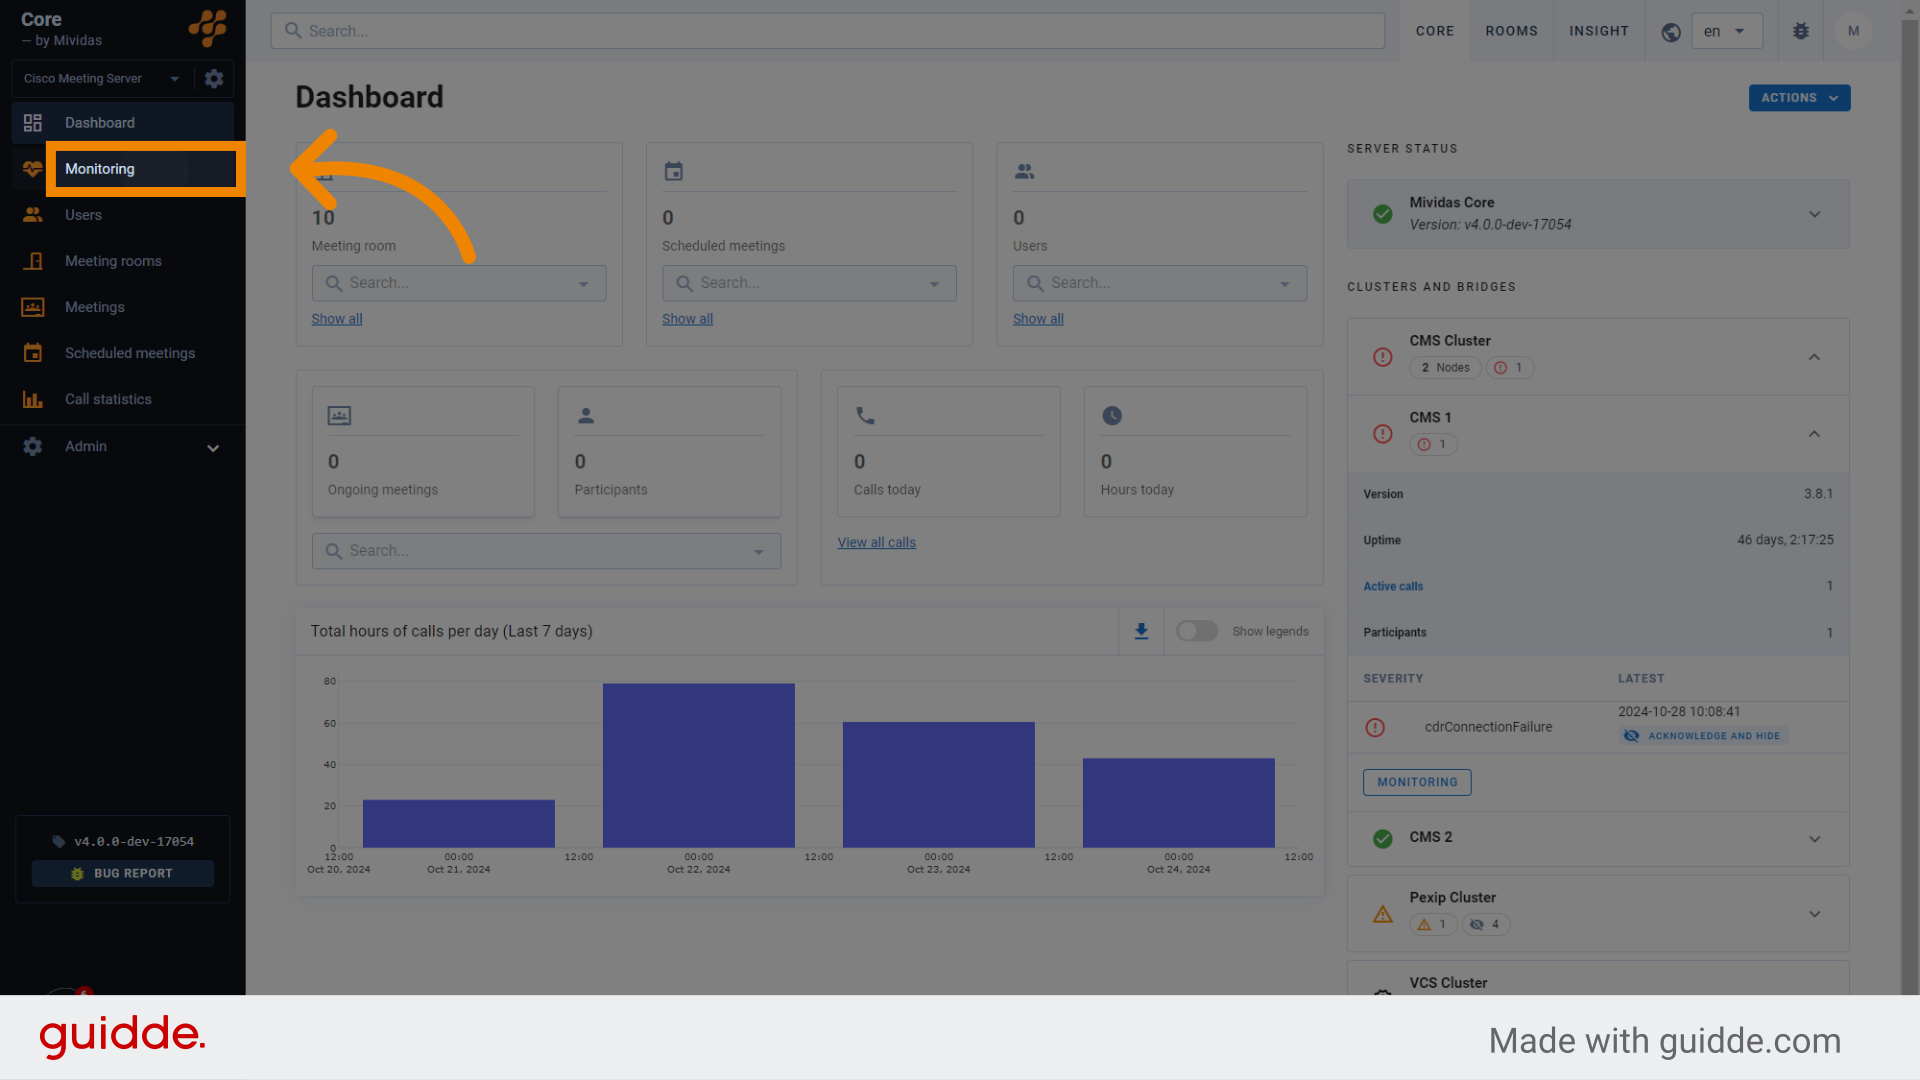
8. Monitoring overview
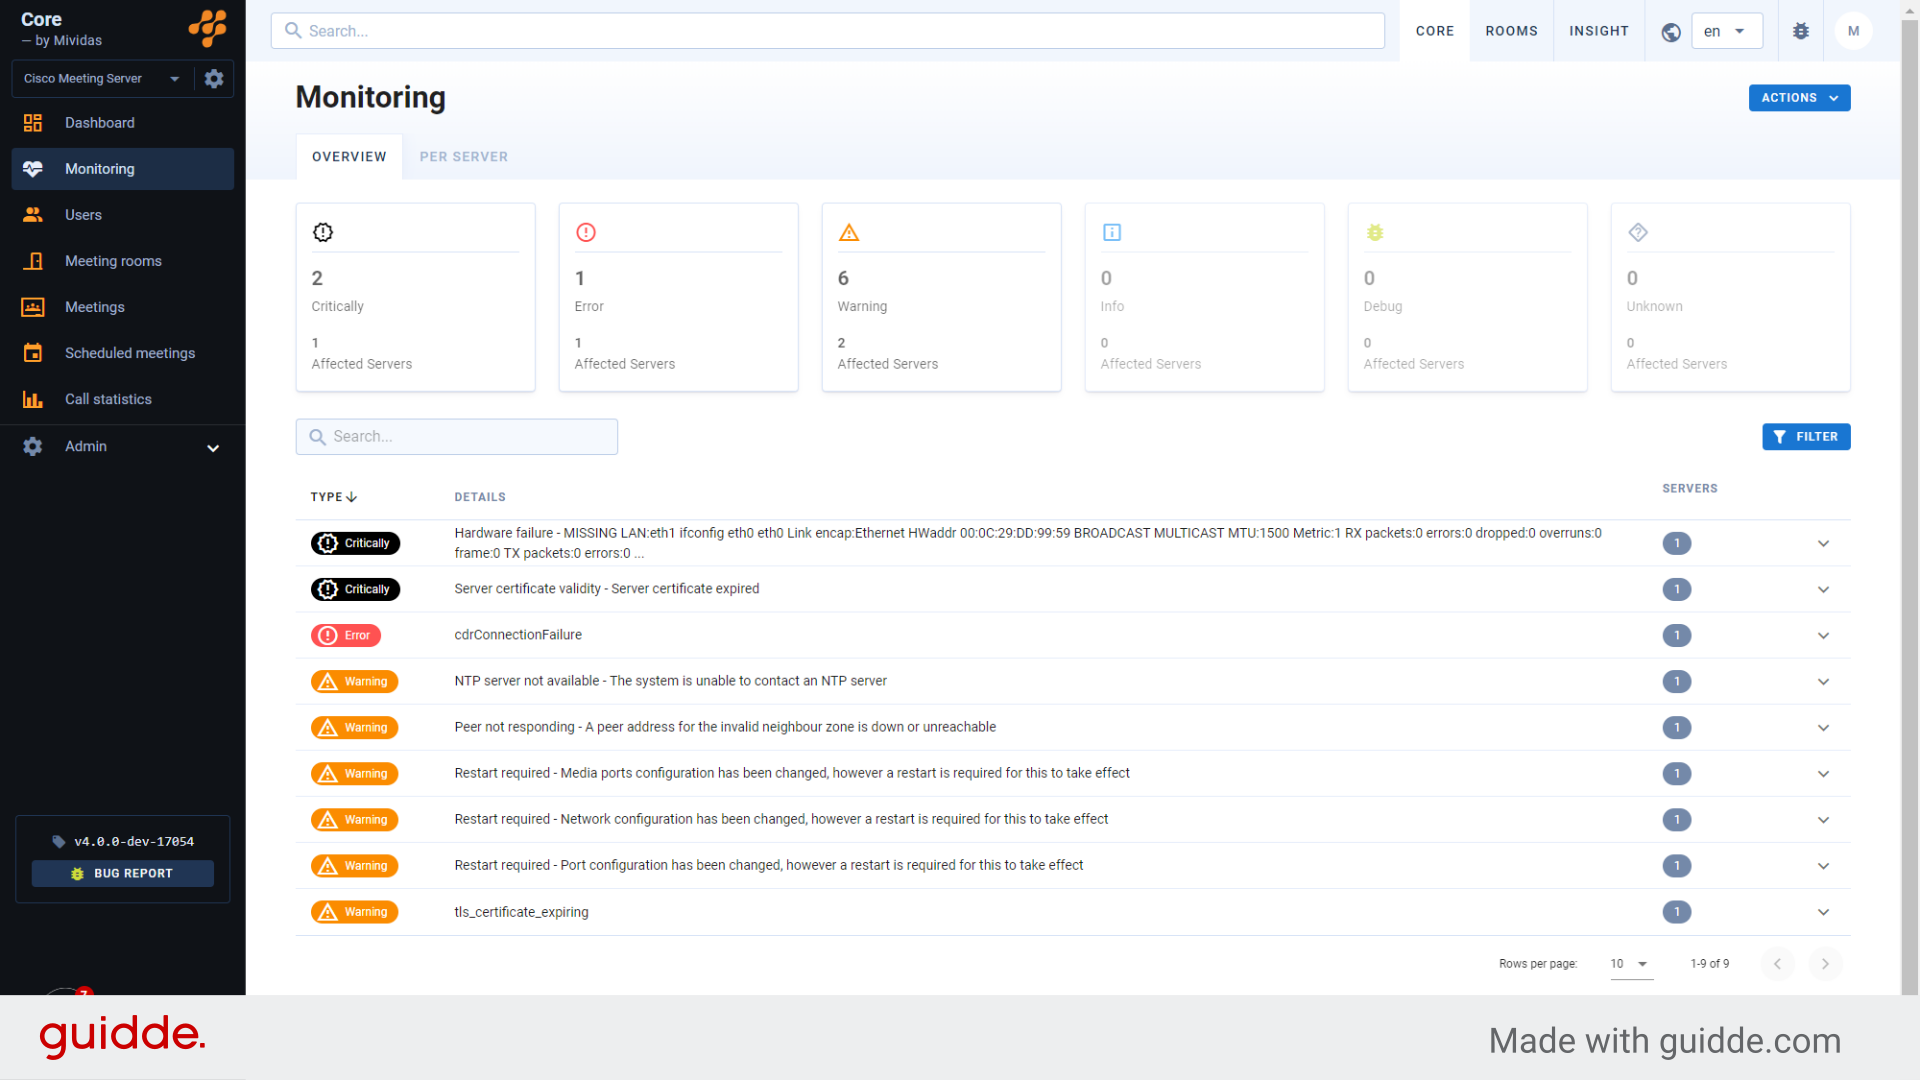
The monitoring section provides an overview of all active notifications generated by your connected servers, along with their severity levels.
9. Filter view on “Errors”
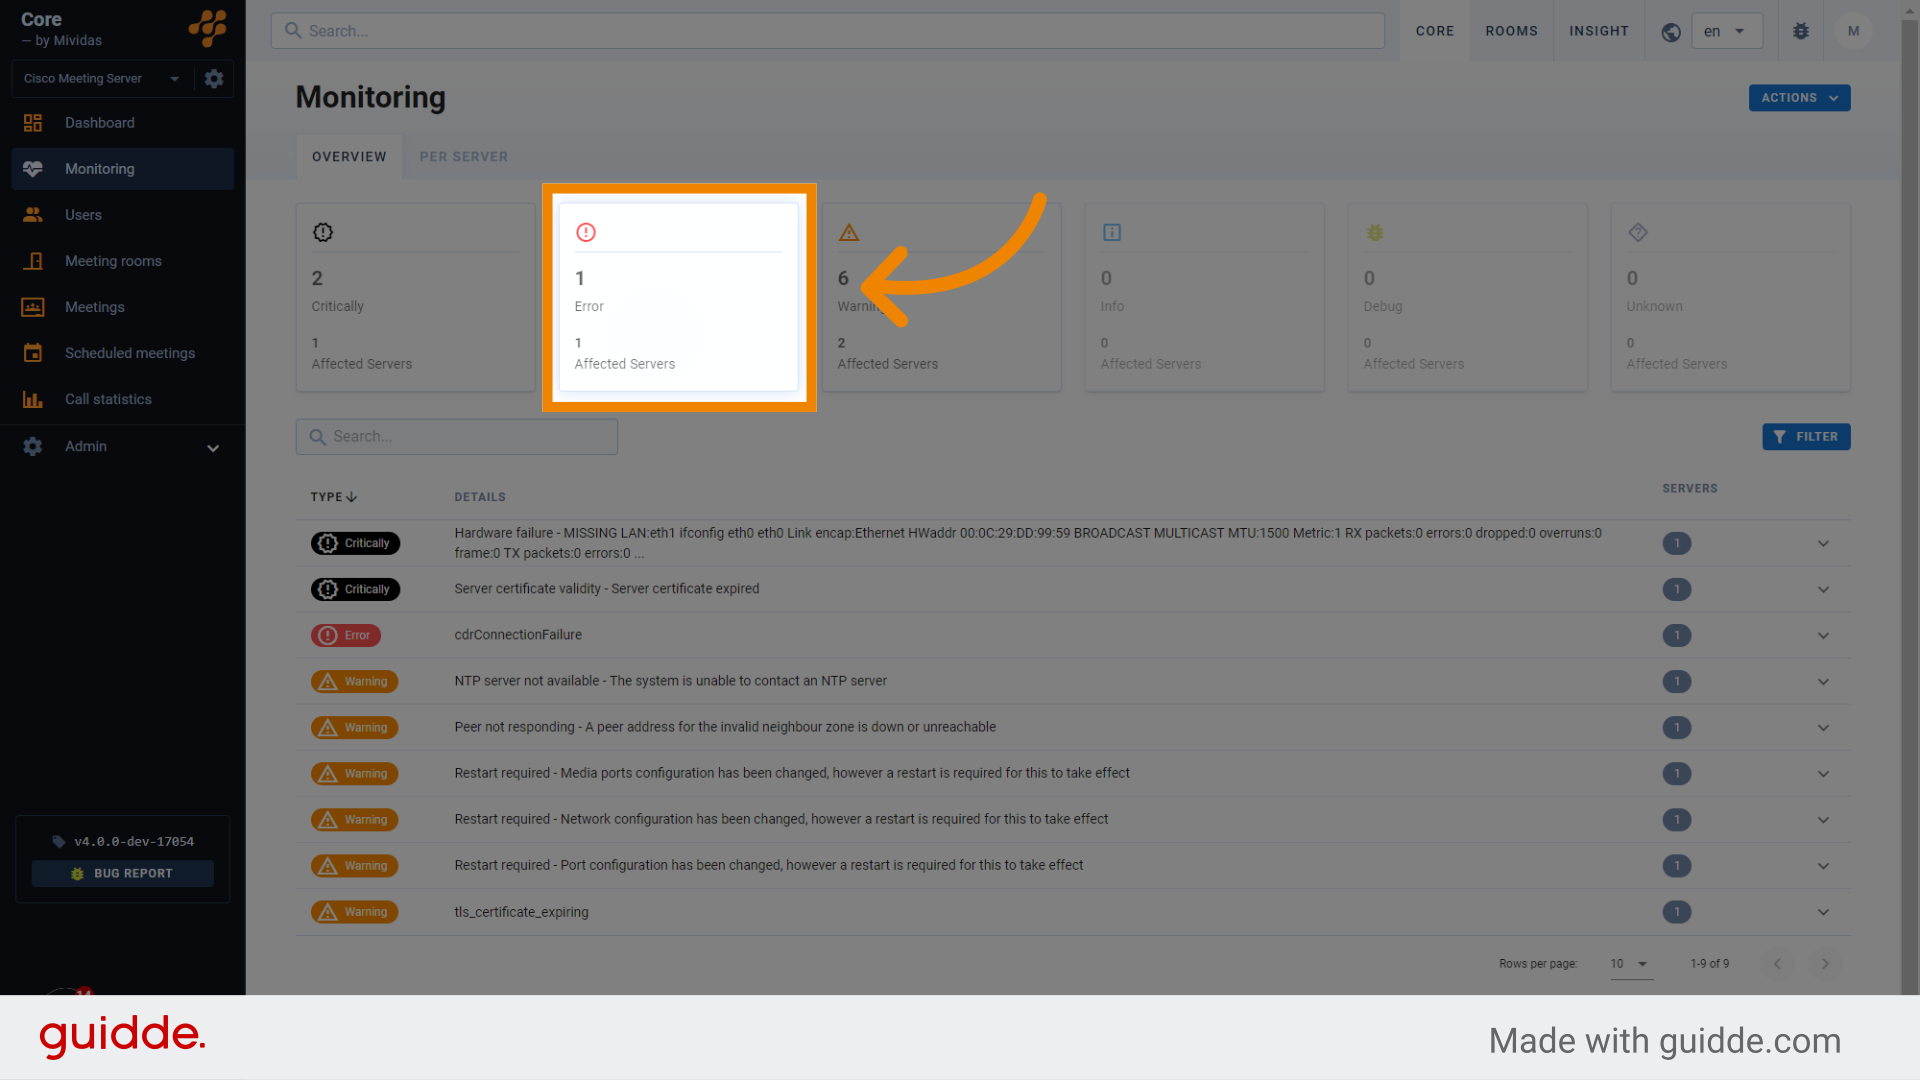
At the top, you’ll find a quick overview of severity levels, indicating the number of affected servers for each severity type. Click on the severity level “Error” to filter the view, displaying only notifications of that severity level.
10. Filtered view

We can see that there is one notification with a severity level of “Error,” which affects one server.
11. Expand row
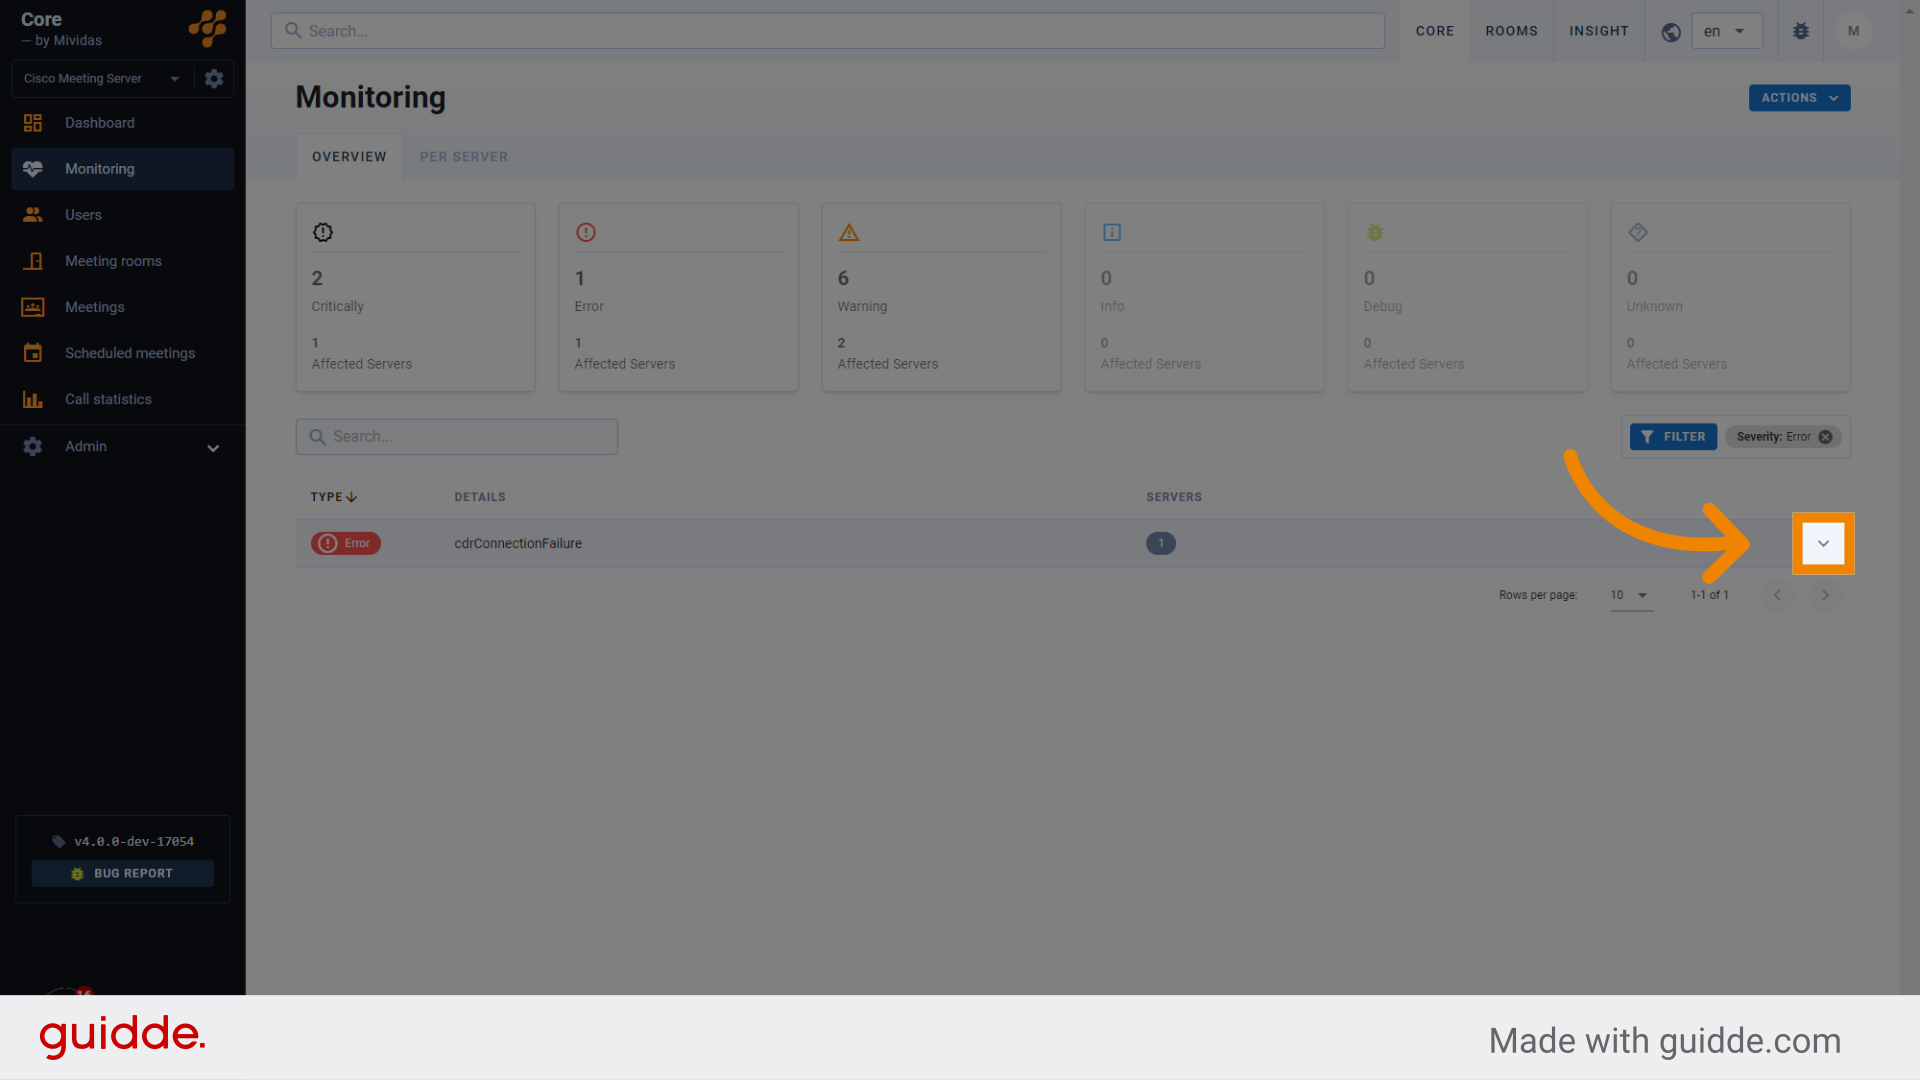
Continue by expanding the row.
12. Expanded row
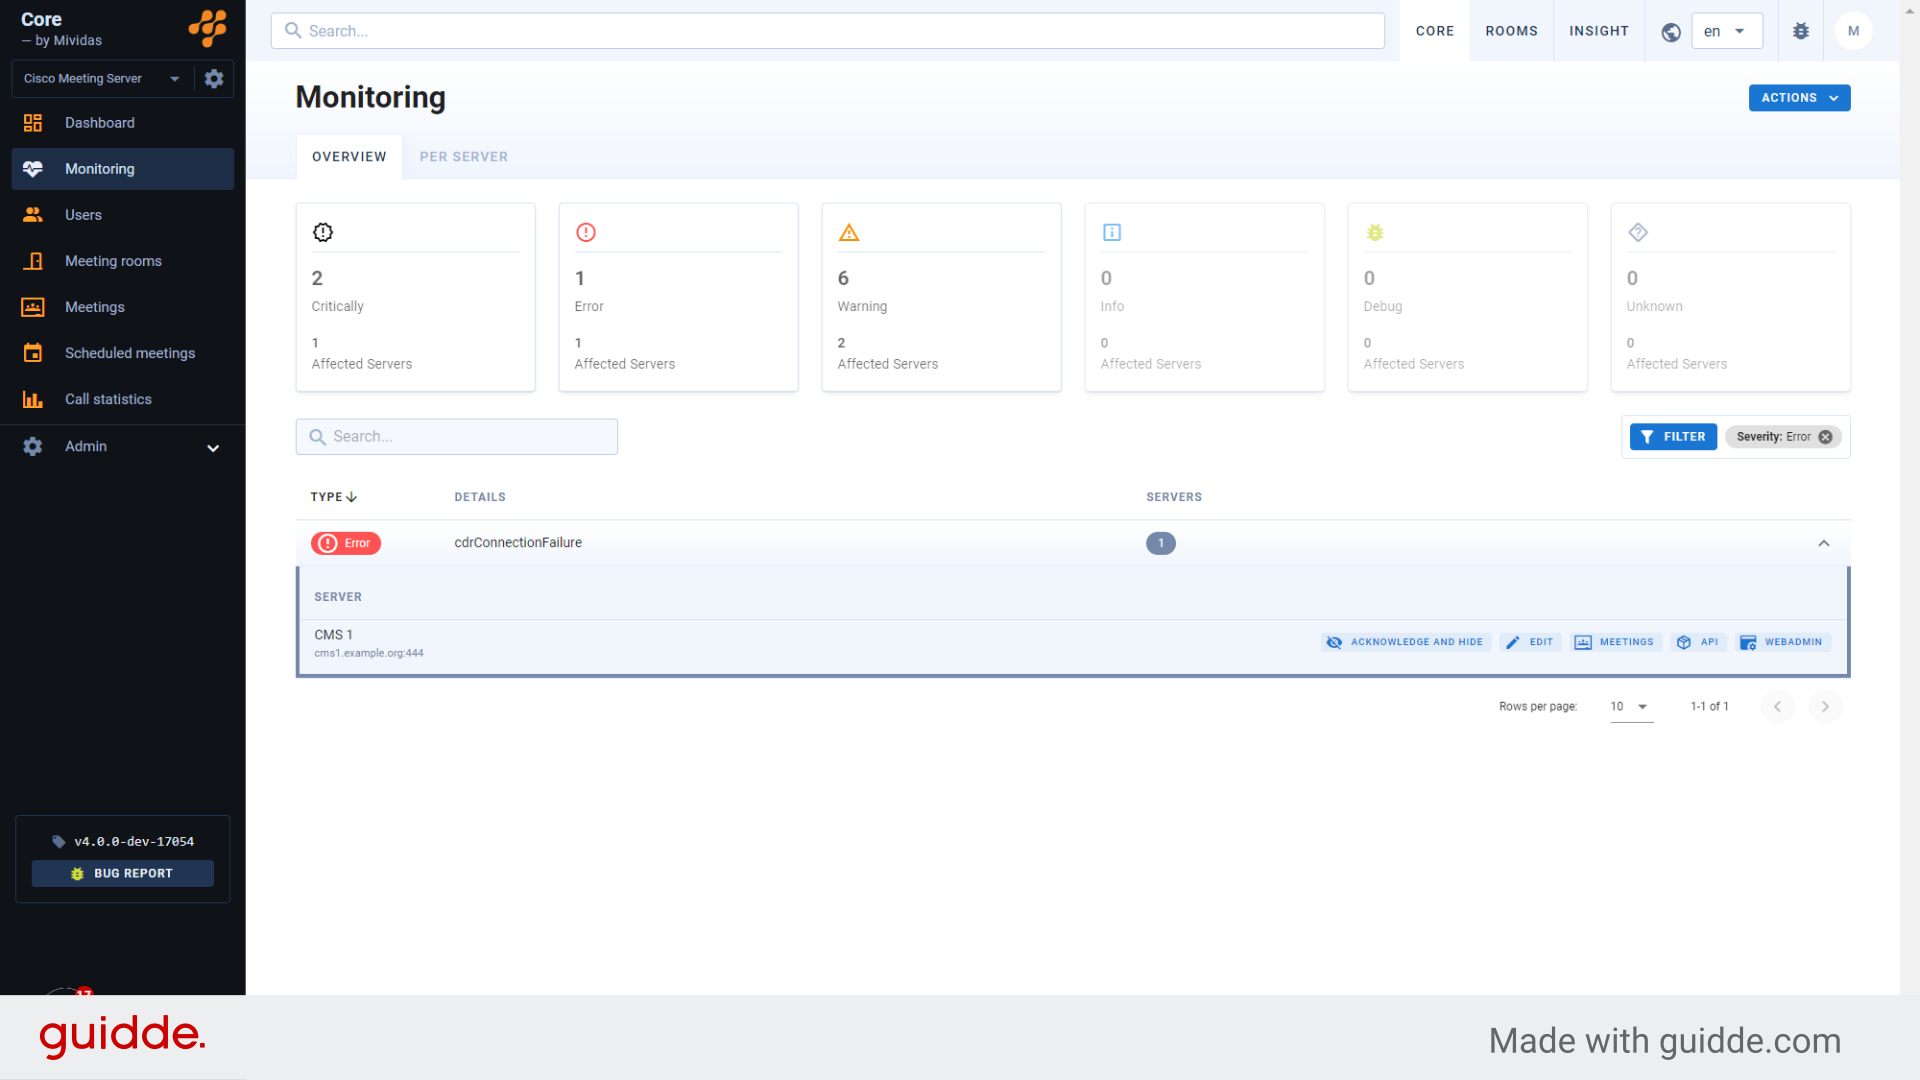
Expanding the row will reveal a list of servers affected by this notification. In this case, we see the “CMS 1” server, consistent with what we observed on the Mividas Core dashboard.
13. Click “Acknowledge and hide”

You now have the option to click “Acknowledge and hide”, which will conceal the notification for the server across the interface until it is triggered again. Proceed by clicking the button.
14. The dashboard view
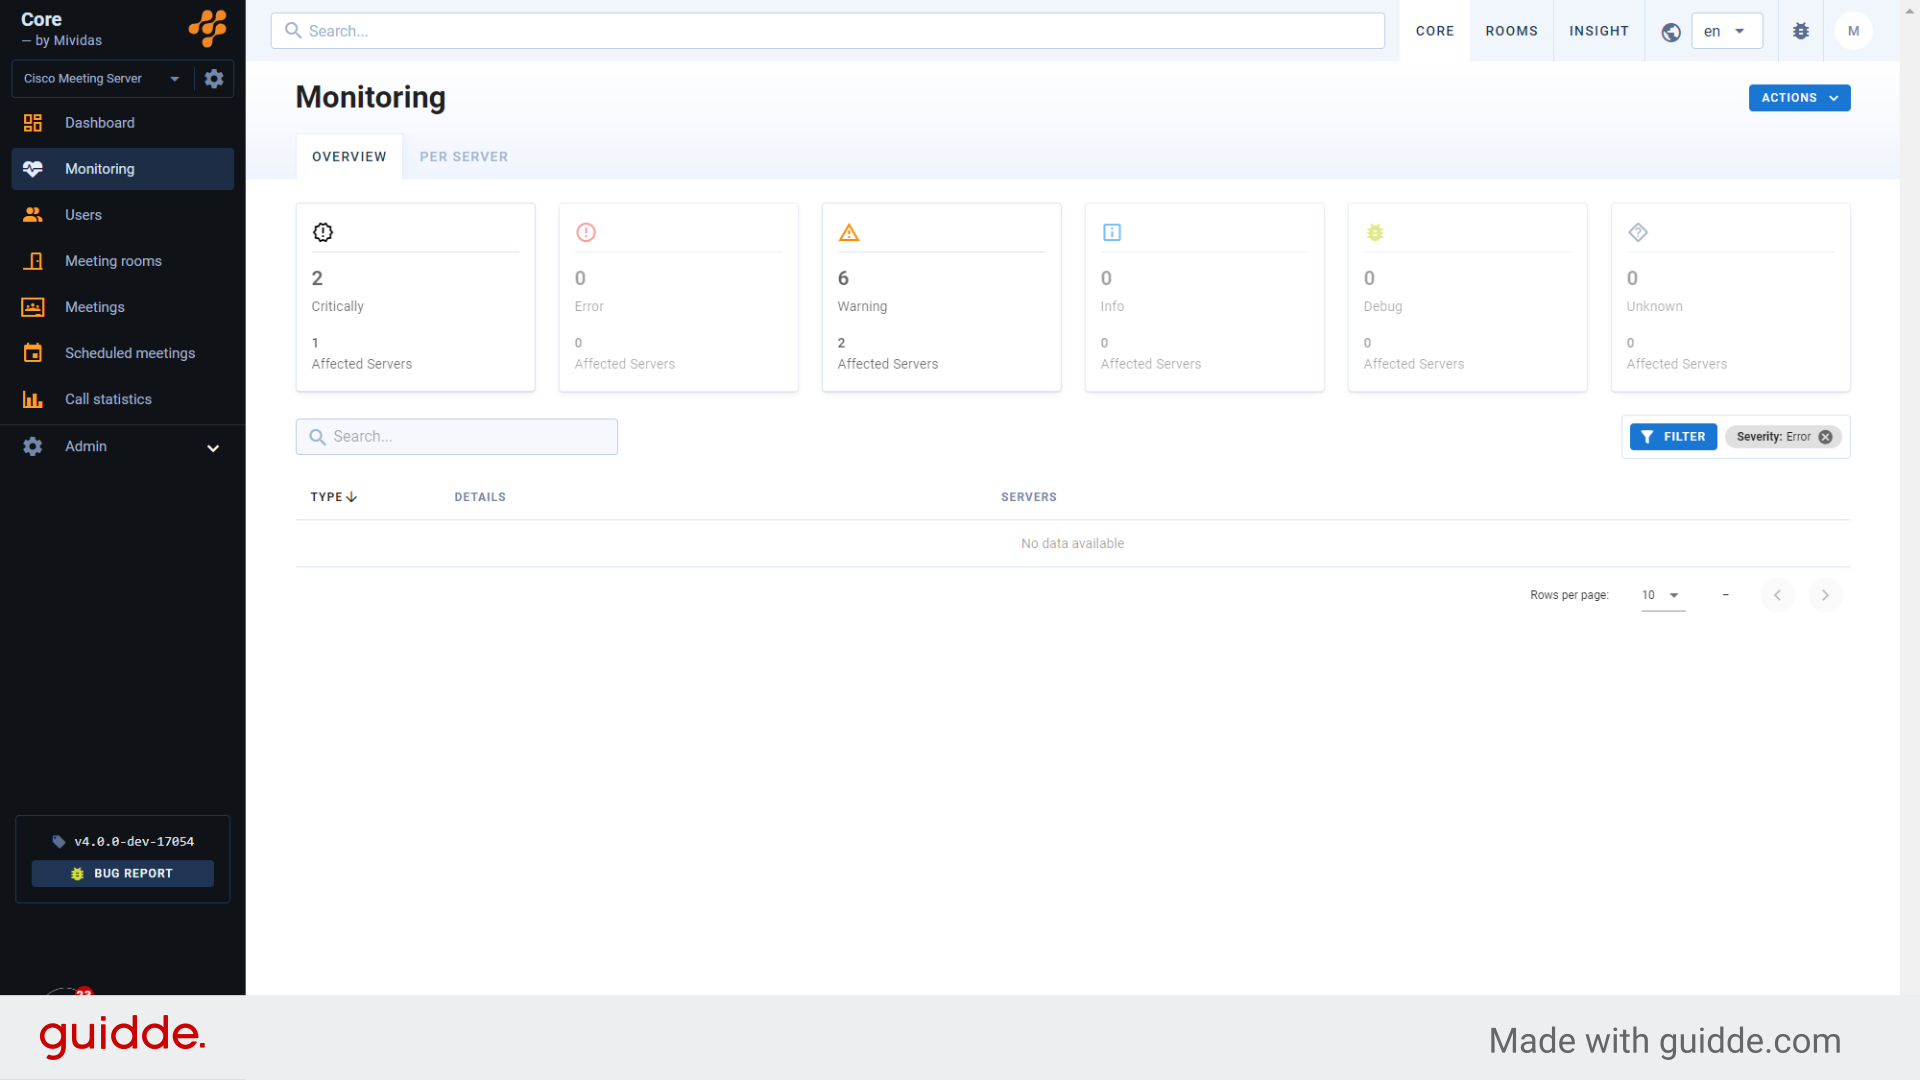
Clicking “Acknowledge and hide” will remove the notification from view. Keep in mind that you can still display acknowledged notifications by using the filter function in the interface.
15. Click “Dashboard”
Navigate back to the Mividas Core dashboard.
16. The dashboard view
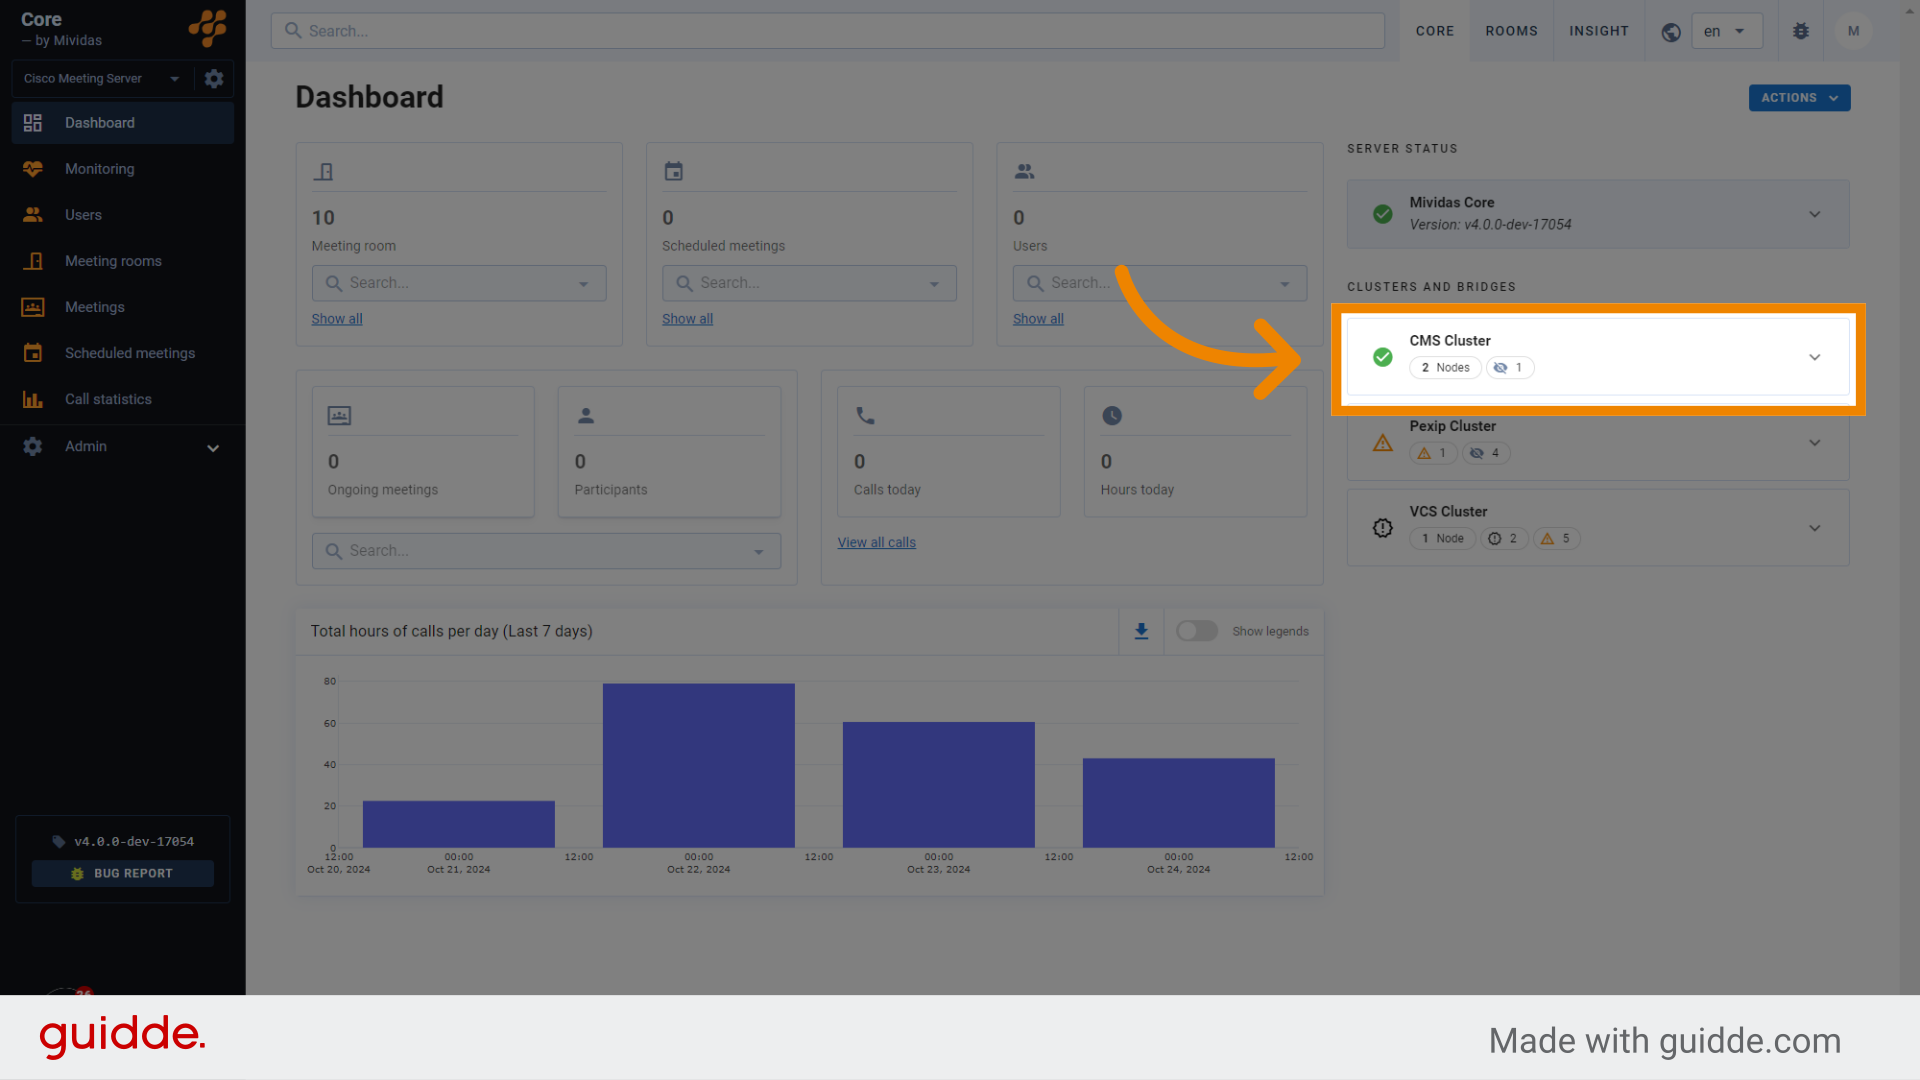
After acknowledging the error, the CMS Cluster displays a green checkmark and a note indicating one acknowledged notification. You can easily re-display the error notification if needed.
17. Click “Monitoring”

Navigate back to the “Monitoring” section.
18. Click “Per Server”
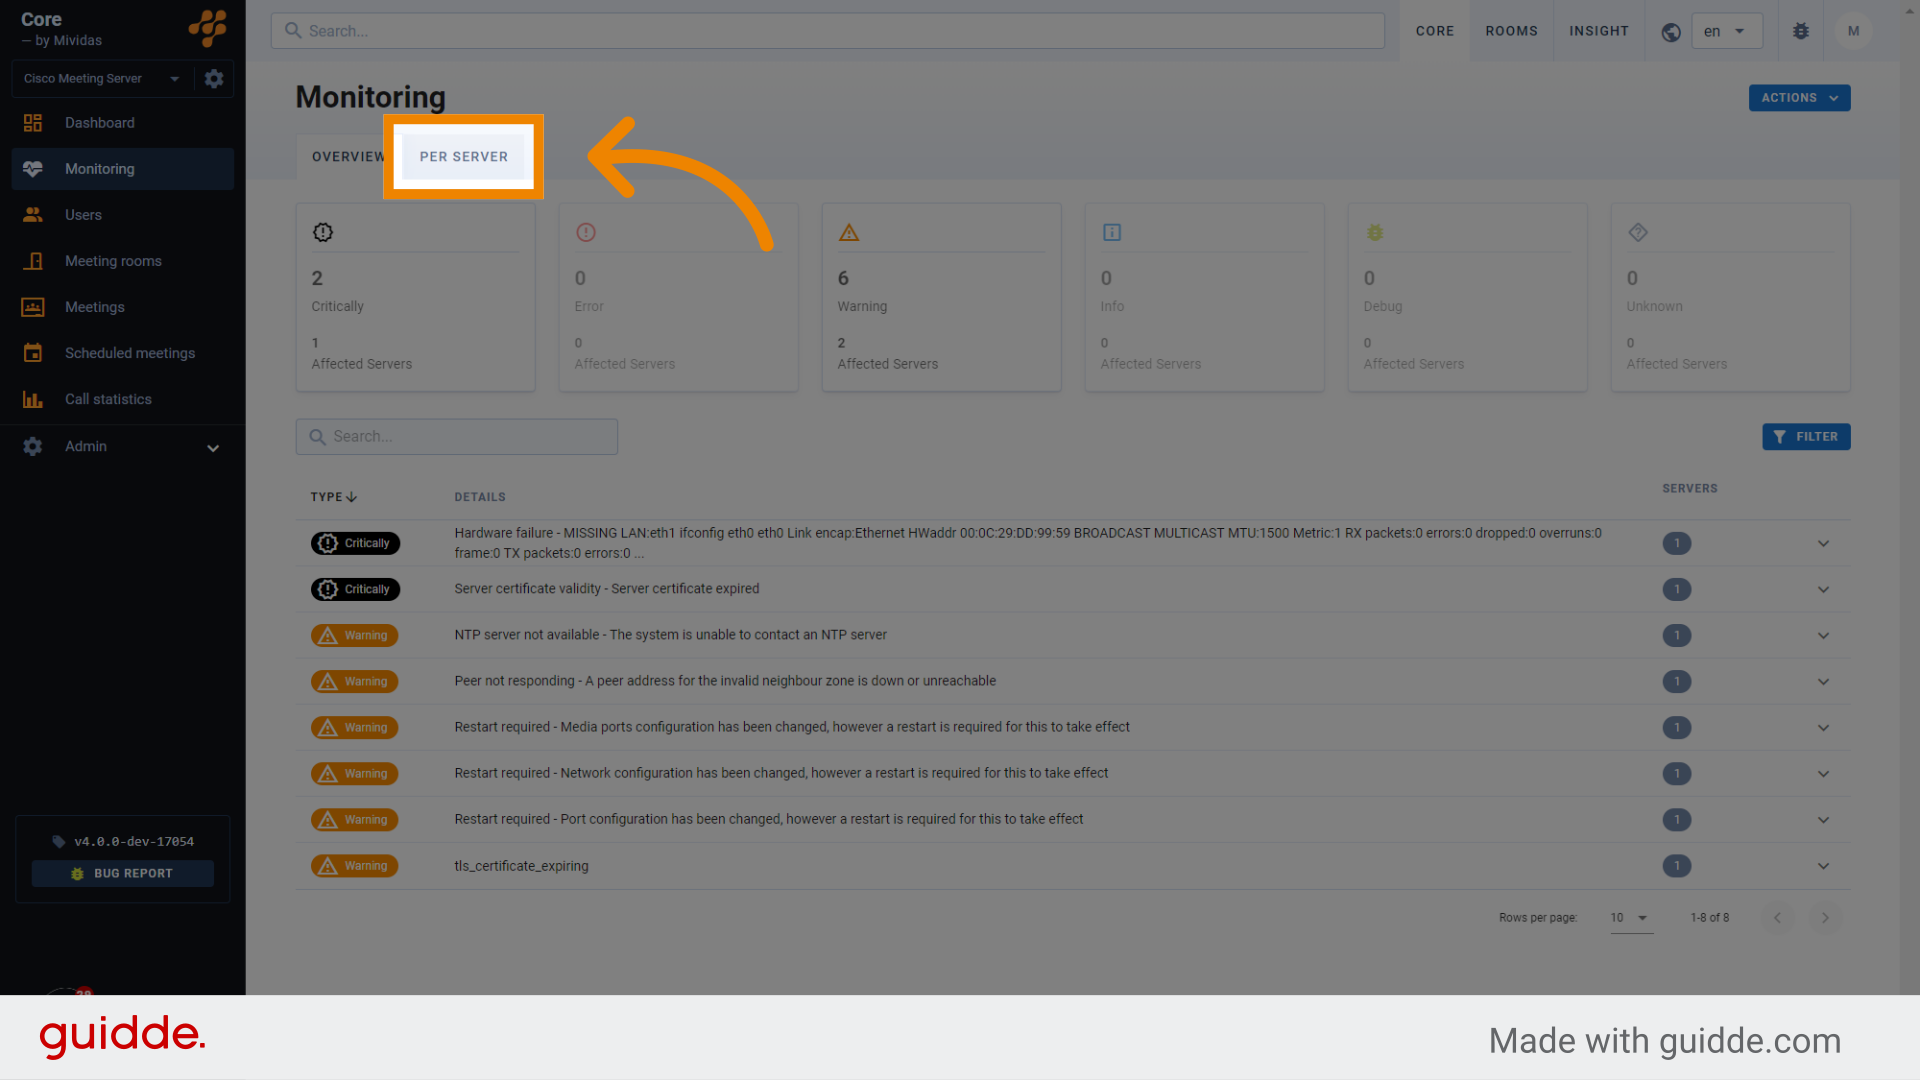
Click on “Per Server” tab.
19. The “Per Server” view
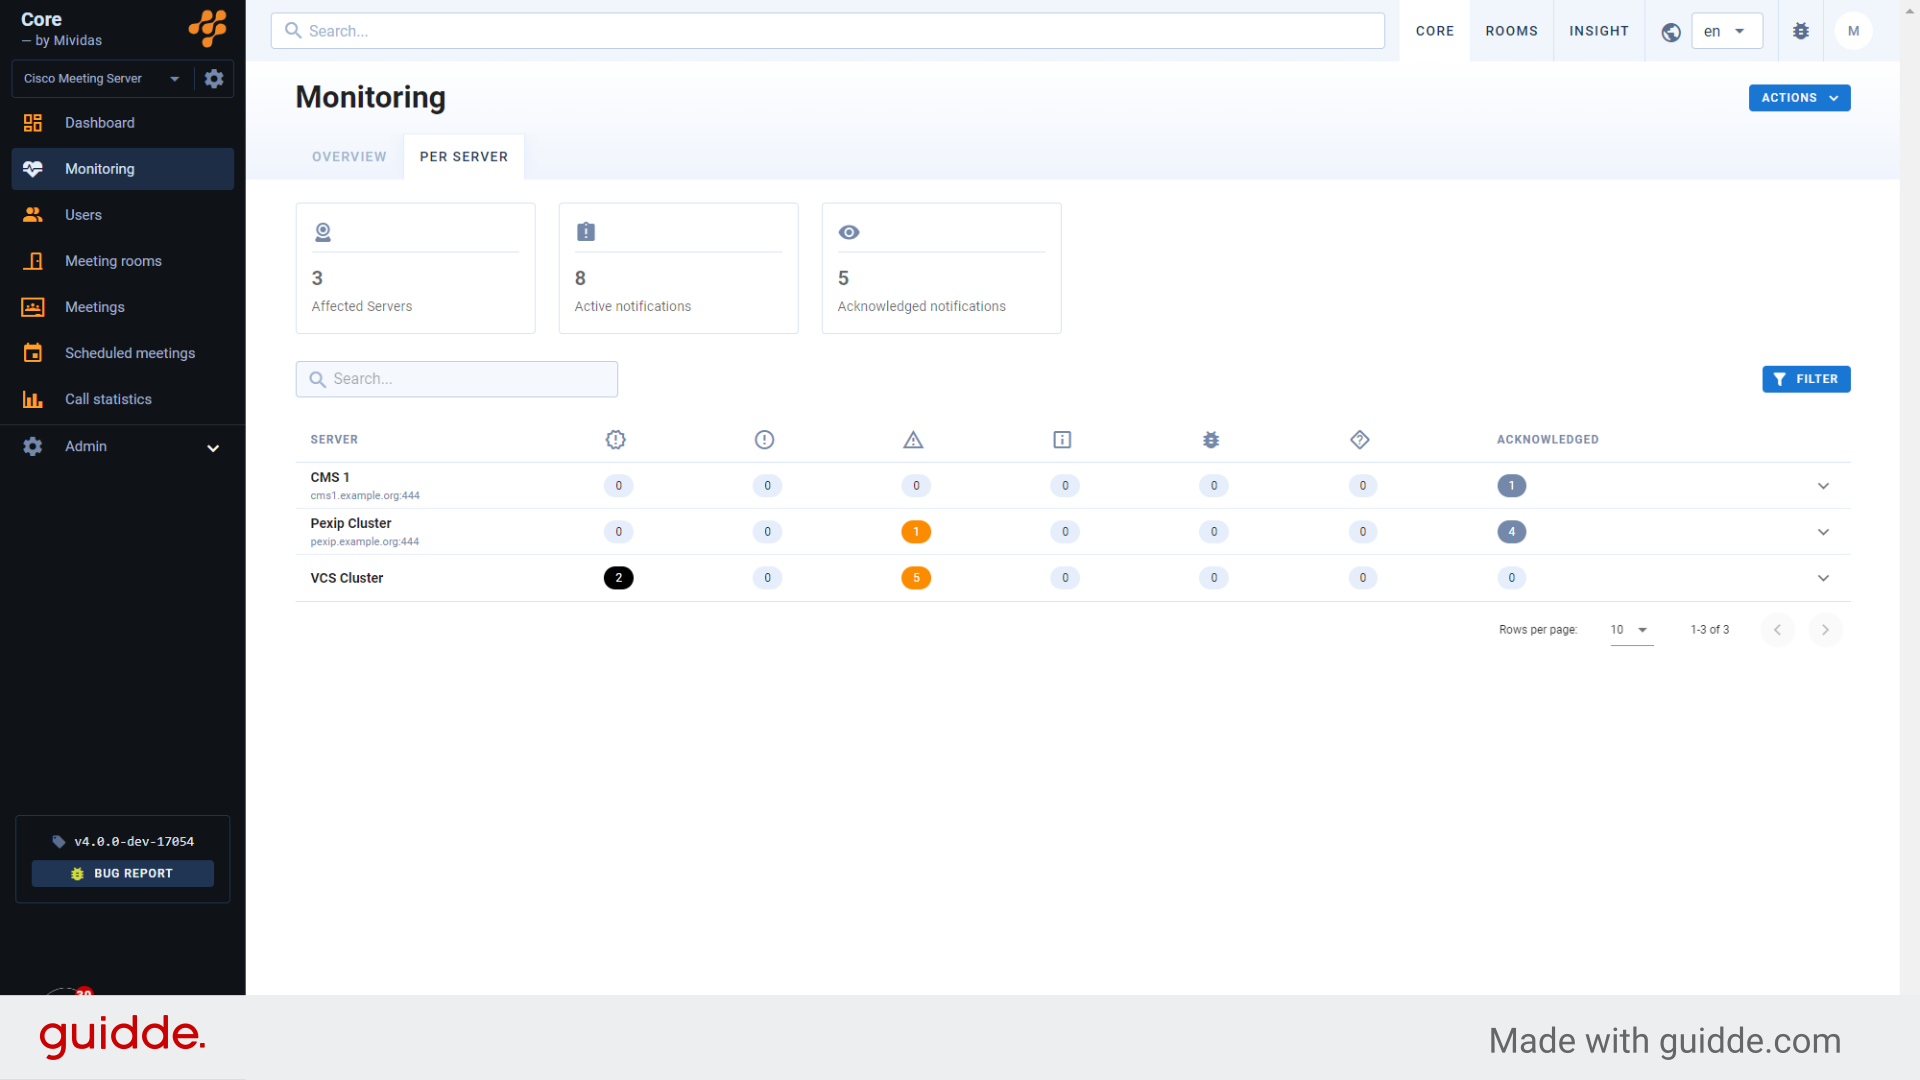
The “Per Server” view in monitoring allows quick access to a specific server, clearly displaying its notifications and severity levels. Here, we can see that the “CMS 1” server now has one acknowledged notification.
20. Expand the “CMS 1” server row.
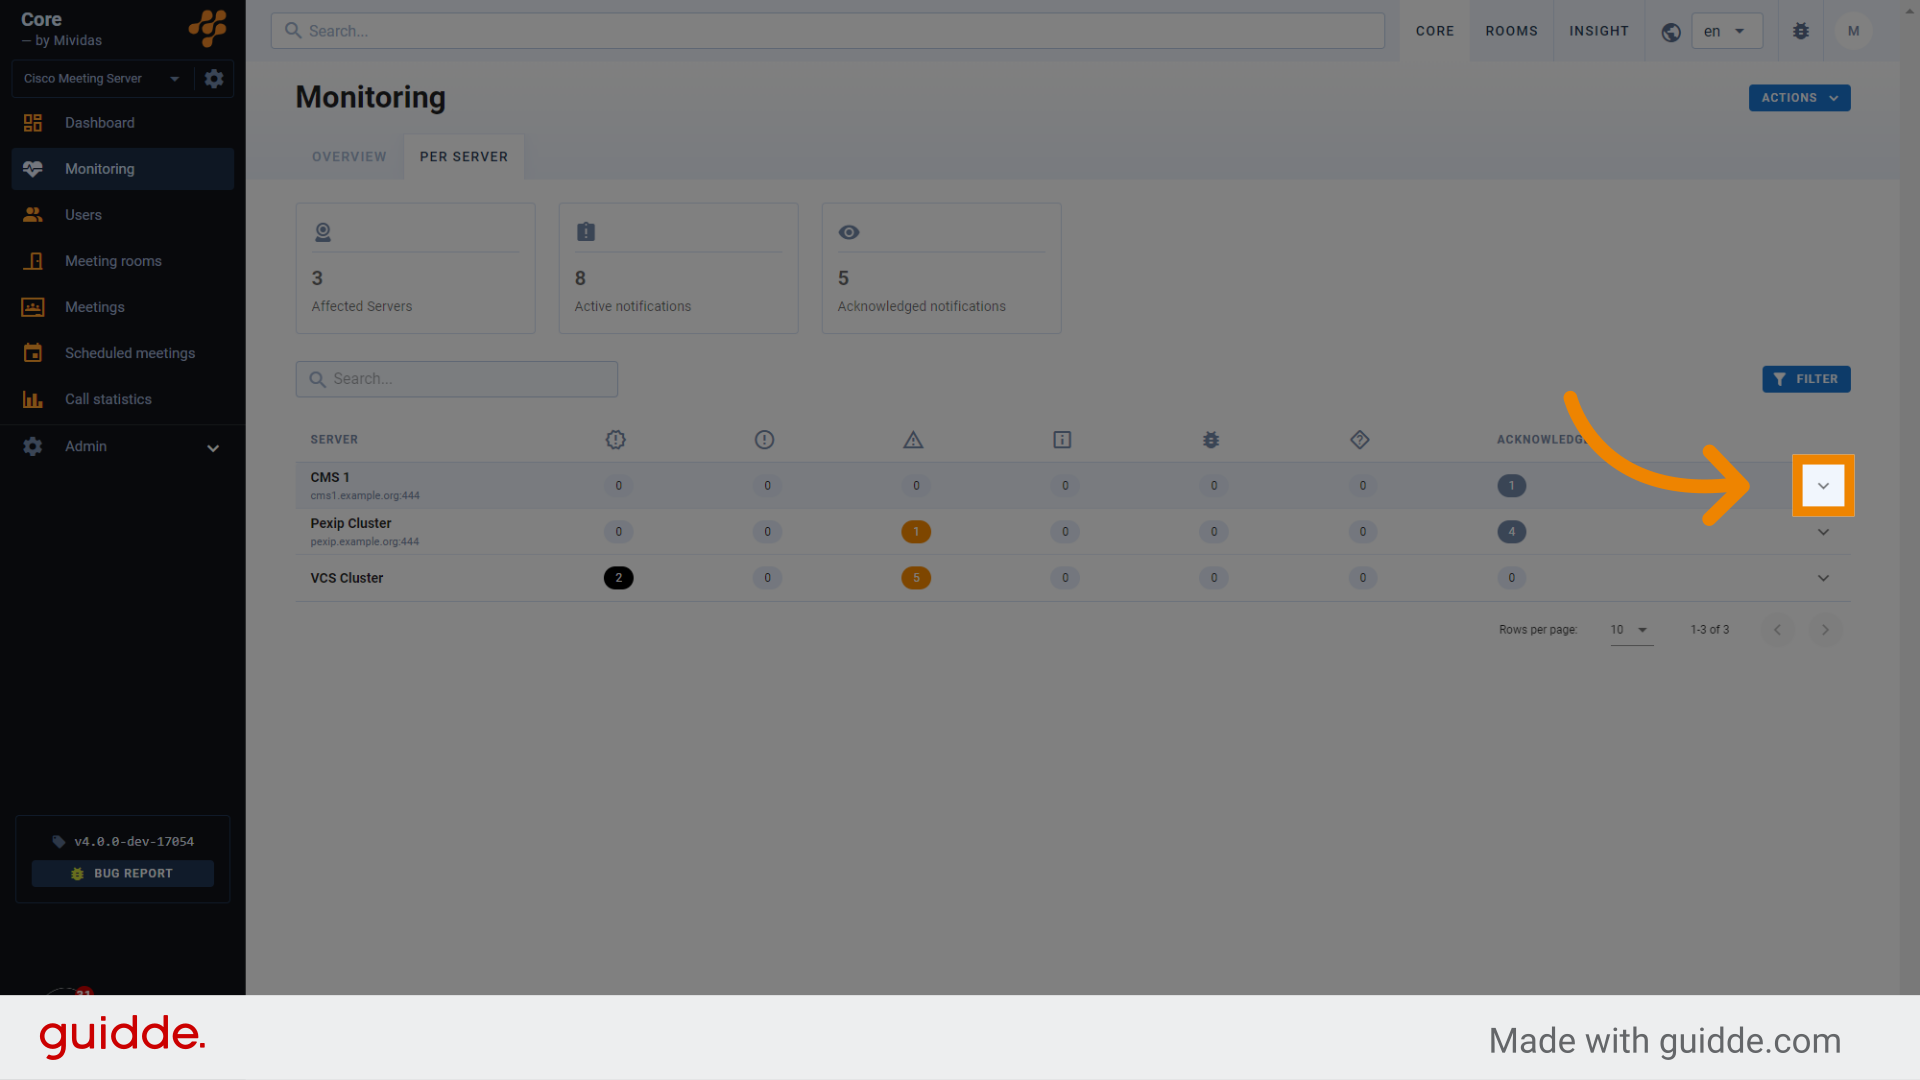
21. Expanded server row
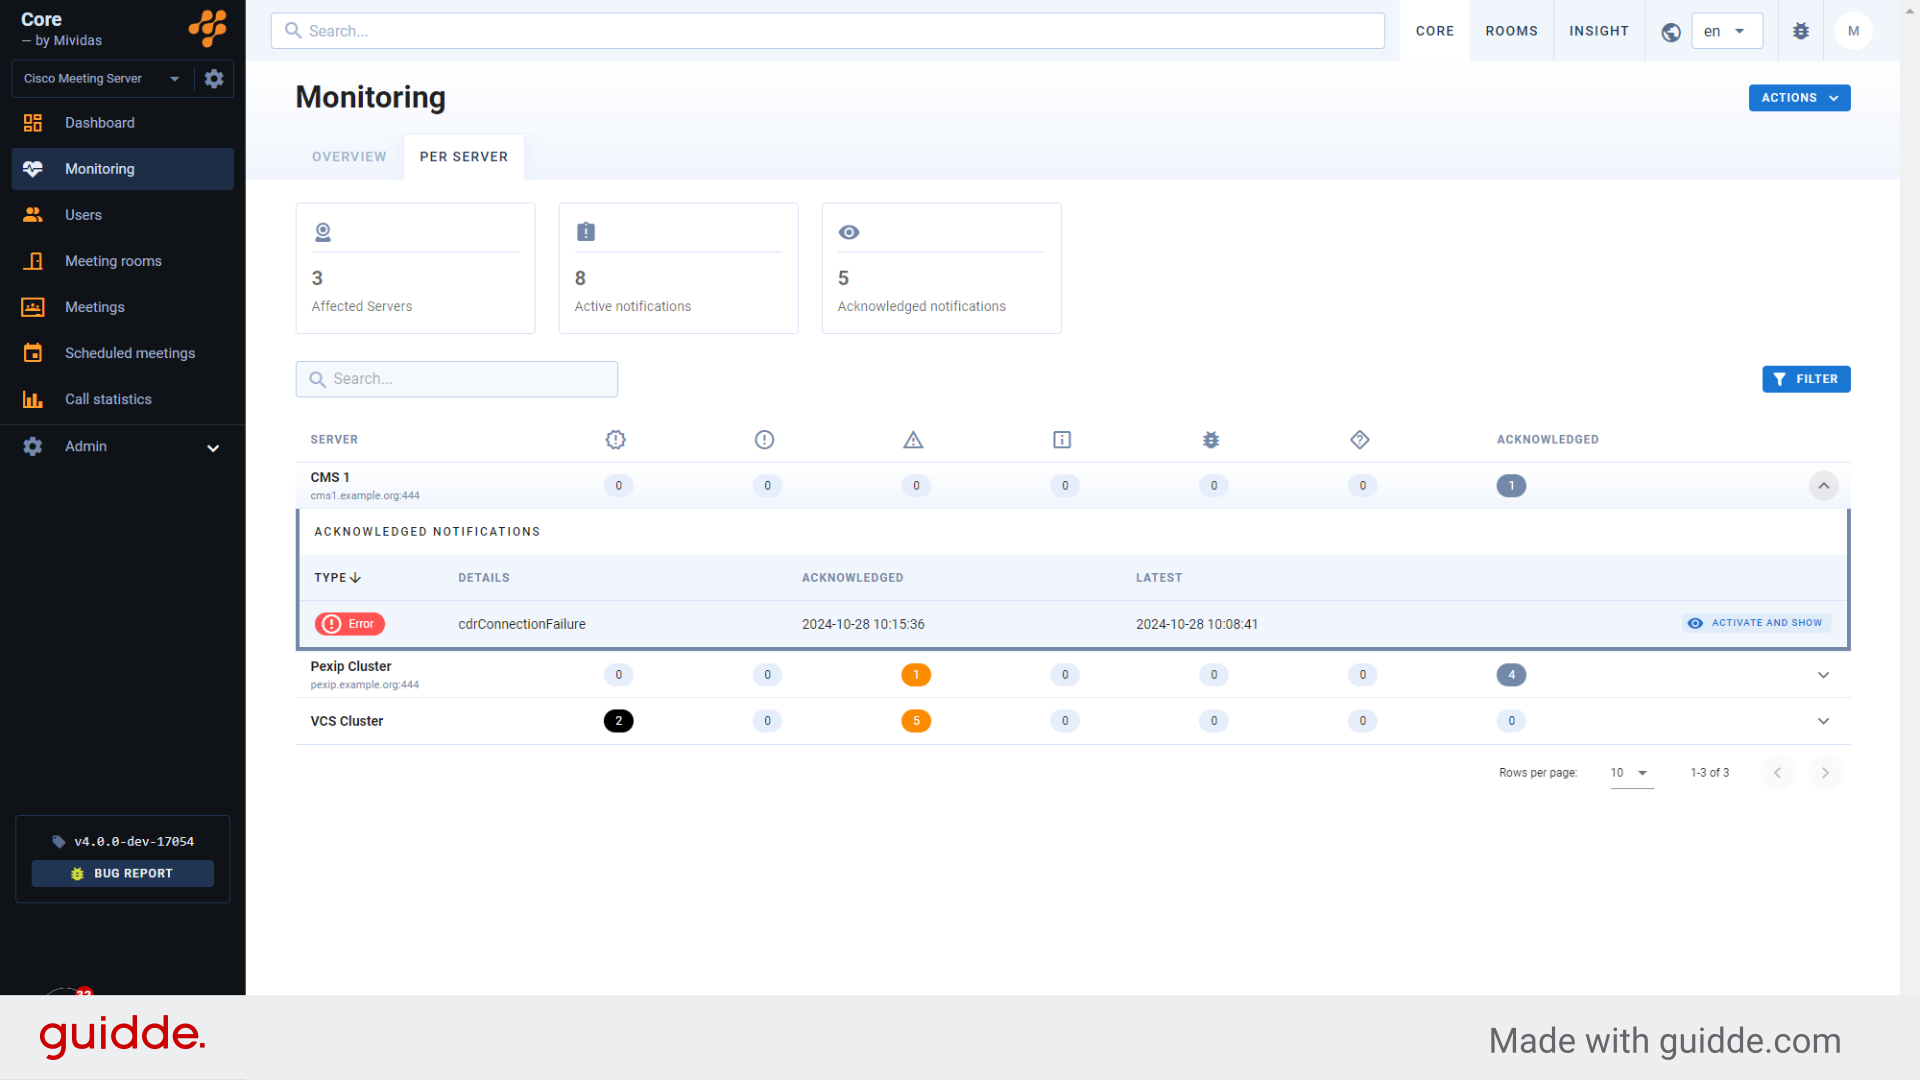
The previously acknowledged “cdrConnectionFailure” now appears as an acknowledged notification, with the option to reactivate and display the error again.
21. Click “Activate and show”
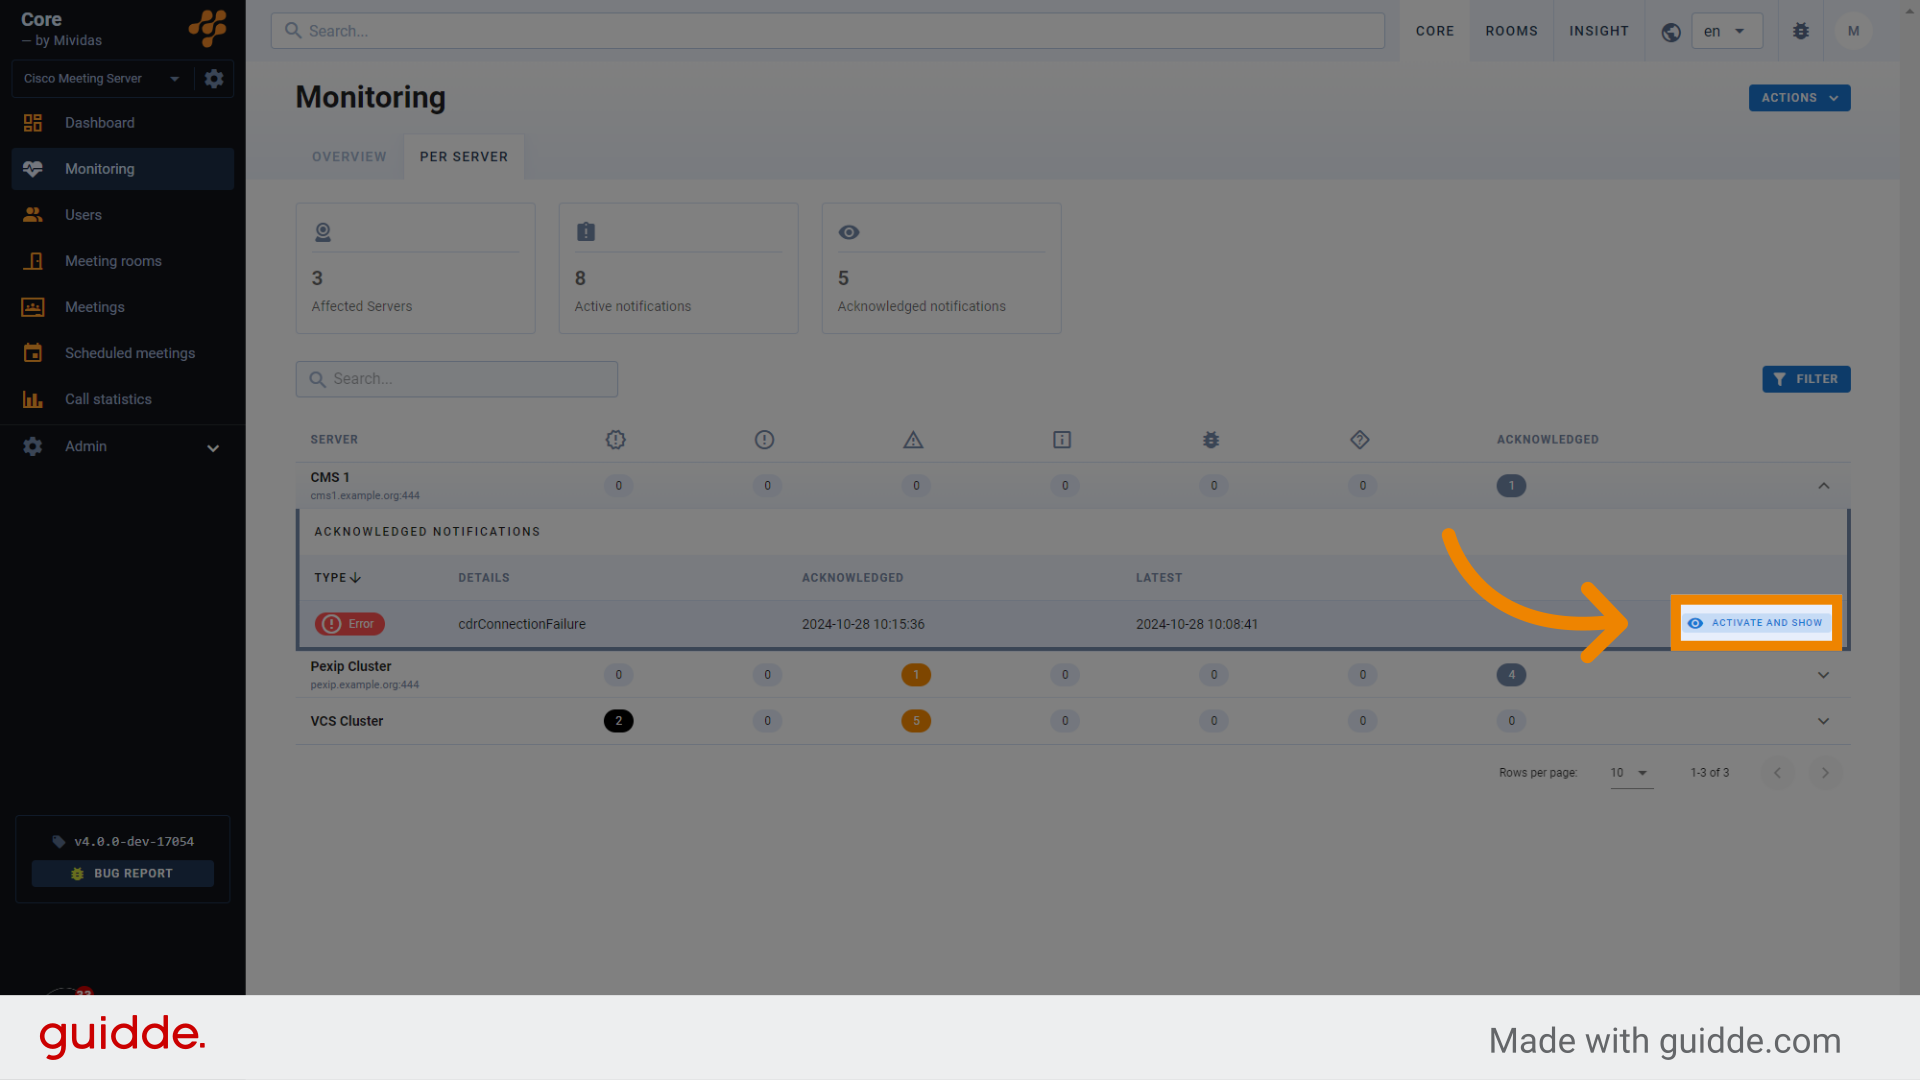
Click the “Activate and Show” button to redisplay the error. Note that the error would also automatically reappear if it is retriggered on the server.
22. Click “Dashboard”
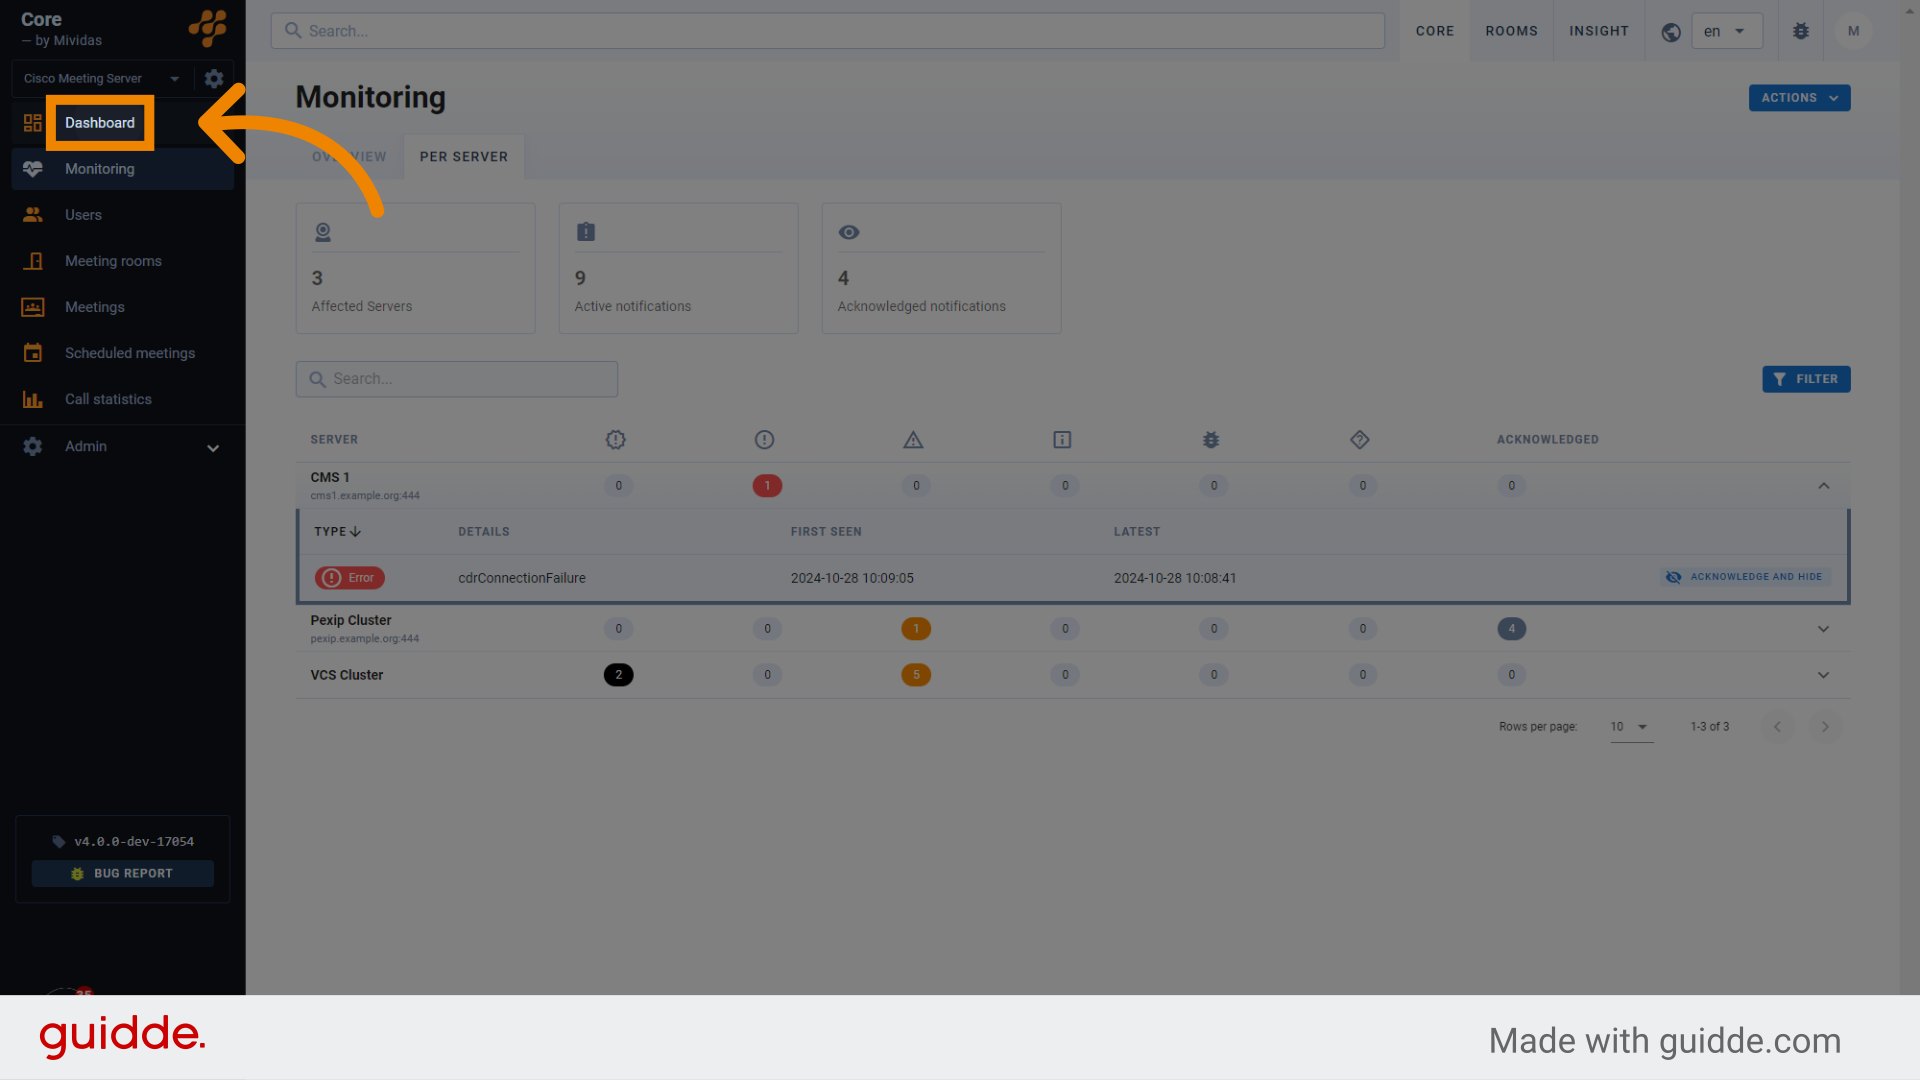
Return to the Mividas Core dashboard.
23. The “Dashboad” view
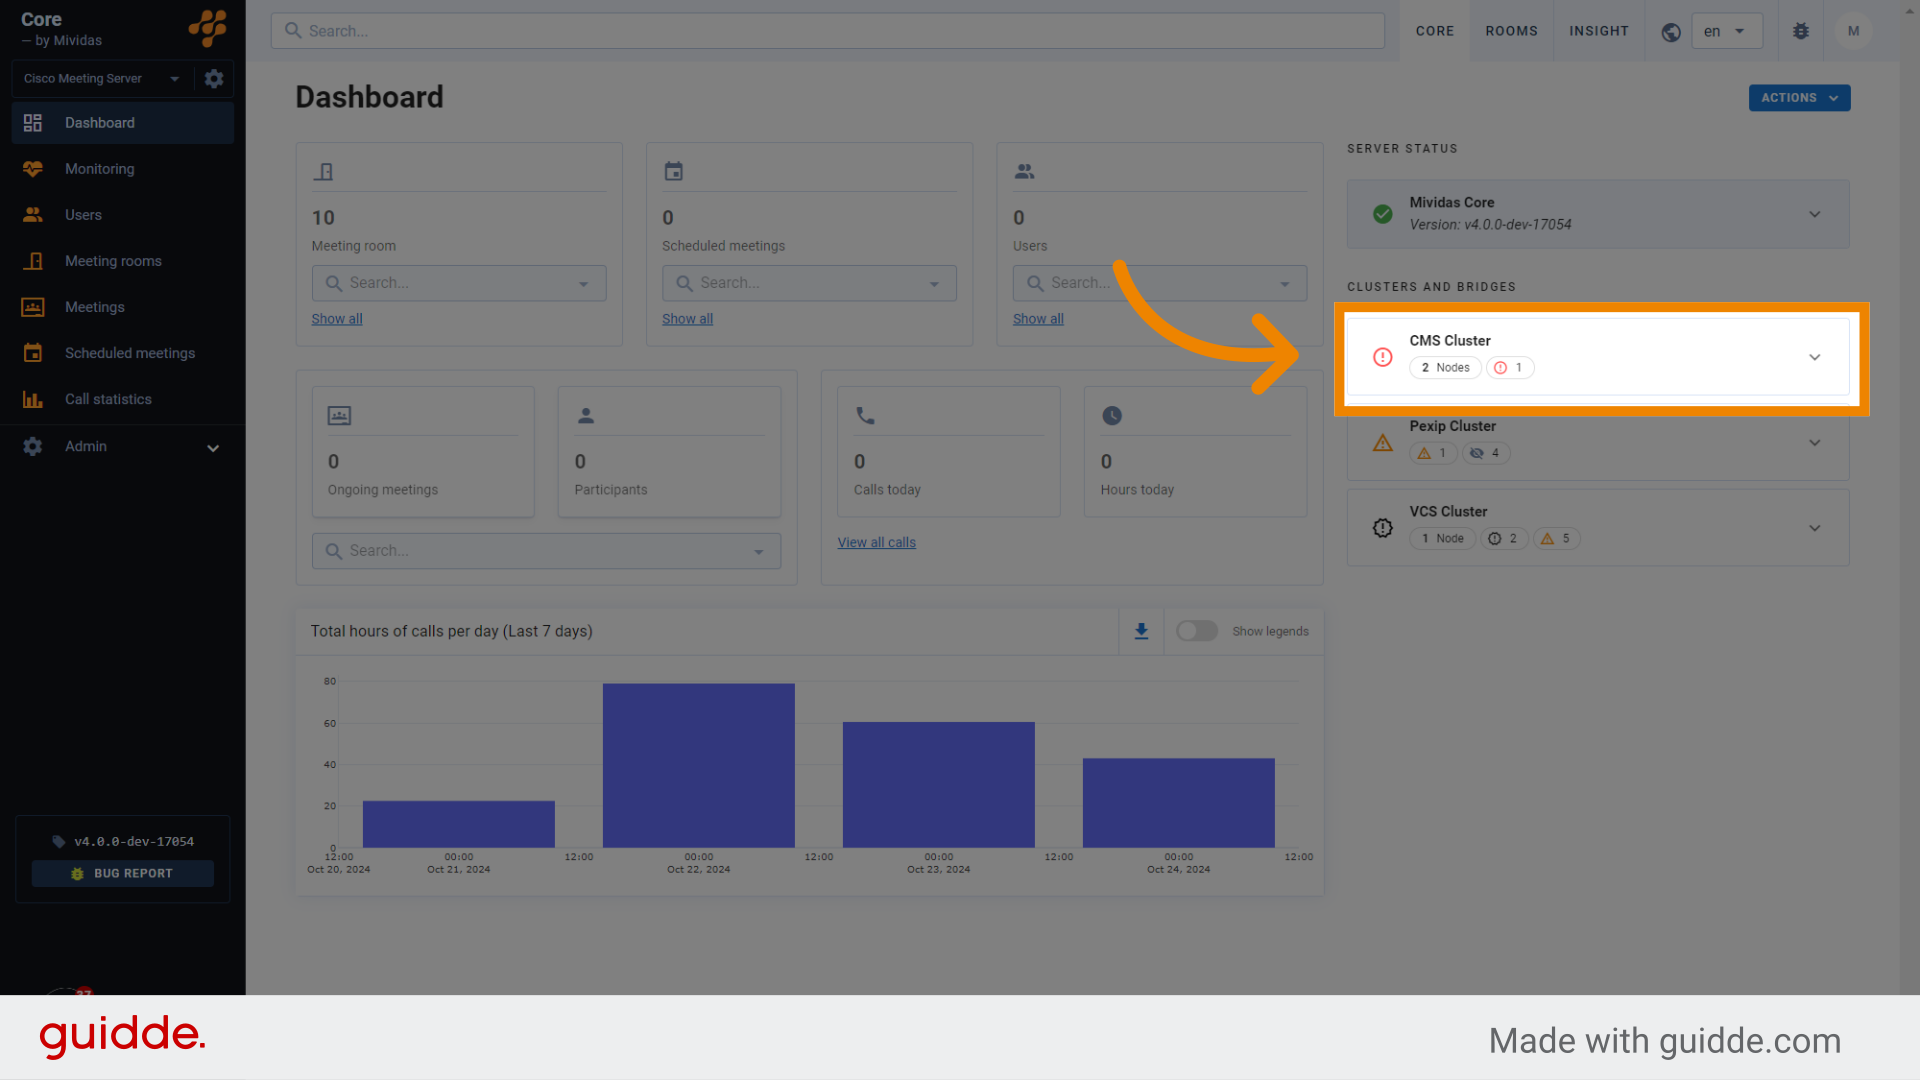
Click and expand the “CMS 1” server.
24. Expanded “CMS 1” server

The cdrConnectionFailure have now return.
25. Acknowledge and hide the notification
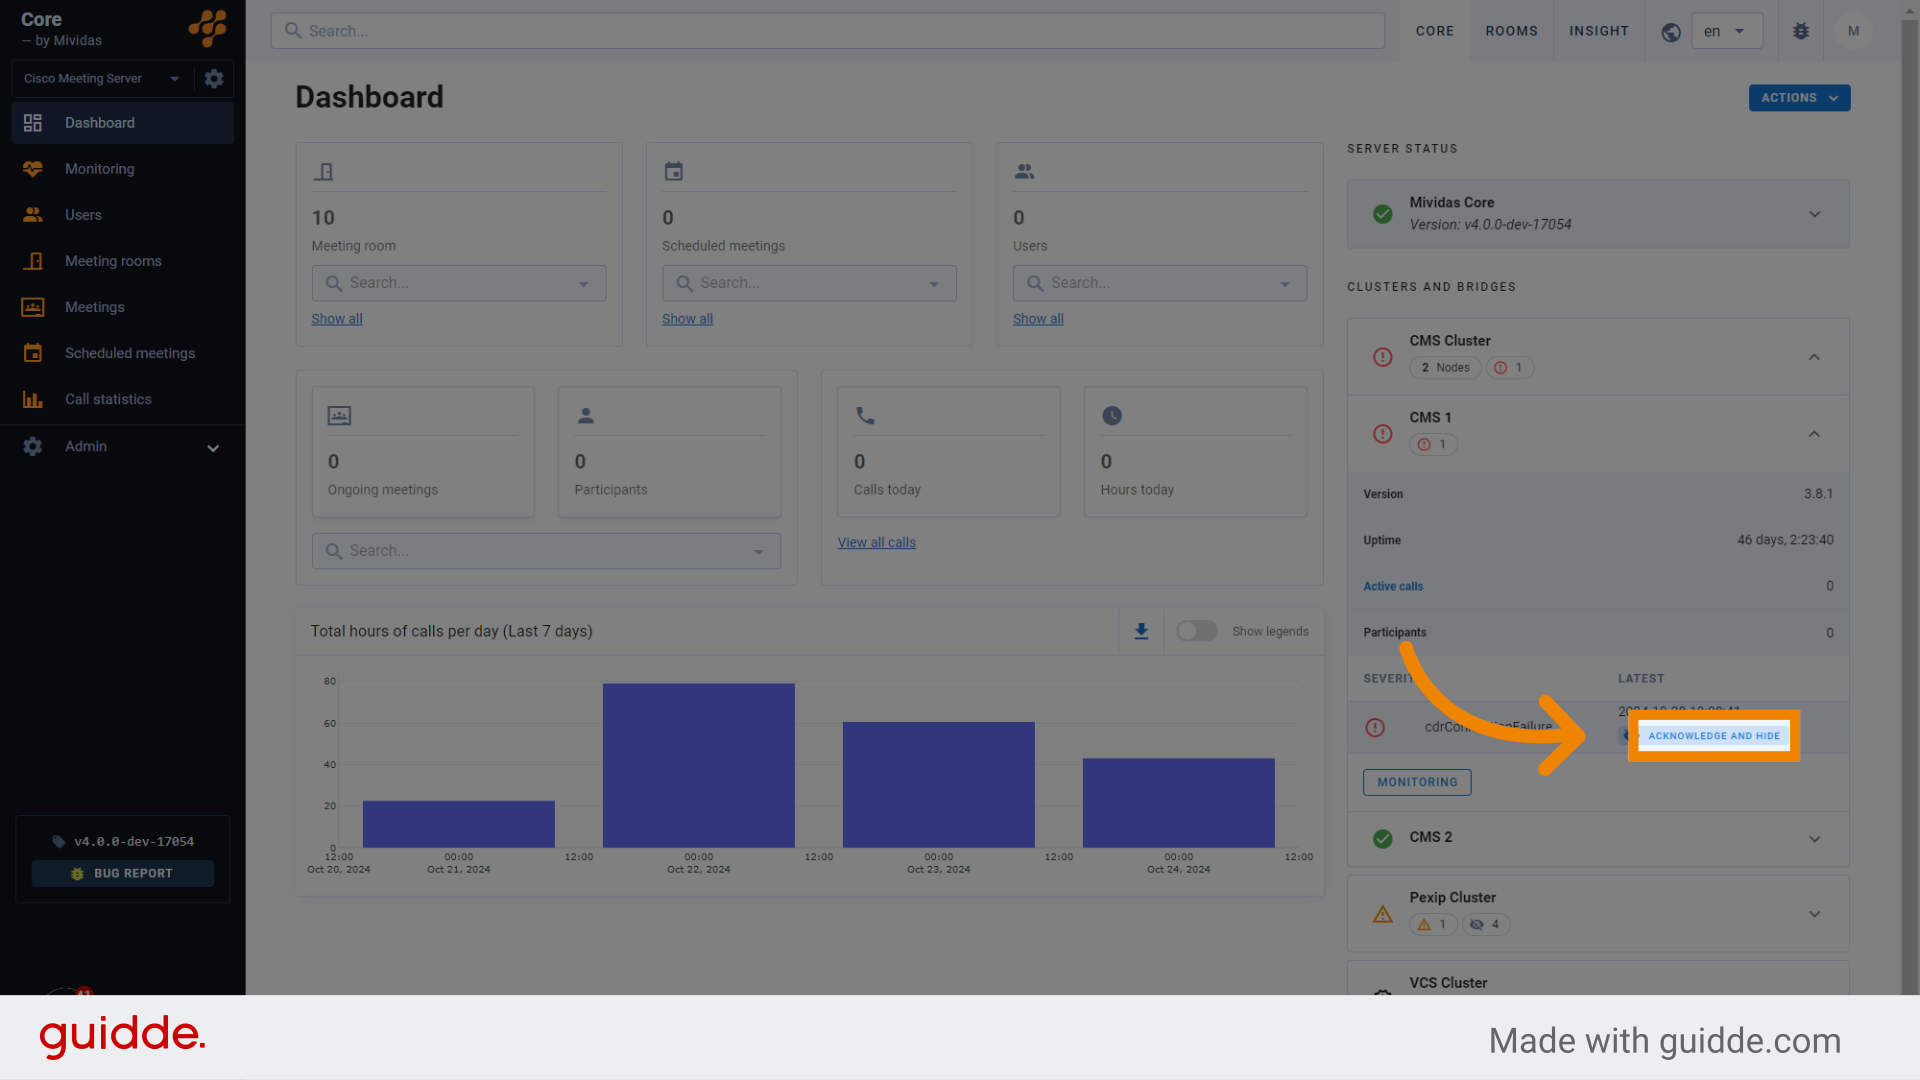
You also have the option to acknowledge and hide the error directly from the dashboard. Click the “Acknowledge and Hide” button to proceed.
26. Acknowledge and hide from expanded server
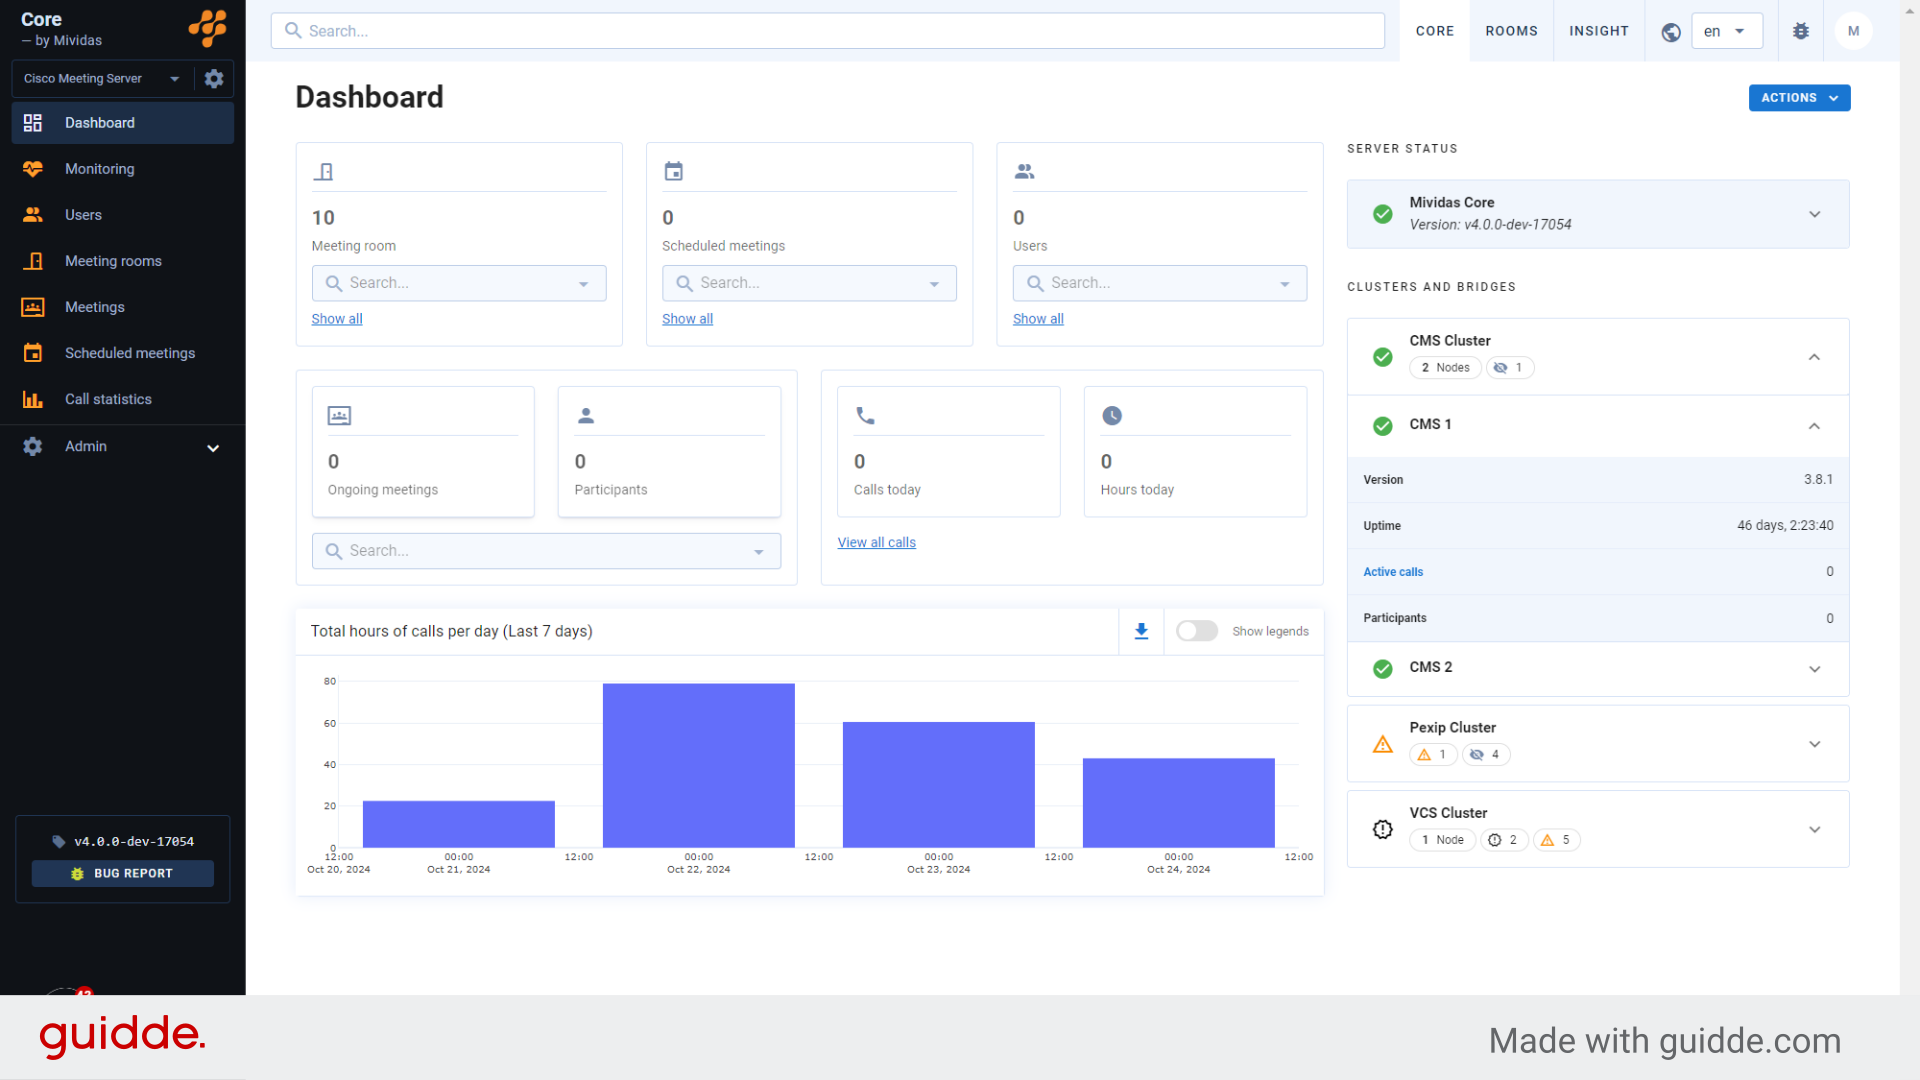
After acknowledging the error, both the “CMS 1” server and the “CMS Cluster” will display a green checkmark. This concludes our brief demonstration of the monitoring views and workflow in Mividas Core.