Table of contents
1. Configuration examples
Here, we will collect examples of commonly used configurations. They may include several products activated to complete them.
1.1. SAML for Entra ID
This guide describes how to configure SAML Single Sign-On (SSO) between Mividas and Microsoft Entra ID.
Prerequisite
- You should know about setting up Single Sign-On in Entra ID.
- Signing certificate created with the attributes listed below.
- Microsoft Entra user account with the appropriate administrative roles (for example, Cloud Application Administrator).
- Time synchronization (NTP) is configured in the Mividas Installer and in sync.
- Security or Distribution groups set up in Entra ID for the following roles:
- Standard Users (Not needed if everyone should have standard user access).
- Administrator.
- Superuser.
- At least one user who is a member of the Superuser group.
Certificate requirement.
| Setting | Value |
|---|---|
| Algorithm | RSA |
| Key length | 2048 or higher |
| Hash | SHA-256 |
| Key Usage | Digital Signature |
| Extended Key Usage (EKU) | Optional / Not required |
| CA trust | Not required for SAML metadata trust |
Quickguide – Configuration steps.
- Create and Assign Users to Groups – If not already done
- Create three Security groups corresponding to the Mividas roles:
- User
- Admin
- Superuser
- Assign the groups to the Enterprise Application.
- Copy the Object ID for each group for use in the Mividas configuration.
- Assign users to the groups.
- You can now continue with the Mividas SAML/SSO configuration.
⚠️ Important:
At least one user must be assigned to the Superuser group.
In this guide, we use Group Object ID as the claim value. Please copy for each group for use later in Mividas setup.
- Create three Security groups corresponding to the Mividas roles:
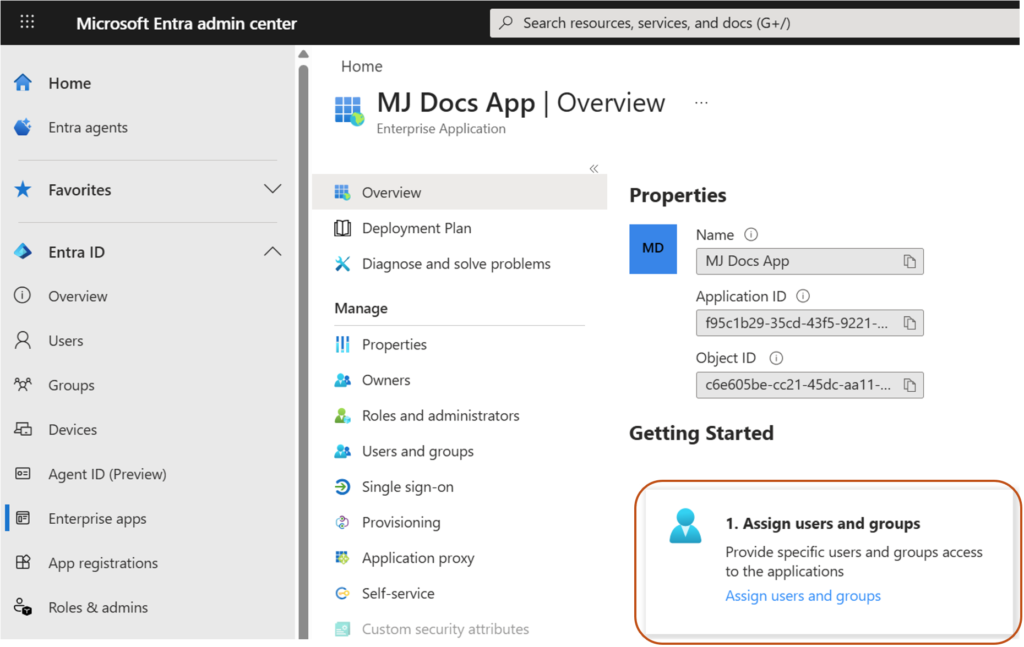
- Create a new Enterprise Application:
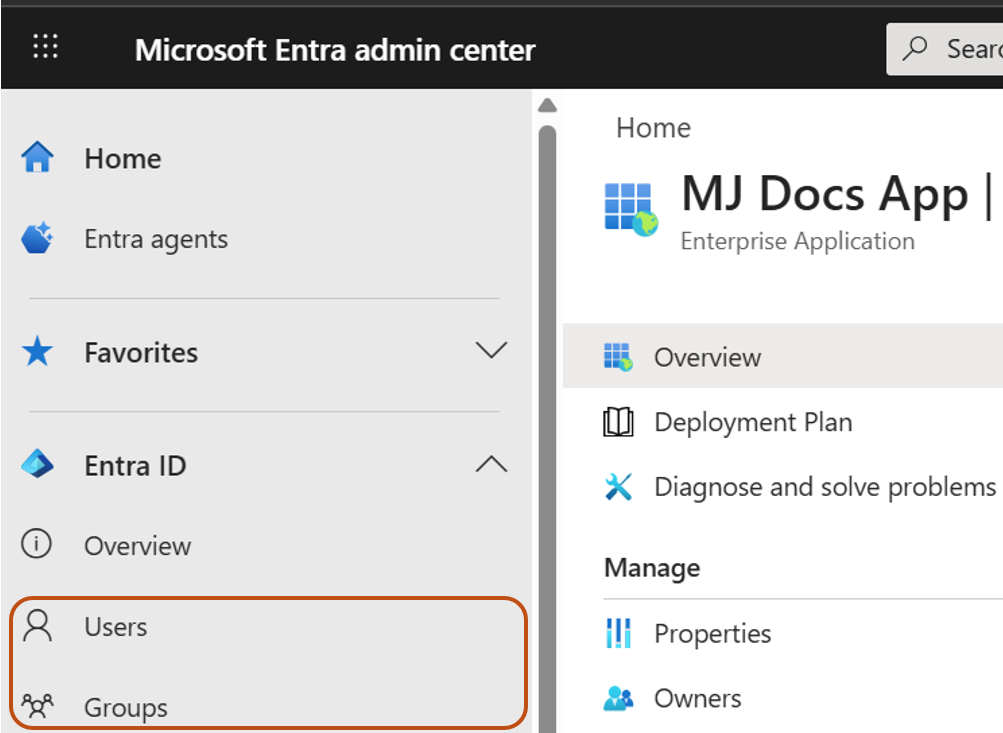
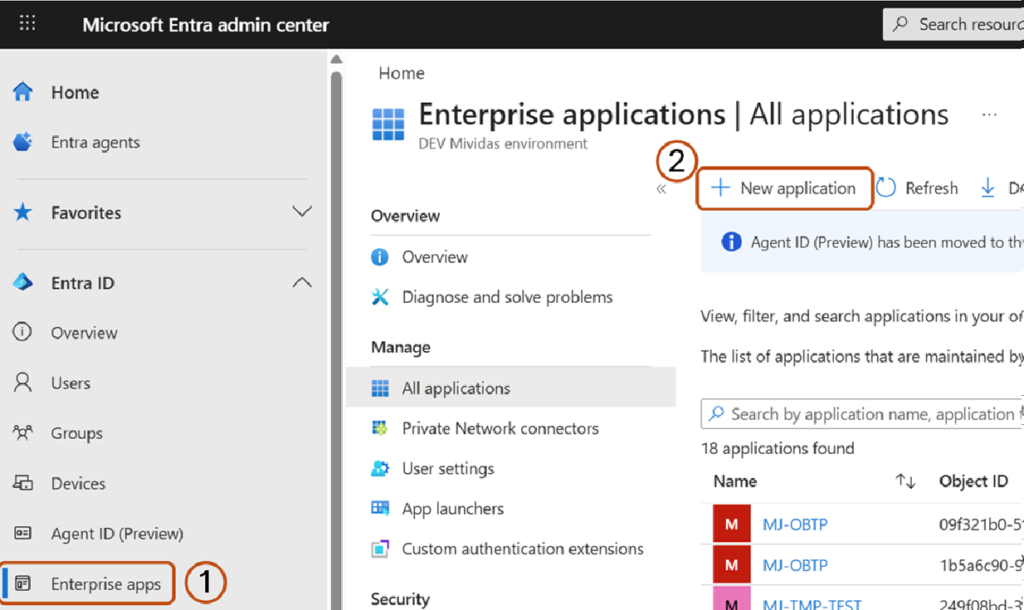
- Log in to the Microsoft Entra admin center.
- Navigate to Enterprise apps.
- Click New application.
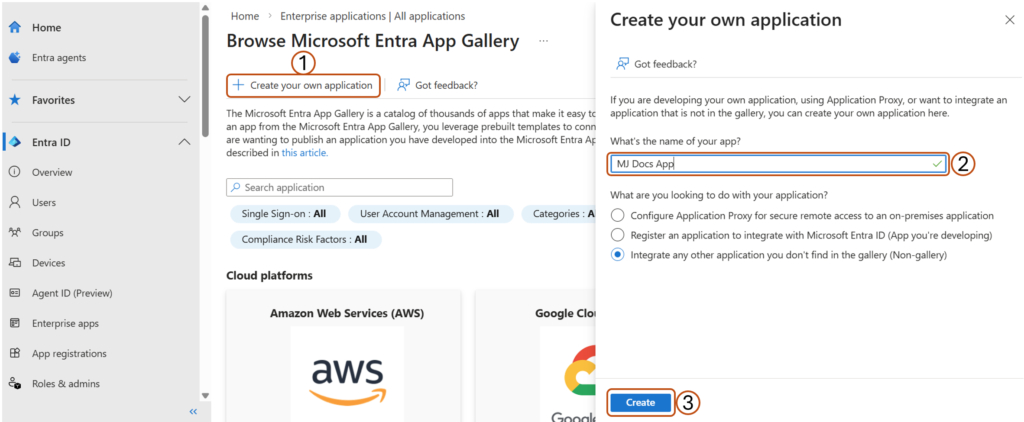
- Choose Create your own application.
- Enter a name for your application and click Create.
- Configure Single Sign-On (SSO):
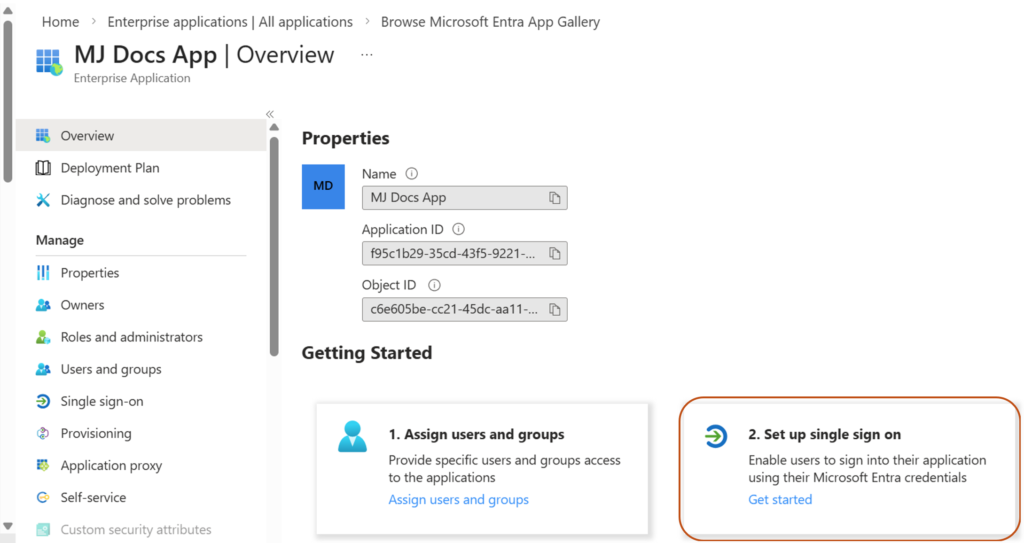
- Open the newly created Enterprise Application.
- In the Set up single sign-on card, click Get started.
- Select SAML.
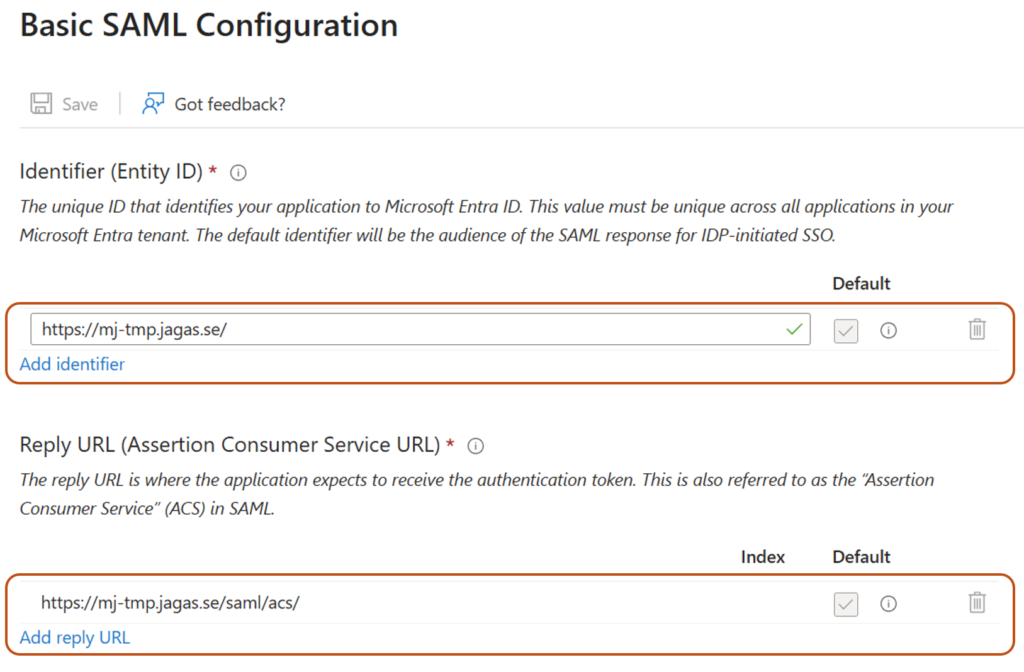
- Fill in the required fields in the Basic SAML Configuration card (You need to fill in at least these 2, to get to the next step):
- Identifier (Entity ID): A unique identifier that represents your application (Service Provider) in the SAML federation. Microsoft Entra ID uses this value to recognize which application the authentication request belongs to. It must exactly match the Entity ID configured in your application.
Example:https://fqdn.example.com/ - Reply URL (Assertion Consumer Service URL): The endpoint in your application where Microsoft Entra ID sends the SAML authentication response after a user successfully signs in.
Example for Mividas:https://fqdn.example.com/saml/acs/ - Click Save.
- Identifier (Entity ID): A unique identifier that represents your application (Service Provider) in the SAML federation. Microsoft Entra ID uses this value to recognize which application the authentication request belongs to. It must exactly match the Entity ID configured in your application.
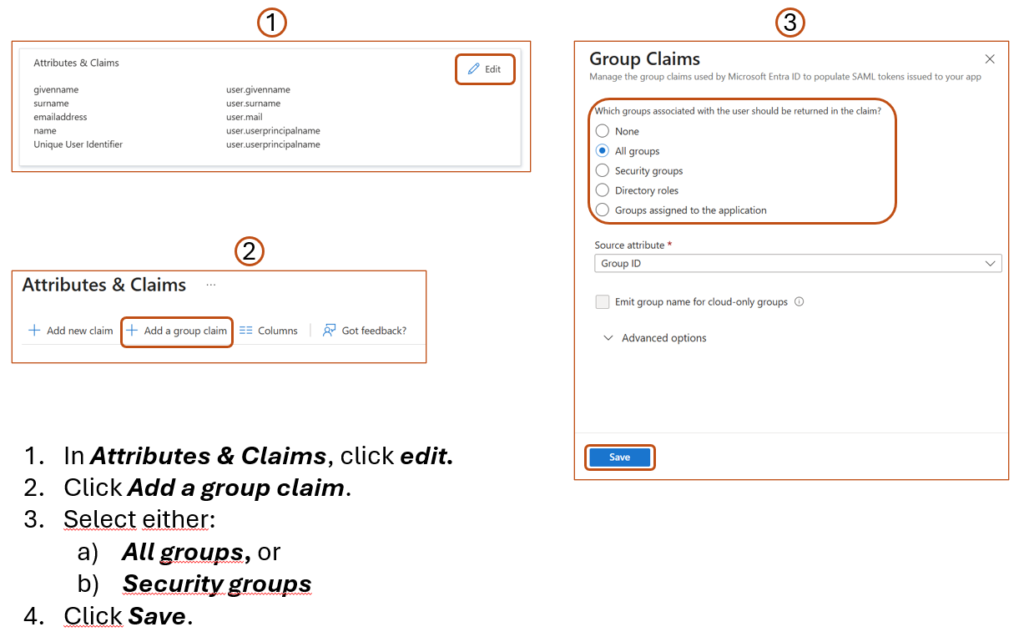
- Configure Group Claims:
- In Attributes & Claims, click edit:
- Click Add a group claim.
- Select either:
- All groups, or
- Security groups
- Leave the other settings as default unless customization is required.
- Click Save.
- Copy the Claim name for later use in the Mividas configuration.
- In Attributes & Claims, click edit:
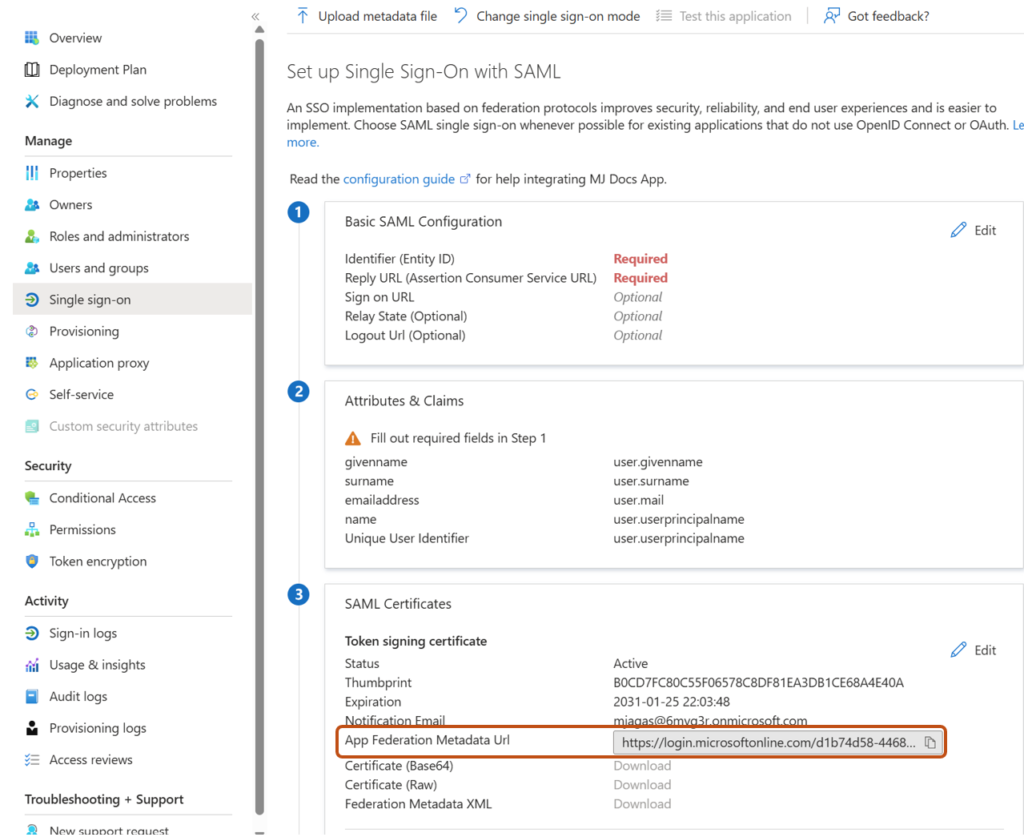
- Retrieve Entra Metadata:
- Go back to the SAML configuration page, and copy the App Federation Metadata URL and save it for the Mividas setup.
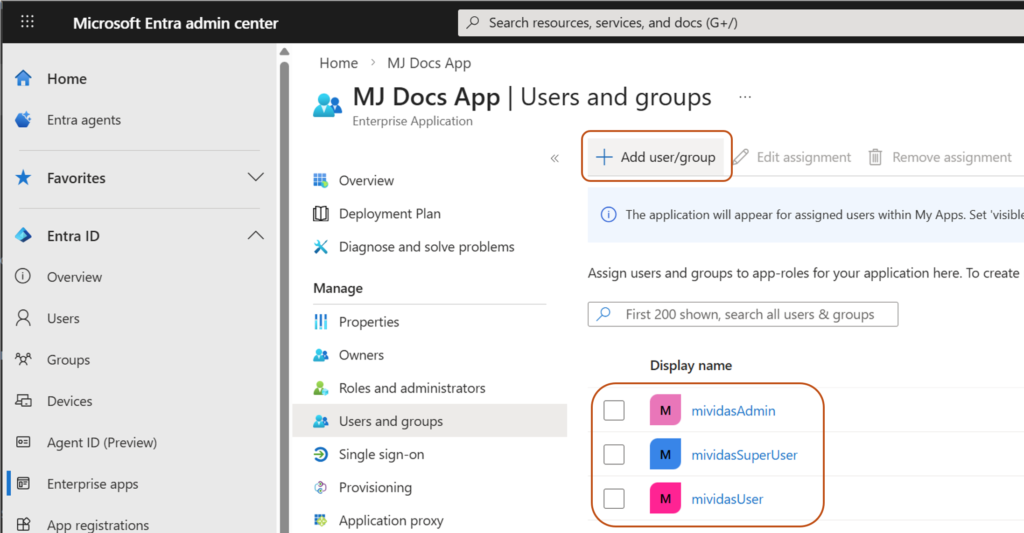
- Assign the Security groups to the Enterprise Application.
- Go to Assign users and groups in the Enterprise App.
- Assign the Security groups created above in step 1.
- Configure the Mividas Application SAML/SSO (Service Provider):
- Go to the Mividas Installer
Example:https://portal.examples.com:8999 - Log in and select the product to configure.
- Click Details → Configure.
- Open SAML SSO Settings.
- Configure the following:
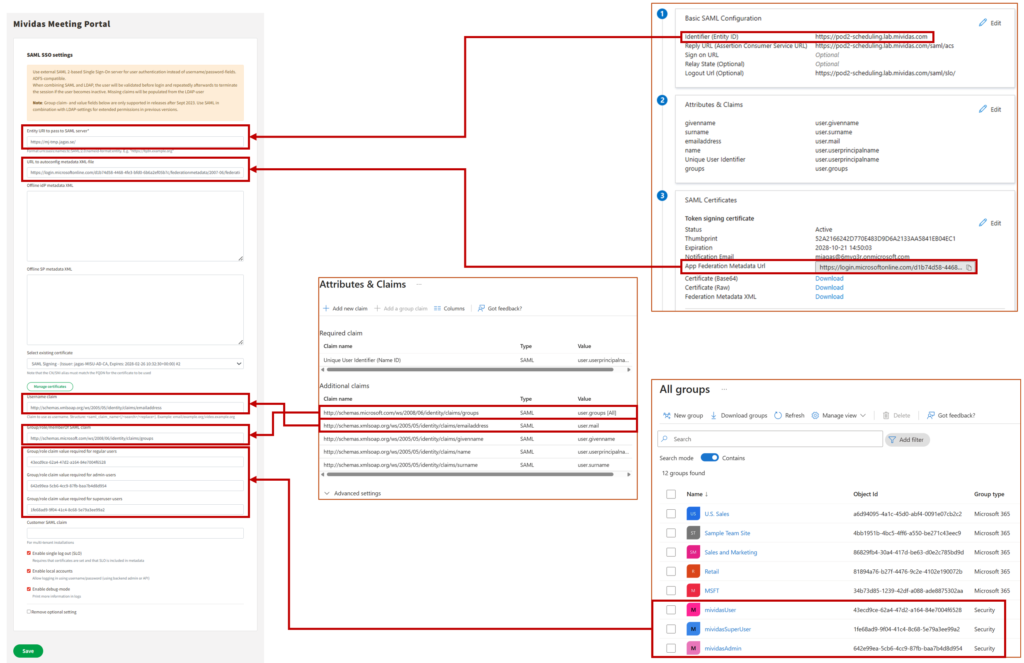
- Entity URI to pass to SAML server. It must match the Identifier (Entity ID) configured in Entra ID.
Normally you can use the product URL.
Example:https://portal.examples.com
- Entity URI to pass to SAML server. It must match the Identifier (Entity ID) configured in Entra ID.
- Paste the App Federation Metadata Url copied from Entra ID into the “URL to autoconfig metadata XML file” field.
- Select the certificate used for SAML signing.
- Enter the claim name in the Username claim field, as configured in Entra ID. This field must be formatted so that it matches the Users/JIDs in your meeting platform.
Example (if email is used):http://schemas.xmlsoap.org/ws/2005/05/identity/claims/emailaddress - Enter the claim name in the Group/role/memberOf SAML claim field, as configured in Entra ID.
Example:http://schemas.microsoft.com/ws/2008/06/identity/claims/groups - Enter the claim value (ex. Group Object ID) for each group, in the Group/role claim value fields.
- Group/role claim value required for regular users
- Group/role claim value required for admin-users
- Group/role claim value required for superuser-users
- Enable SAML SSLO if needed, by checking the Enable single log out (SLO) box.
- Note: If you want more information in the logs for troubleshooting, check the Enable local accounts box.
- Click Save.
- Click Deploy changes and wait for all services to start.
- When the services are running, download the Service Provider metadata.
Example:https://portal.examples.com/saml/metadata - Save this file.
- At this stage, you go back to your Entra ID setup.
- Go to the Mividas Installer
- Complete the Entra ID Configuration:
- Return to your Enterprise Application in Entra ID.
- Go to Single Sign-On (SAML).
- Upload the metadata file downloaded from Mividas.
Screenshots
Create and Assign Users to Groups
Create a new Enterprise Application
Log in to Microsoft Entra admin center.
Navigate to Enterprise apps and select New application.
Choose Create your own application, enter a name for your application and click Create.
Configure Single Sign-On (SSO):
Go to Set up Single sign on card on the page and click Get started.
Click on the SAML card on the page.

Fill in the Required Basic SAML Configuration and Save.
Copy the App Federation Metadata Url.
Configure Group Claims
Assign the Security groups to the Enterprise Application.
Continue configuration in Mividas – Configure the Mividas Application SAML/SSO (SP)
Go to the Mividas Installer (Ex. For Portal): https://portal.examples.com:8999 and login.
Troubleshooting
Logs
To retrieve detailed logs for troubleshooting, you need to turn on the Enable debug-mode in the SAML setup in Mividas.
- Go to the Mividas Installer
Example:https://portal.examples.com:8999 - Log in and select the product to configure.
- Click Details → Configure.
- Open SAML SSO Settings.
- Check Enable debug-mode.
- Save.
- Deploy Changes.
You can reach the logs Globally in the installer by selecting the menu logs at the top of the page or directly point to:https://fqdn.example.com:8999/logs/
When you are at the Log page, select the log that ends with _web for the product you are troubleshooting.
Problems with claims
Search for “Got identity data” in the log and you will see all claims coming from the IdP.
For example you can see all group claims comming in:'http://schemas.microsoft.com/ws/2008/06/identity/claims/groups': AttributeValue(values=['1fe68ad9-9f04-41c4-8c68-5e79a3ee99a2', 'cce0b4de-9f62-404b-aace-e934a889cfa0', '9555d513-bd06-48f9-b62d-d2a474295225', '63ac74df-d855-410d-b1f7-ecea6441a1de', 'aed49a21-0ef7-47de-bdfa-f7a5384ce035', 'be763f38-7989-4d6d-9067-3fa4ab38f345', 'f8eb83ae-5e45-443b-b174-7a112ade180e', '5815ac3c-1af5-4a7c-b446-46ea41d4d9b8', '34b73d85-1239-42df-a088-ade8875302aa', '24d09d3d-a752-4d6b-9b98-8ac78b78fb74']
You can also see if users are matched correctly based on group matching.
Example:event="User [email protected] matches superuser claim value"
1.2. Configure SAML authentication for meetings
Prerequisite
- A working installation of Mividas Core and Portal.
- Needed metadata, either IDP Metadata URL or the metadata in XML format.
- The claims that are listed under point 1.8 below.
- Mividas Identify installed an onboarded.
Configuration
1. SAML configuration
- Access the admin area by going to
https://[Identify FQDN]/adminand log in as an administrator. - Click the BACKEND tab to open the backend admin interface.
- Next to “Saml configurations”, click Add.
- Enter a name for your configuration. E.g.
saml. - Enter the “Entity id”, this value should be the same as the Entity ID in your IDP. You may read Configure Microsoft ADFS for SAML/SSO to see detailed steps for configuring this in Microsoft ADFS.
- Enter the “Remote IDP metadata XML” to get dynamic idp Metadata.
Example for Microsoft ADFS:https://{fqdn_ms_adfs}/FederationMetadata/2007-06/FederationMetadata.xml
If you don’t have access to the IDP Metadata URL, you can paste the metadata in the “Local/offline IDP metadata XML” field instead. - Under “Auth type,” select e-ID login.
- Enter claims as agreed with your IDP technical team.
- Email claim – Enter the attribute containing the email-address.
- First name claim – Enter the attribute containing the First name.
- Last name claim – Enter the attribute containing the Last name.
- Full name claim – Optional, and only needed if first- and last name is not provided.
- Identification claim – Needed if you want to validate identity number, personal identification number, email, or other.
- Click .
2. Configure a new authentication provider
- Stay within the backend admin area. If you left, you can reach it by going to
https://[Identify FQDN]/adminand clicking BACKEND. - Next to “Auth providers”, click Add.
- In the Backend dropdown, select
saml. - Enter the same “System configuration name” as specified in step #4 in the above topic SAML configuration (we used saml in this example).
- Check the “Enabled” checkbox.
- Click .
3. Connect Mividas Identify to Mividas Meeting Portal
If Mividas Identify is already connected to Mividas Meeting Portal, you can skip these steps.
Mividas Identify settings
- Log in to the Mividas Installer used for your Mividas Identify installation. E.g.
https://ext-installer.example.com:8999 - On the start page, find Mividas Identify och click .
- Click and then Portal API settings.
- If the Mividas Identify installation is on the same Mividas Installer as the Mividas Meeting Portal, leave External Mividas Portal server domain name blank. If they are on separate Mividas Installers, enter the FQDN of the Mividas Meeting Portal.
- Copy the API Key, to be pasted in the next steps when configuring the Mividas Meeting Portal.
- If you made any changes, click followed by .
Mividas Meeting Portal settings
- Go to backend admin in Mividas Meeting Portal:
https://[Portal FQDN]/adminand log in with an administrator account. - Check Secure meetings settings. If none is available, click Add. If one is already available, click on it.
- Connect portal url: Enter the FQDN to Mividas Identify.
- Make sure Enable is checked.
- API key: Paste the API key that you copied from Mividas Identify.
- Click .
1.3. Configure and use custom meeting types and access methods
Configuring meeting types and access methods is a powerful way to control access and meeting settings tailored to specific needs. What you can control differs between Cisco Meeting Server and Pexip, depending on their native support.
Cisco Meeting Server
Introduction
Before configuring meeting types and access methods, it is important to understand how Cisco Meeting Server manages meeting settings.
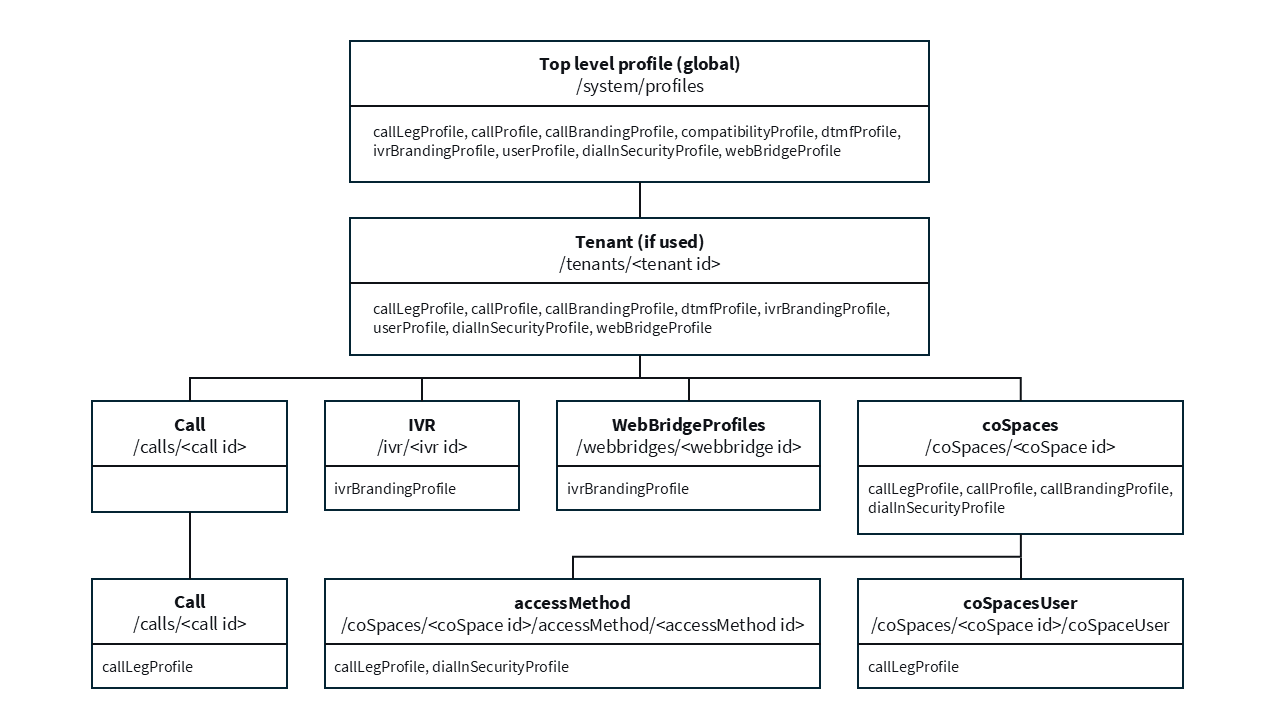
- Values in lower profiles in the image above will override those settings set above.
- If no profile is set at one level, the object inherits values from the profile above.
- A specific setting will be used from the first matching profile that contains that setting, by the priority stated in the image above.
- If a specific setting is left empty, it will be reset, and the next available profile settings will be used instead.
The different profiles and where they can be set(in priority):
callLegProfile– Settings for a participantcallLegs/<id>paticipants/<id>coSpaces/<id>/accessMethods/coSpaces/<id>members/coSpaces/<id>tenants/<id>system/profiles
callProfile– Settings for a callcalls/<id>coSpaces/<id>tenants/<id>system/profiles
lobbyProfile– Settings on how you can connectcoSpaces/<id>/accessMethods/coSpaces/<id>/coSpaceUsers/coSpaces/<id>tenants/<id>system/profiles
dialInSecurityProfile– Security settingscoSpaces/<id>/accessMethods/<id>coSpaces/<id>/coSpaceUsers/<id>coSpaces/<id>tenants/<id>system/profiles
callBrandingProfile– Branding settingscoSpaces/<id>(requires a license)tenants/<id>(requires a license)system/profiles
ivrBrandingProfile– IVR branding settingstenants/<id>(requires a license)system/profiles
Setting up the Cisco Meeting Server
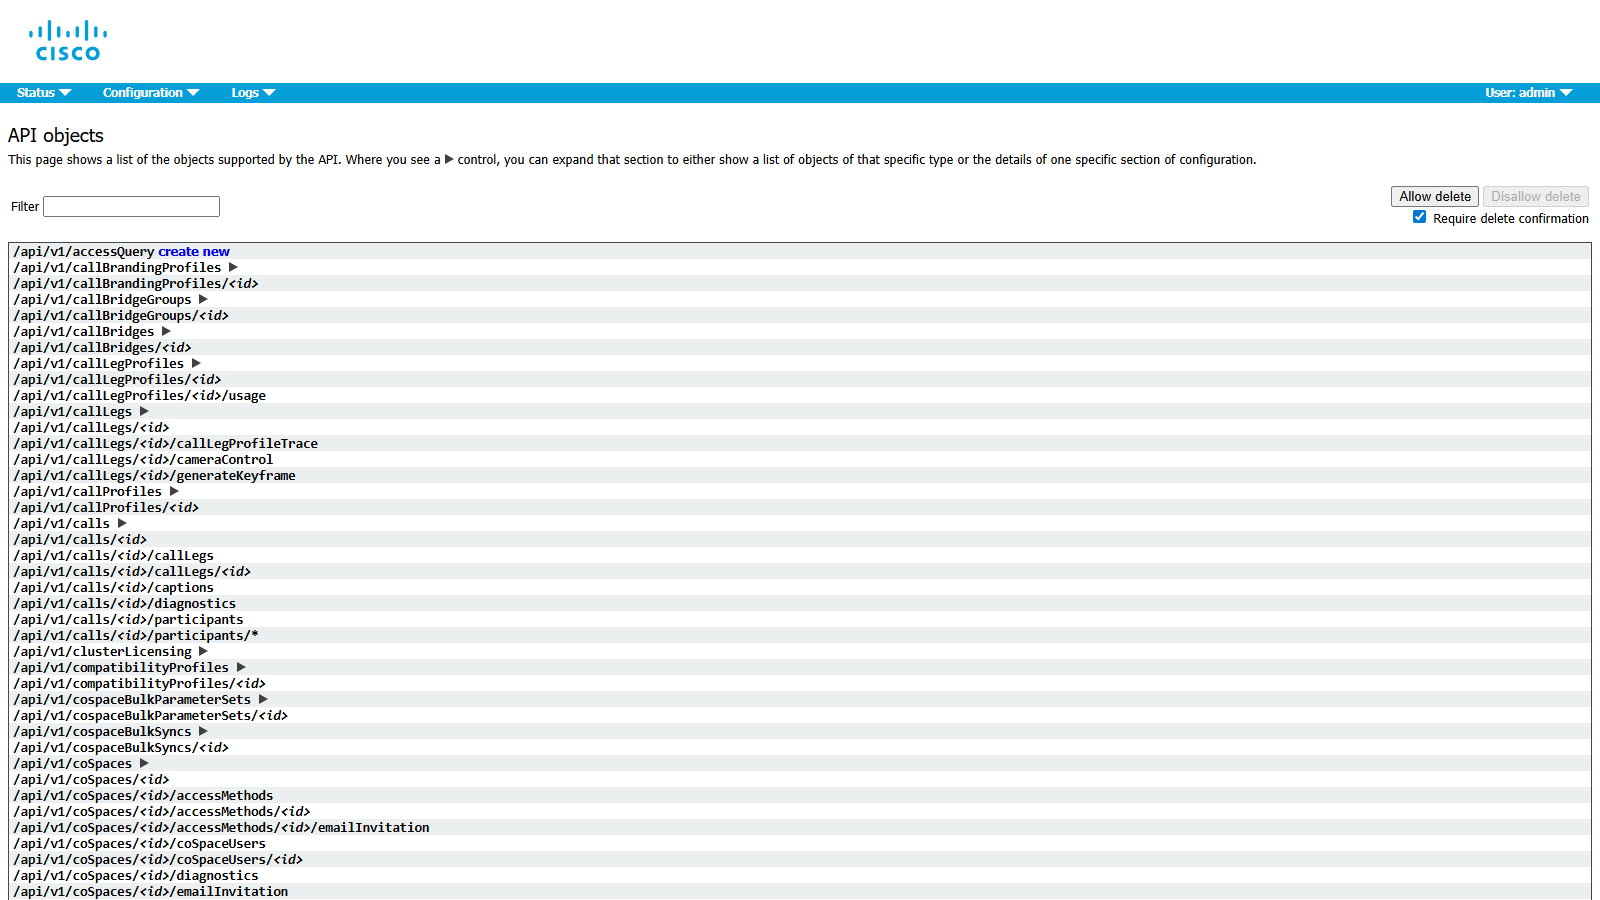
Before you can configure Mividas, you must first configure the profiles you wish to use in the Cisco Meeting Server. The easiest way to do this is to go to the API page in the web interface of the CMS, e.g. https://cms01.example.com/api_explorer.html. If you have already set up profiles that you wish to use, find and copy the object ID of those profiles, have them ready, and then proceed to Link profiles between Mividas Core and the CMS.
NOTE: For detailed information about all available settings and what they do, please refer to Cisco’s documentation here: https://www.cisco.com/c/en/us/support/conferencing/meeting-server/products-programming-reference-guides-list.html
For each profile you wish to use, find them in the tree and click ( ) next to it, then click Create new. Fill in all the settings you wish to use, refer to Cisco’s documentation linked above for detailed information about each setting. When you have filled in all the settings you wish to use, click Create to create the profile. After this, take note of the object ID of the profile you created, which will be needed in the next steps.
Repeat this for all profiles and settings you wish to use.
Link profiles between Mividas Core and the CMS
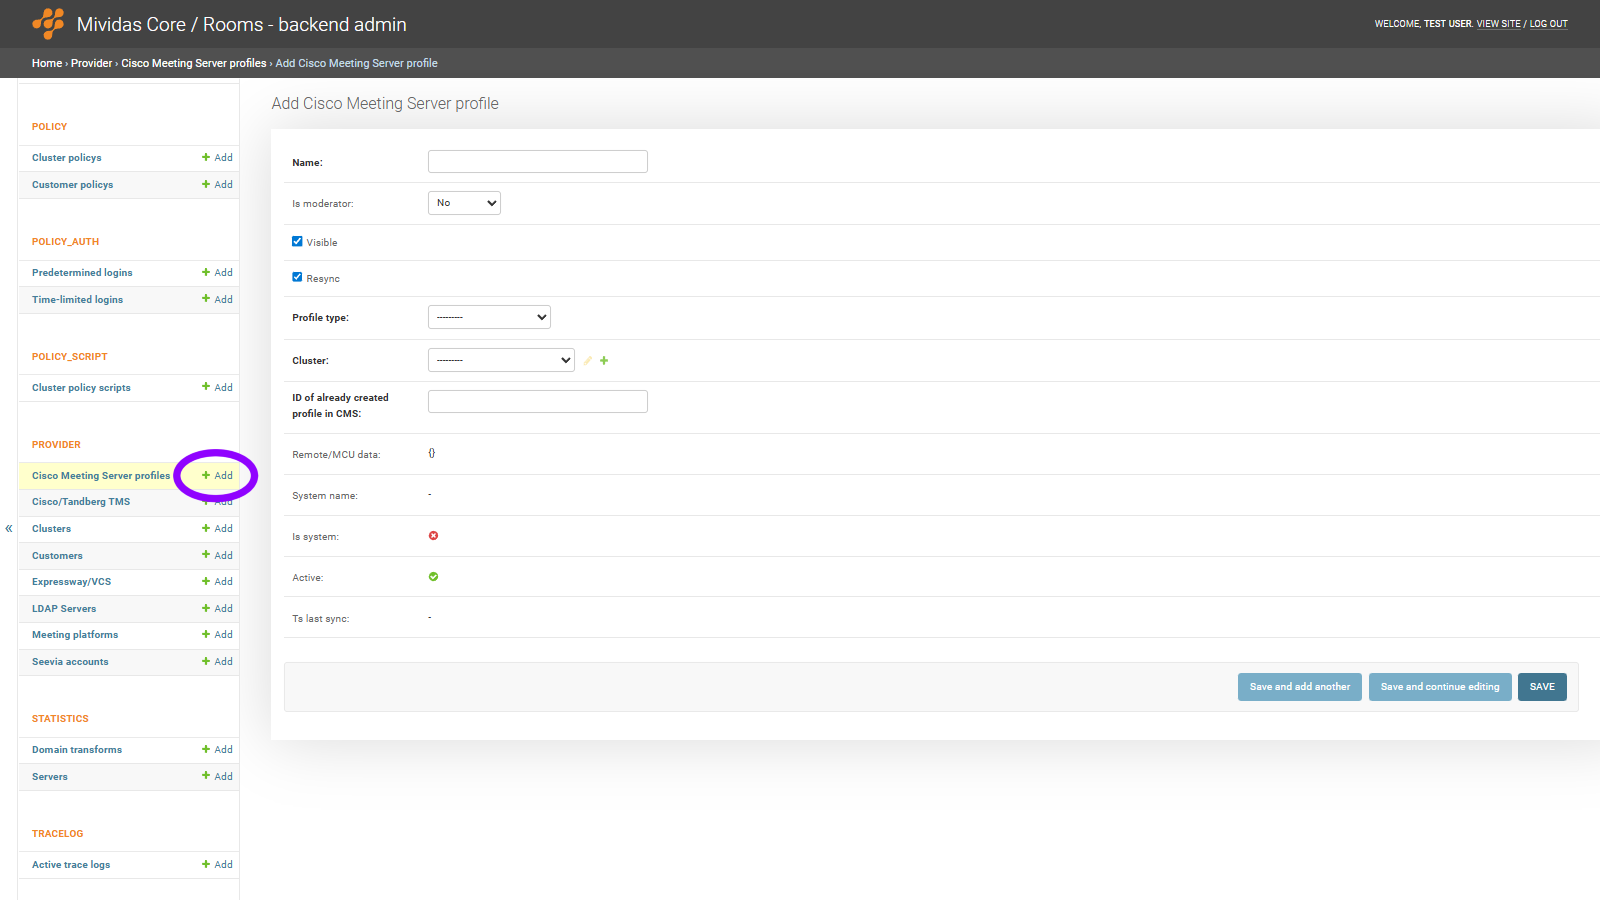
Log in to Mividas Core with your admin account, and go to admin > backend admin > provider > Cisco Meeting Server profiles and click
Add.
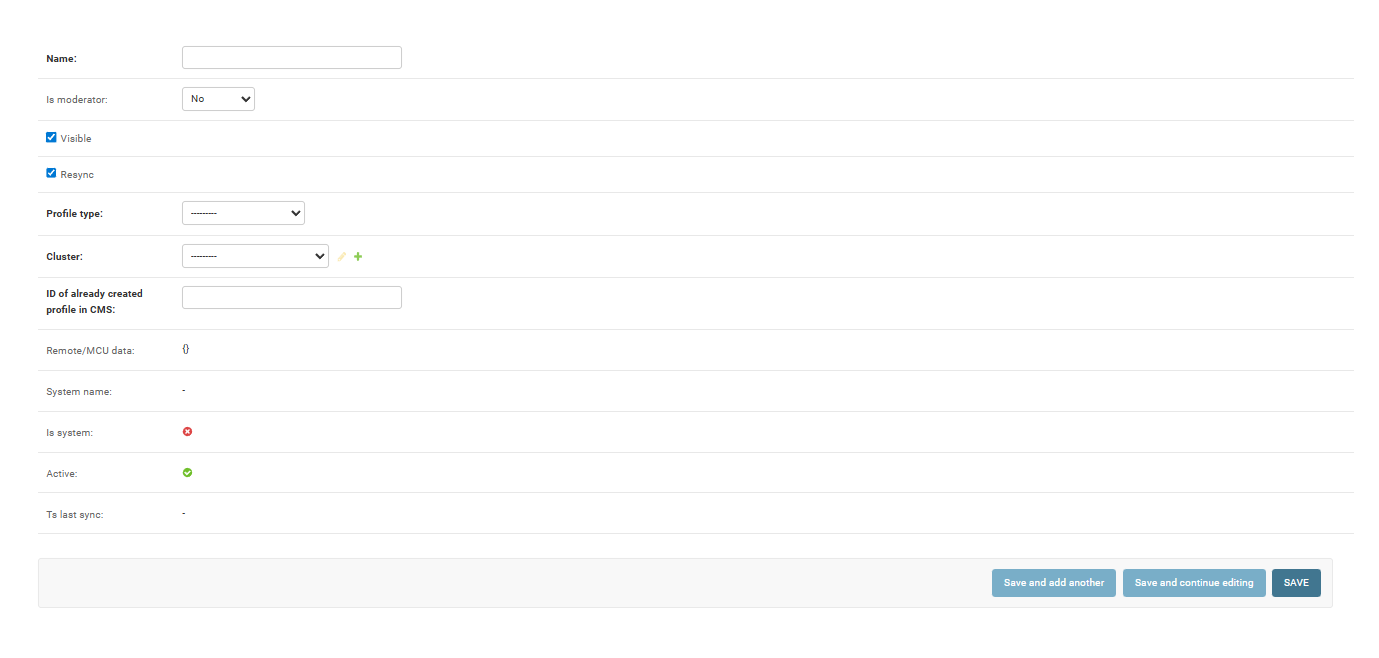
When everything is set, click to save the profile link. Continue to add all profiles you wish to use.
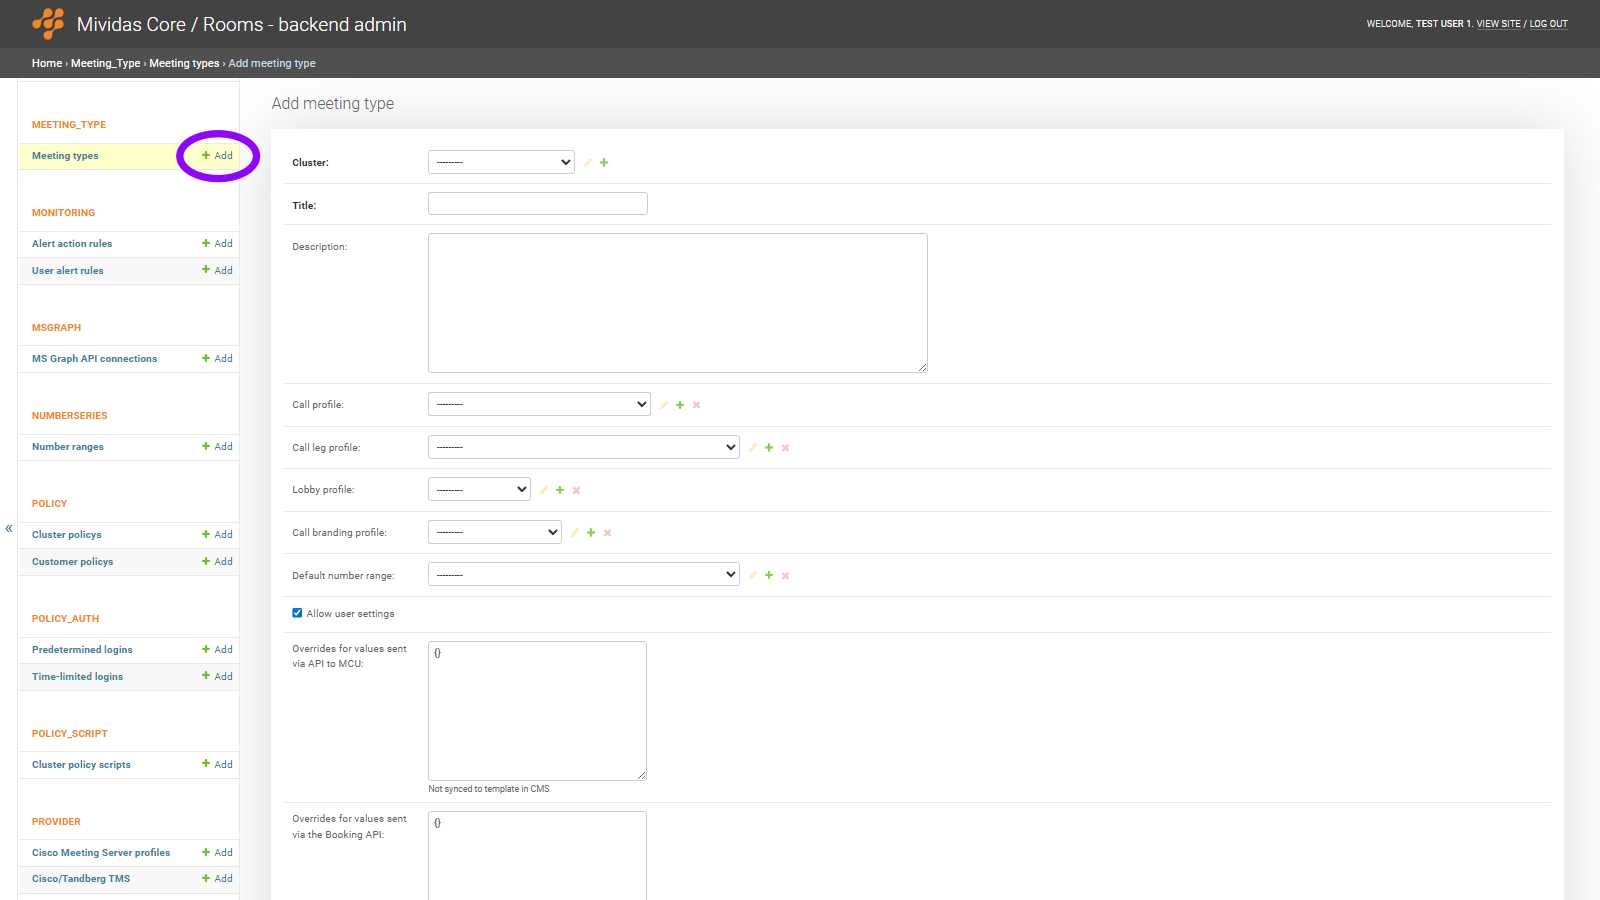
Create predefined custom meeting types in Mividas Core
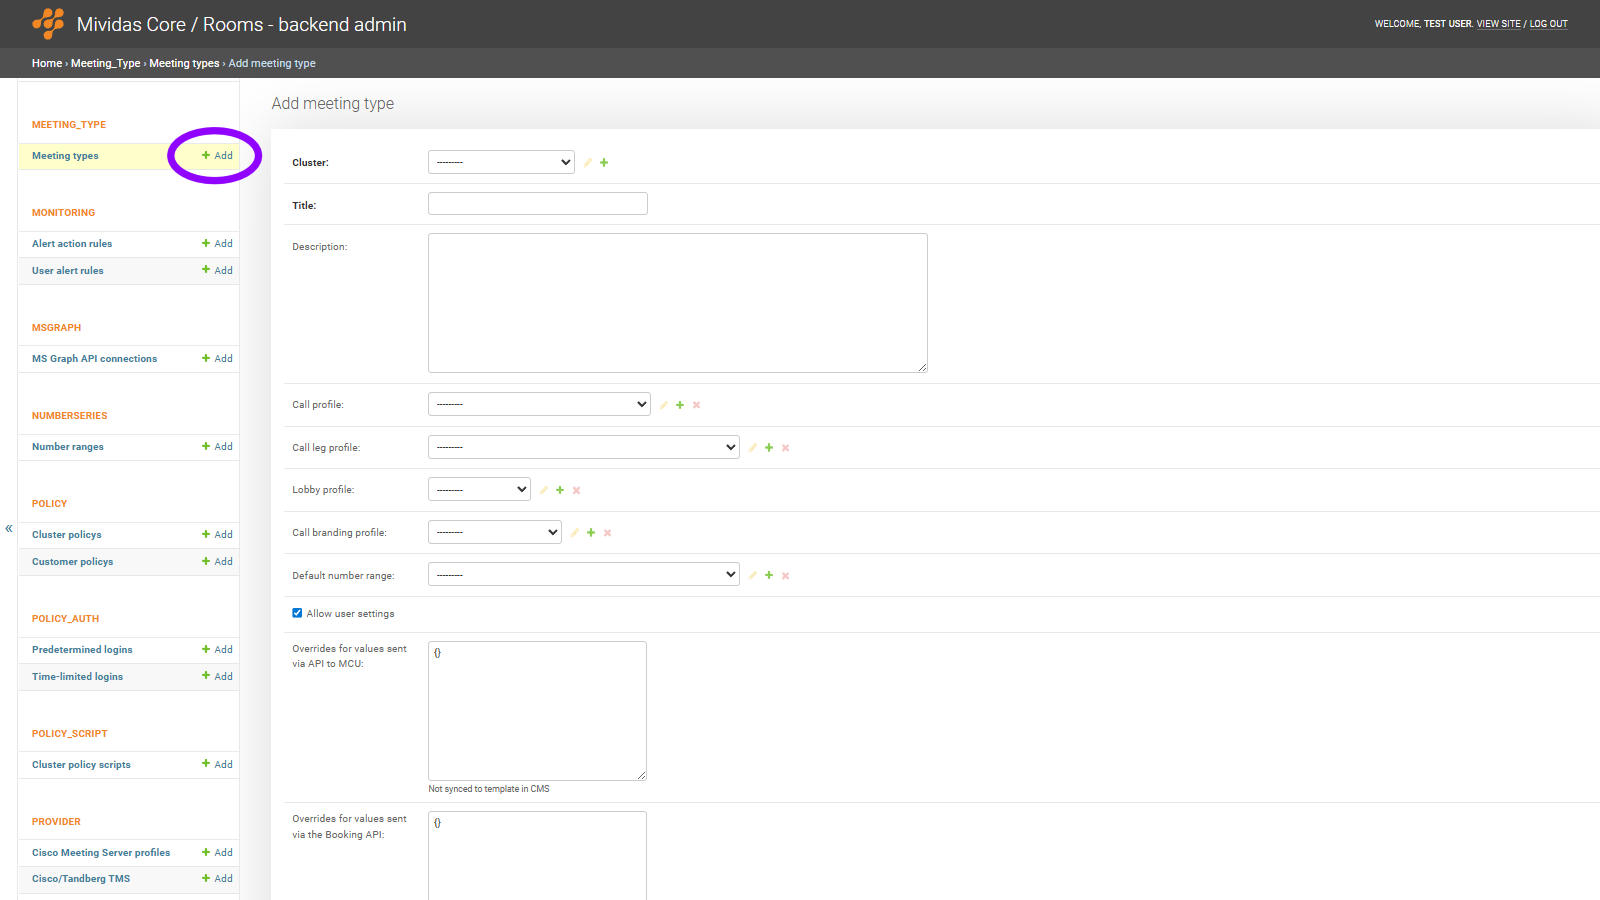
Log in to Mividas Core with your admin account, and go to admin > backend admin > meeting_type > Meeting types and click
Add.

| Option | Description |
|---|---|
| Key | Enter a key to use to match this meeting type from Mividas Meeting Portal and invite templates. E.g. custom_meeting_1 |
| Delete | If not yet saved: Click (
) to remove that row. If already saved: Check the box and click to remove that row. |
| Add another Meeting type match key | Adds another row to add another meeting type match key. |

| Option | Description |
|---|---|
| Customer | Select the customer this override applies to. Each customer can only have one override per meeting type. |
| Show in Core | Override whether this meeting type is visible when creating static meeting rooms in Mividas Core for this specific customer. Unknown – Use the default setting from the meeting type. Yes – Show this meeting type in Mividas Core for this customer. No – Hide this meeting type in Mividas Core for this customer. |
| For all users | Override whether this meeting type is visible in the Mividas Meeting Portal for all users of this customer. Unknown – Use the default setting from the meeting type. Yes – Show this meeting type in the Mividas Meeting Portal for all users in this customer. No – Hide this meeting type in the Mividas Meeting Portal for this customer. |
| Meeting type key | A customer-specific key that can be used to look up this meeting type instead of the default match keys. This allows different customers to reference the same meeting type using different keys. |
| Delete | If not yet saved: Click (
) to remove that row. If already saved: Check the box and click to remove that row. |
| Add another override for customer | Adds another row to add another override. |

| Option | Description |
|---|---|
| Enabled | Check to enable this access method. |
| Title | Enter a title for this access method. |
| Call leg profile | Select which call leg profile to use for this access method. |
| Lobby profile | Select which lobby profile to use for this access method. |
| Always create | When enabled, this access method will always be created for rooms using this meeting type, regardless of other conditions. When disabled, the access method is only created when matching conditions are met, such as a moderator PIN being set. |
| Fallback setting | When enabled, this access method is used as the fallback for all additional addresses matching the same member scope. When disabled, the access method is only used when explicitly matched. |
| Is the default address for room | When enabled, this access method will be used as the primary address for the meeting room. Only one access method per meeting type can be set as the default. Enabling this will automatically unset the default flag on other access methods in the same meeting type. |
| System ID | Defines the role of this access method. Only one guest and one moderator access method can exist per meeting type; any additional access methods must be set to None. None – No specific role assigned. Used for additional access methods such as member or directory entries. Guest – This access method is for guest participants joining without moderator privileges. Moderator – This access method is for moderator participants with full meeting control. |
| Member scope | Defines who can use this access method to join the meeting. None – No specific scope. The access method is not restricted. Public – Anyone can join using this access method. Private – Only specific members or moderators can join. Member – Only organization members can join. Directory – Only users listed in the directory can join. |
| Overrides for values sent via API to MCU | A JSON object with additional or overriding values that will be sent to the provider API for this specific access method. These values are not synced to the provider template. |
| Delete | If not yet saved: Click (
) to remove that row. If already saved: Check the box and click to remove that row. |
| Add another access method | Adds another row to add another access method. |
When everything is set, click to save the meeting type. To delete the meeting type, click .
Pexip
Create predefined custom meeting types in Mividas Core
Log in to Mividas Core with your admin account, and go to admin > backend admin > meeting_type > Meeting types and click
Add.
| Option | Description |
|---|---|
| Key | Enter a key to use to match this meeting type from Mividas Meeting Portal and invite templates. E.g. custom_meeting_1 |
| Delete | If not yet saved: Click (
) to remove that row. If already saved: Check the box and click to remove that row. |
| Add another Meeting type match key | Adds another row to add another meeting type match key. |
| Option | Description |
|---|---|
| Customer | Select the customer this override applies to. Each customer can only have one override per meeting type. |
| Show in Core | Override whether this meeting type is visible when creating static meeting rooms in Mividas Core for this specific customer. Unknown – Use the default setting from the meeting type. Yes – Show this meeting type in Mividas Core for this customer. No – Hide this meeting type in Mividas Core for this customer. |
| For all users | Override whether this meeting type is visible in Mividas Meeting Portal for all users belonging to this customer. Unknown – Use the default setting from the meeting type. Yes – Show this meeting type in the Mividas Meeting Portal for all users in this customer. No – Hide this meeting type in the Mividas Meeting Portal for this customer. |
| Meeting type key | A customer-specific key that can be used to look up this meeting type instead of the default match keys. This allows different customers to reference the same meeting type using different keys. |
| Delete | If not yet saved: Click (
) to remove that row. If already saved: Check the box and click to remove that row. |
| Add another override for customer | Adds another row to add another override. |
| Option | Description |
|---|---|
| Enabled | Check to enable this access method. |
| Title | Enter a title for this access method. |
| Call leg profile | Select which call leg profile to use for this access method. |
| Lobby profile | Select which lobby profile to use for this access method. |
| Always create | When enabled, this access method will always be created for rooms using this meeting type, regardless of other conditions. When disabled, the access method is only created when matching conditions are met, such as a moderator PIN being set. |
| Fallback setting | When enabled, this access method is used as the fallback for all additional addresses matching the same member scope. When disabled, the access method is only used when explicitly matched. |
| Is the default address for room | When enabled, this access method will be used as the primary address for the meeting room. Only one access method per meeting type can be set as the default. Enabling this will automatically unset the default flag on other access methods in the same meeting type. |
| System ID | Defines the role of this access method. Only one guest and one moderator access method can exist per meeting type; any additional access methods must be set to None. None – No specific role assigned. Used for additional access methods such as member or directory entries. Guest – This access method is for guest participants joining without moderator privileges. Moderator – This access method is for moderator participants with full meeting control. |
| Member scope | Defines who can use this access method to join the meeting. None – No specific scope. The access method is not restricted. Public – Anyone can join using this access method. Private – Only specific members or moderators can join. Member – Only organization members can join. Directory – Only users listed in the directory can join. |
| Overrides for values sent via API to MCU | A JSON object with additional or overriding values that will be sent to the provider API for this specific access method. These values are not synced to the provider template. |
| Delete | If not yet saved: Click (
) to remove that row. If already saved: Check the box and click to remove that row. |
| Add another access method | Adds another row to add another access method. |
When everything is set, click to save the meeting type. To delete the meeting type, click .
Create a custom invitation template for your meeting type
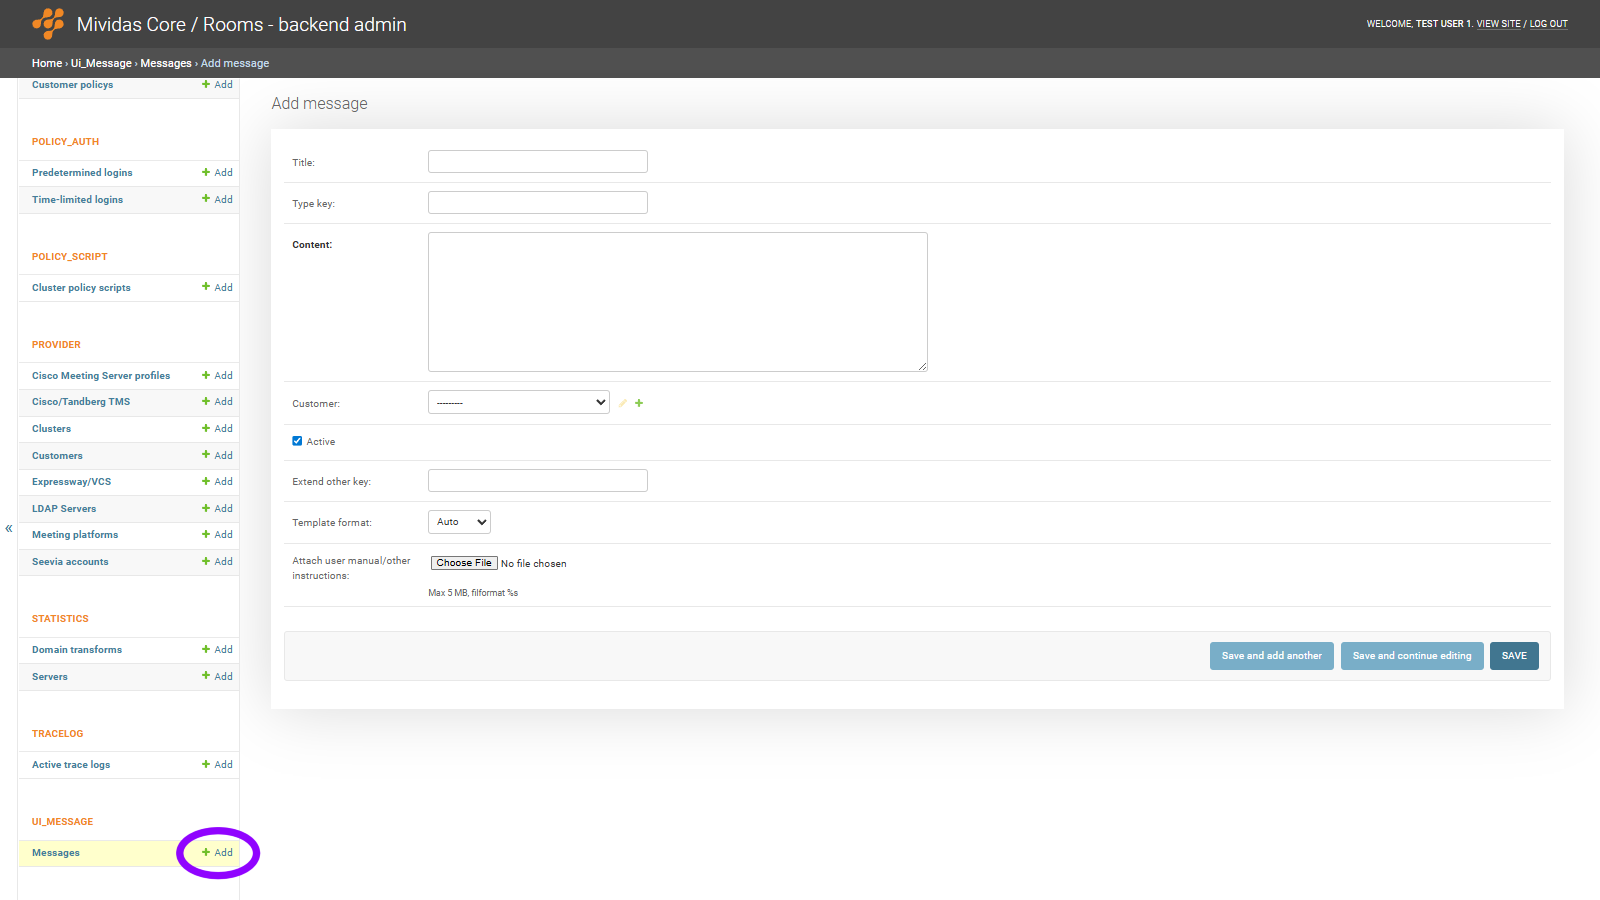
Log in to Mividas Core with your admin account, and go to admin > backend admin > ui_message > Messages and click
Add.
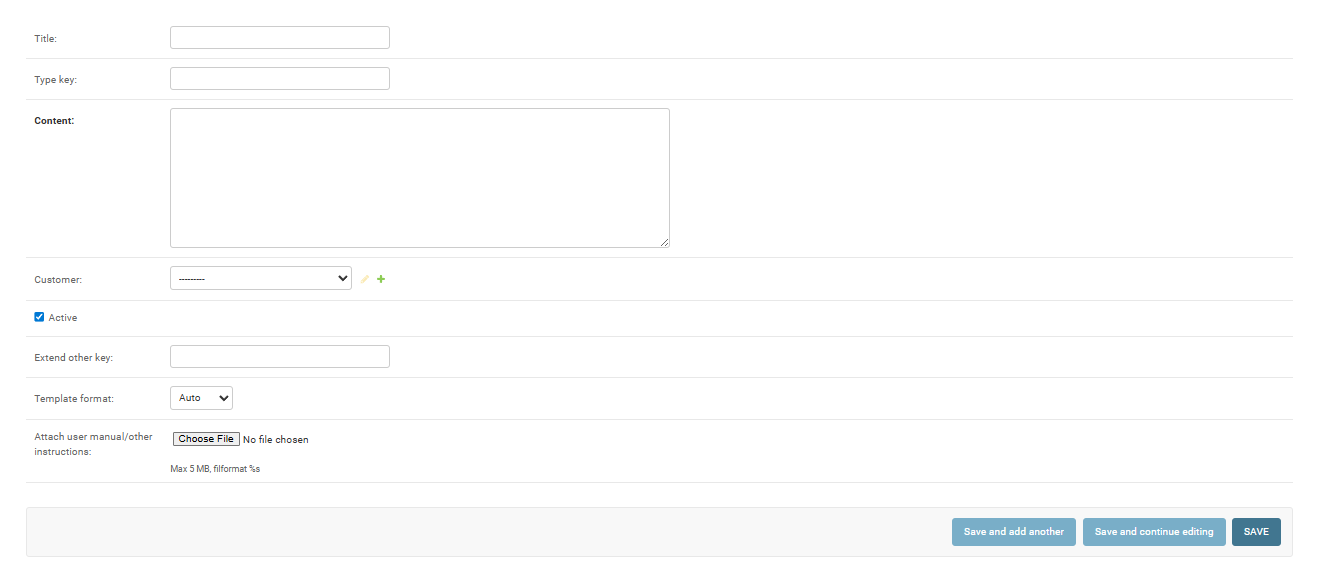
When everything is set, click to save the template.
Edit the template in Mividas Core
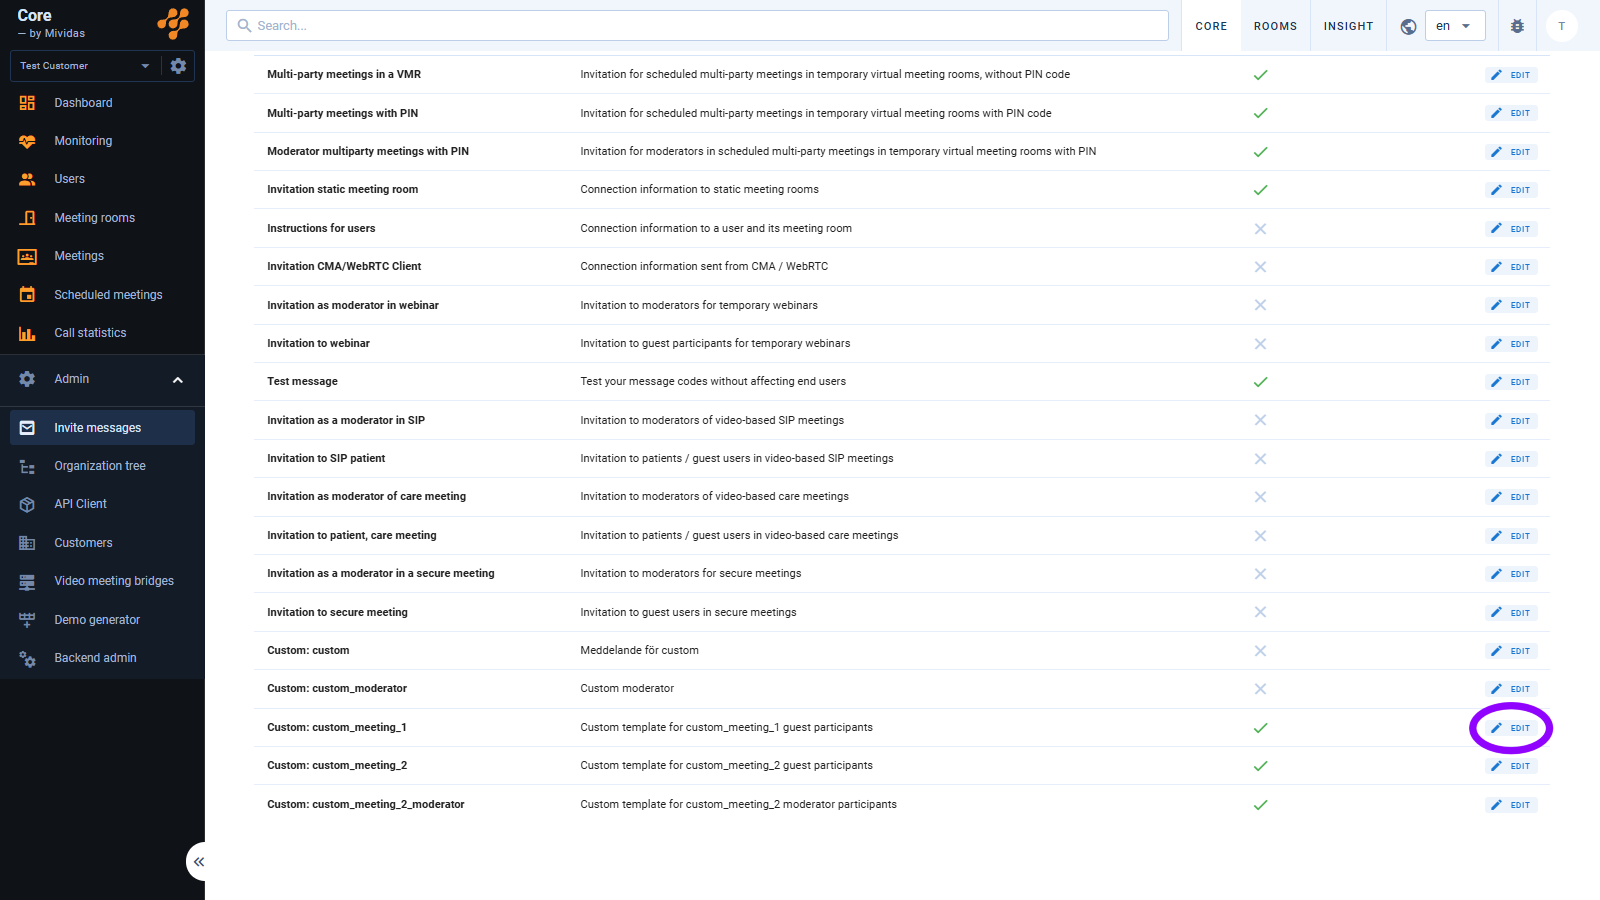
Log in to Mividas Core with your admin account, and go to admin > invite messages. Find the template that you have created, it should be towards the bottom of the list and have the prefix Custom:, e.g. Custom: custom_meeting_1. Click
to edit the template.
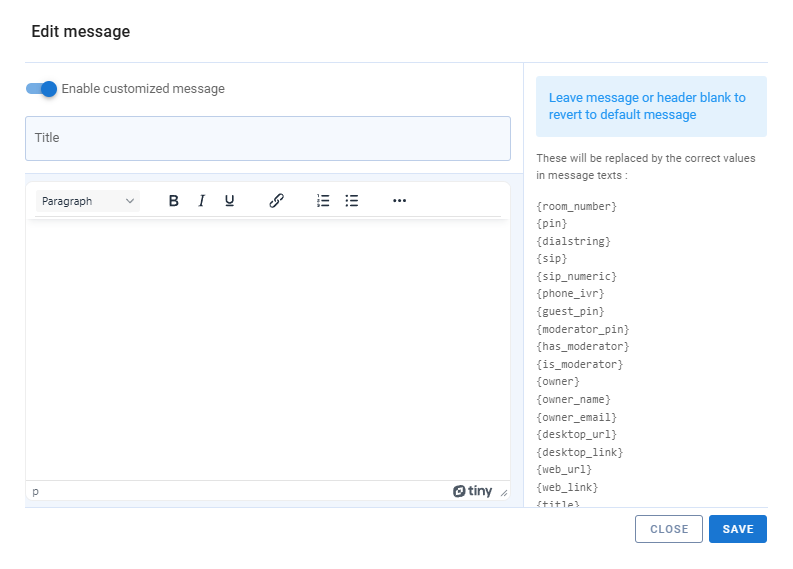
| Option | Description |
|---|---|
| Toggle to disable, or enable, the custom message. | |
| Edit the title of your custom message. | |
 | Edit the content of your custom message. |
 | This displays information, replacement codes, and conditional variables. Read more about them here. |
Click to save or click to close without saving.
Enable scheduling of your custom meeting type from Mividas Meeting Portal
To be able to schedule meetings using your custom meeting type, you must manually enable it for it to be visible in Mividas Meeting Portal.
Add meeting type
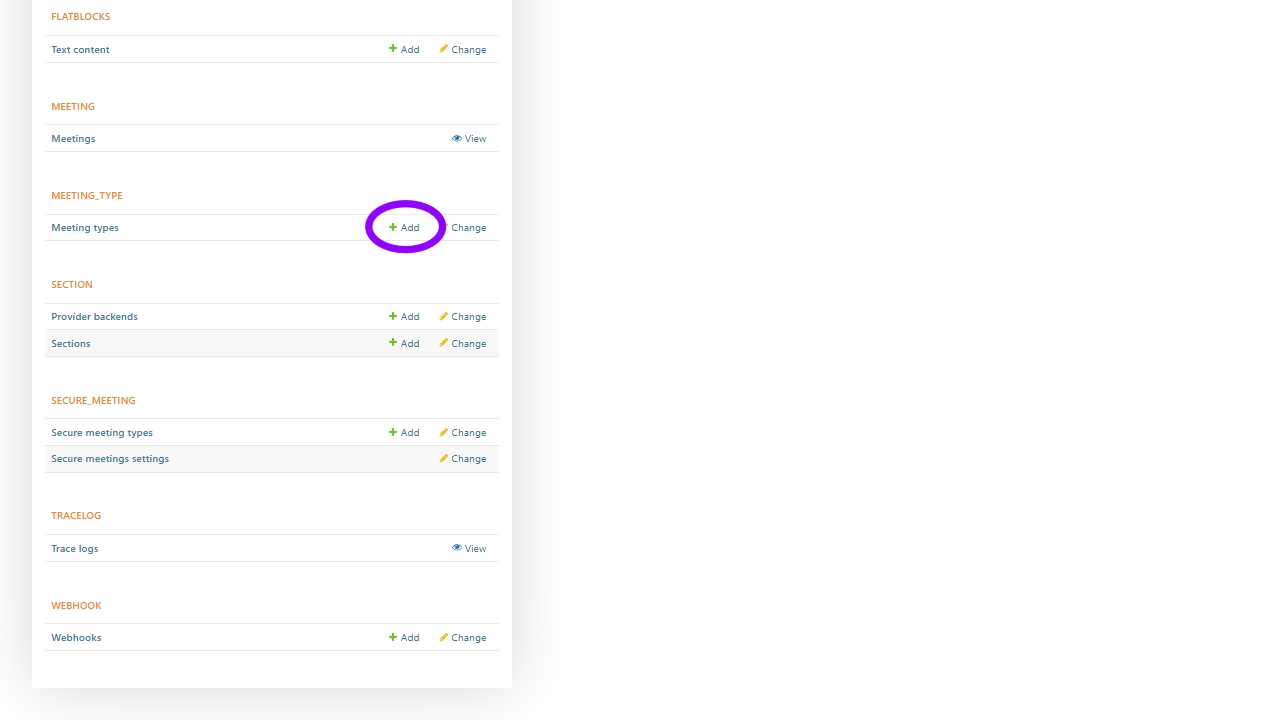
Log in to Mividas Meeting Portal with your admin account, and go to backend admin > MEETING_TYPE > Meeting types and click
Add.
This will enable scheduling for this meeting type in the Mividas Meeting Portal and the Mividas Outlook Add-in.
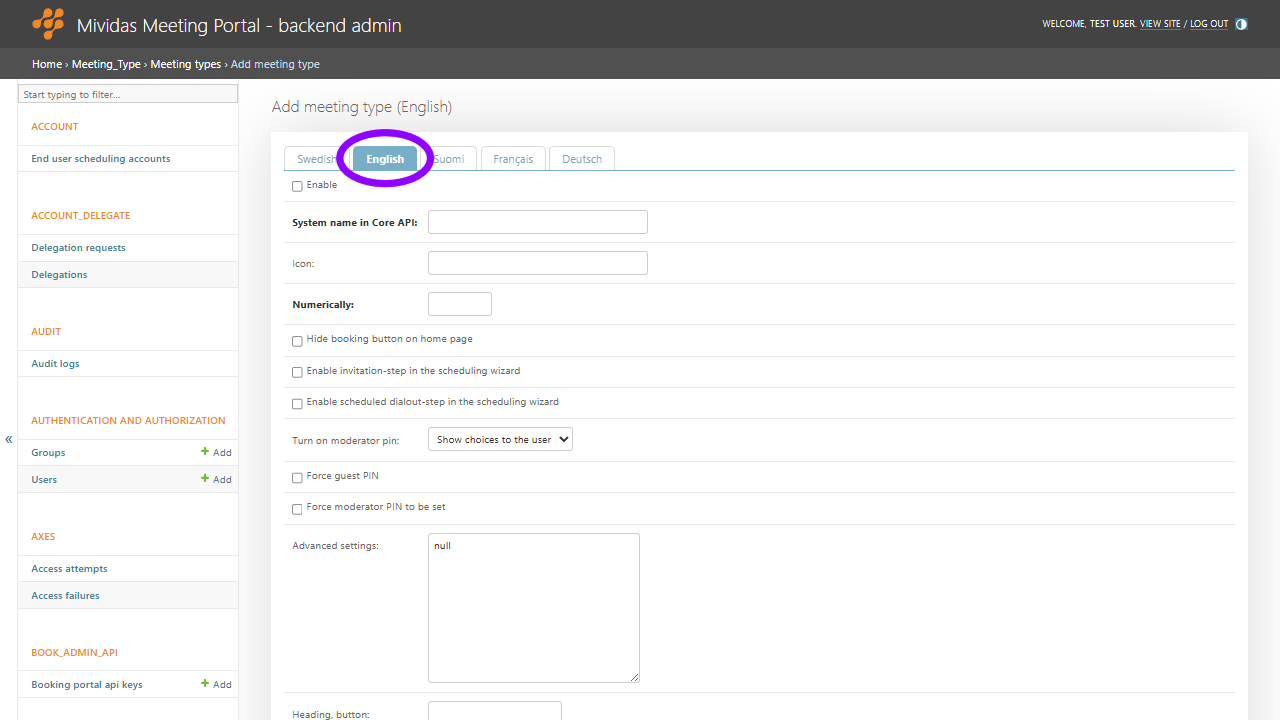
Start by selecting your preferred Language. If only one language is set up, that language will be used for all languages.
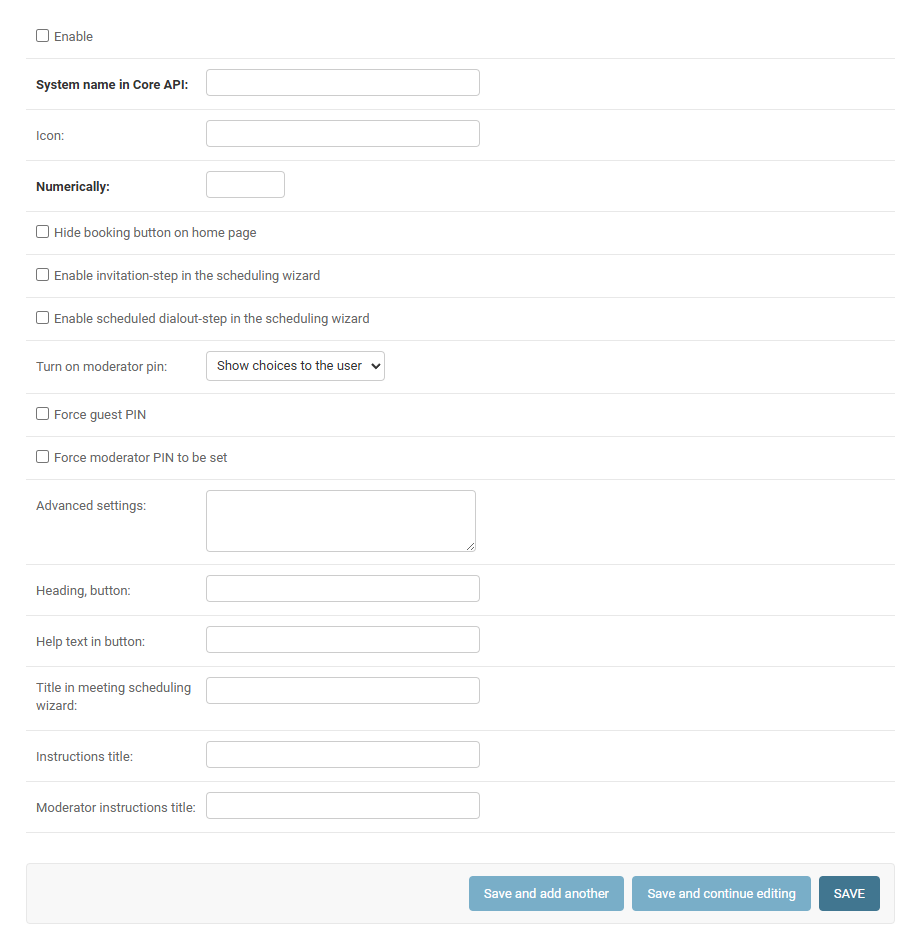
When everything is set, click to save. You should now be able to schedule these meetings from Mividas Meeting Portal and Mividas Outlook add-in.
1.4. Configure BankID authentication for meetings
Prerequisite
- A working installation of Mividas Core and Portal.
- Certificate and the certificate password from your BankID provider.
- Mividas Identify installed an onboarded.
Configuration
1. Upload certificate
- Access the admin area by going to
https://[Identify FQDN]/adminand log in as an administrator. - Click the BACKEND tab to open the backend admin interface.
- Next to “Bank id configurations”, click Add.
- Enter a name for your configuration. E.g.
bankid. - Upload the certificate you have received from your provider.
- Enter the password for the certificate you uploaded.
- Click .
2. Configure a new authentication provider
- Stay within the backend admin area. If you left, you can reach it by going to
https://[Identify FQDN]/adminand clicking BACKEND. - Next to “Auth providers”, click Add.
- In the Backend dropdown, select
bankid. - Enter the same “System configuration name” as specified in step #4 in the above topic Upload certificate (we used bankid in this example).
- Check the “Enabled” checkbox.
- Click .
3. Connect Mividas Identify to Mividas Meeting Portal
You can skip these steps if Mividas Identify is already connected to Mividas Meeting Portal.
Mividas Identify settings
- Log in to the Mividas Installer used for your Mividas Identify installation. E.g.
https://ext-installer.example.com:8999 - On the start page, find Mividas Identify och click .
- Click and then Portal API settings.
- If the Mividas Identify installation is on the same Mividas Installer as the Mividas Meeting Portal, leave External Mividas Portal server domain name blank. If they are on separate Mividas Installers, enter the FQDN of the Mividas Meeting Portal.
- Copy the API Key, to be pasted in the next steps when configuring the Mividas Meeting Portal.
- If you made any changes, click followed by .
Mividas Meeting Portal settings
- Go to backend admin in Mividas Meeting Portal:
https://[Portal FQDN]/adminand log in with an administrator account. - Check Secure meetings settings. If none is available, click Add. If one is already available, click on it.
- Connect portal url: Enter the FQDN to Mividas Identify.
- Make sure Enable is checked.
- API key: Paste the API key that you copied from Mividas Identify.
- Click .
1.5. Configure Microsoft ADFS for SAML/SSO
Prerequisite
- You should know about Mividas products, ADFS, DNS, and certificates.
- AD FS Service installed and configured for the organization.
- All certificates, including CA root and Intermediary certificates, should be installed in the Mividas product.
- Hostname/Fully Qualified Domain Name of ADFS Server and Mividas product.
- Time synchronization (NTP) is configured and in sync.
- Active Directory Security or Distribution groups set up for the following roles:
- Standard User
- Administrator
- Superuser
Configuration step by step
- Configure Mividas Core/Portal
- Configure Microsoft ADFS
- Configure Relying Party Trust in Microsoft ADFS
- Configure Claims in Microsoft ADFS
Configure Mividas Core/Portal
Note: See the URLs above for adding certificate and details for the different SAML SSO settings in the Mividas Product.
Configuring Microsoft ADFS
Start the AD FS Manager. Click on the Windows flag on the server hosting the ADFS Service and select Windows Administrative Tools -> AD FS Management.
Configure Relying Party Trust
Step 1: Add Relying Party Trust
When AD FS Management is started, right-click Relying Party Trust, select Add Relying Party Trust, and then click Start.

Step 2:
Fill in the URL, https://<Mividas FQDN>/saml/metadata to automatically get the Federation Metadata from the Mividas Product in the Federation metadata address field, then click Next.

Step 3:
Enter a Display name that describes this setup, then click Next>.

Step 4:
Choose an appropriate access control policy for your implementation, and click on Next.

Step 5:
Review the data in the different tabs and click on Next.

Step 6:
Check the “Configure claims issuance policy for this application” and click Close on the next page.
Configure Claims
If you checked the “Configure claims issuance policy for this application”, you will see the Edit Claims configuration Window. If you did not, or have closed the Edit Claims Window, you can access it again by right-clicking the Relying Party Trust you configured and selecting the “Edit Claim Issuance Policy…” menu.
Step 1: Click on the “Add Rule…” button.
Step 2: In the “Claim rule template” dropdown menu, select “Send LDAP Attributes as Claims.” and click Next.

Step 3: Enter Claims
Select Active Directory as the Attribute store and select the LDAP Attribute in the left column and type in the Outgoing claims in the right column in the “Mapping of LDAP attributes to outgoing claim types field” (as the screenshots below) and click on Finish.
Make sure the Outgoing claims for username, groups and customers ** are configured exactly as in the SAML/SSO configuration for the Mividas product.
** Customer SAML claim is only used in Multi-tenant solutions!

Step 4: Finish by clicking Apply and Ok in the next dialog.
Test the configuration
Go back to the Mividas Product, check the configuration and try to log in.
Troubleshooting
First go back to the “SAML SSO settings” in the Mividas product and check “Enable debug-mode” to get more information in the logs.
Mividas logs
Step 1: Navigate to the Mividas Installer https://<fqdn-or-ip>:8999
Step 2: Click on for the product.

Step 3: Click on Log viewer.

Step 4: Check the service that ends with _web and click to view the logs.
Timing issue between Mividas Meeting Portal and ADFS
If you see the following in the logs there is a time issue between Mividas Meeting Portal and ADFS.
| XML parse error: Can't use response yet: (now=2022-05-02T13:56:38Z + slack=0) <= notbefore=2022-05-02T13:56:39.221Z
Solution
The solution relies on using the PowerShell API to make the modification. There is no setting for “NotBeforeSkew” when configuring Relying Trust in the GUI.
Load up the ADFS PowerShell plug in
Add-PSSnapin Microsoft.Adfs.PowerShell
View current values
Get-ADFSRelyingPartyTrust –identifier “urn:party:sso”
Set the skew to 1 minutes Where “urn:party:sso” is one of the Identifiers for your Relying Party and you want the NotBefore values set back 1 minutes before the ticket is created.
Set-ADFSRelyingPartyTrust –TargetIdentifier “urn:party:sso” –NotBeforeSkew 1
Diffie-Hellman Key to short
If you see the following in the log the idp is probably using a Diffie-Hellman Key lenght of 1024 bit.
"139651732964544:error:141A318A:SSL routines:tlsprocessskedhe:dh key too small:../ssl/statem/statemclnt.c:2158:"
Solution
Follow the instructions in Security Advisor from Microsoft: https://learn.microsoft.com/en-us/security-updates/SecurityAdvisories/2016/3174644?redirectedfrom=MSDN to increase Diffie-Hellman Key length.
If you can’t change the ADFS server Diffie-Hellman Key lenght support at this time, folow the steps below:
- Remove the config in the field “URL to autoconfig metadata XML-file” from Mividas Portal (Step 4 above).
- Use the same URL in your web-browser to retreive the metadata as a text file.
- Copy the content of the textfile in the “Offline idP metadata XML” instead.
- Save
- Deploy Mividas Product